
Morph Implicit Geometry
Morph one implicit body into another and vice versa. Physically separate bodies may not produce meaningful results.
-
On the Implicit Modeling ribbon, select the
Morph tool.

Tip: To find and open a tool, press Ctrl+F. For more information, see Find and Search for Tools. - Optional: For Visualization Quality, select from Low to Very High quality, which corresponds to a low to very high density of elements. A higher quality produces sharper geometry features but is more computationally intensive. When creating a complicated function, it’s recommended to work using a lower quality and then switch to a higher quality after the function is complete.
- In the modeling window, select Body A.
-
Select Body B.
Warning: Physically separate bodies might not produce meaningful results.
-
Adjust the Morph Value, which can be constant, variable
driven, or field driven.
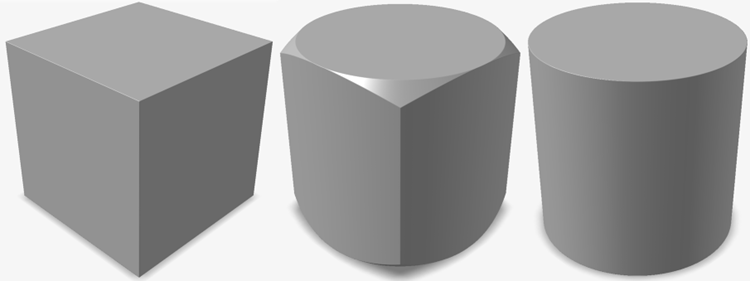
The Morph Value should lie between 0 and 100, and this controls a linear interpolation between the underlying fields of Bodies A and B.An illustrative example would be to overlay a cube (Body A) and a cylinder (Body B). A Morph Value of 0 would result in a perfect copy of the cube (Body A), and a Morph Value of 100 would result in a perfect copy of the cylinder (Body B). A Morph Value of 50 would produce a new implicit body that has some attributes of both the sphere and a cylinder (see images below).
 At every location, the Morph operation looks at the scalar value of Body A's field, the scalar value of Body B's field and the Morph amount (percentage) at that location. The Morph amount specifies the weighting that controls whether the Morphed scalar value is closer to that of Body A or Body B at that location. As such, the Morph amount can become a field-driven property that is controlled by a user-specified field. In this scenario, whether or not the resulting geometry looks more like Body A or Body B is defined locally by the field. In the image below, field-driven design is used to smoothly morph between a cuboid and cylinder, with the morph amount increasing between the top and bottom faces.
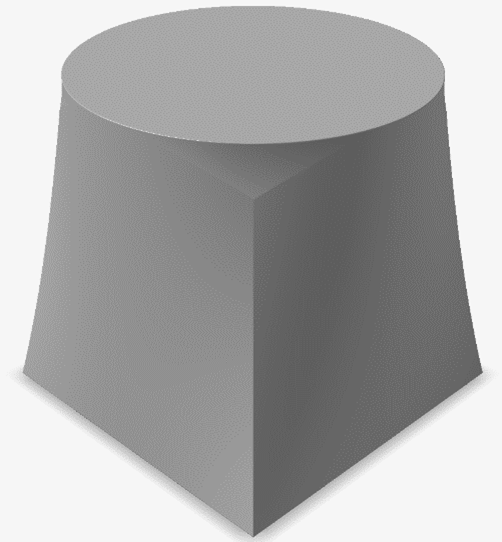
- Click OK.