Create Summary Tables
Create summary tables and/or write *.csv files containing free-body forces and moments for one or multiple sections and for one or multiple loadcases.
Create Displacement/Rotation Summary Table
Use the FBD Manager tool to create summary tables with free-body displacements and rotations for the selected free-body sections and loadcases.
-
From the Post ribbon, select the FBD Manager context
from the Plot group.
Figure 1. 
The FBD Manager context opens. - From the first drop-down menu on the guide bar, select Summary table.
- Select free-body sections.
-
Select loadcases to consider.
- Keep the Use current option selected to consider only active loadcases.
-
If you select a loadcase with multiple simulation steps, you can
control if the selector takes all simulations or only the last by
changing the value of subcase steps under Options,
 .
.
-
From the microdialog, select imposed
disp,
 , to create a summary table of
displacements/rotations.
, to create a summary table of
displacements/rotations.
-
Turn on/off the System button to choose the resolved-in
option.
- Use Free Body System (“on”)
- Turn off System to resolve in the global/user system.
- Select System to resolve in the user system.
-
Click Play,
 .
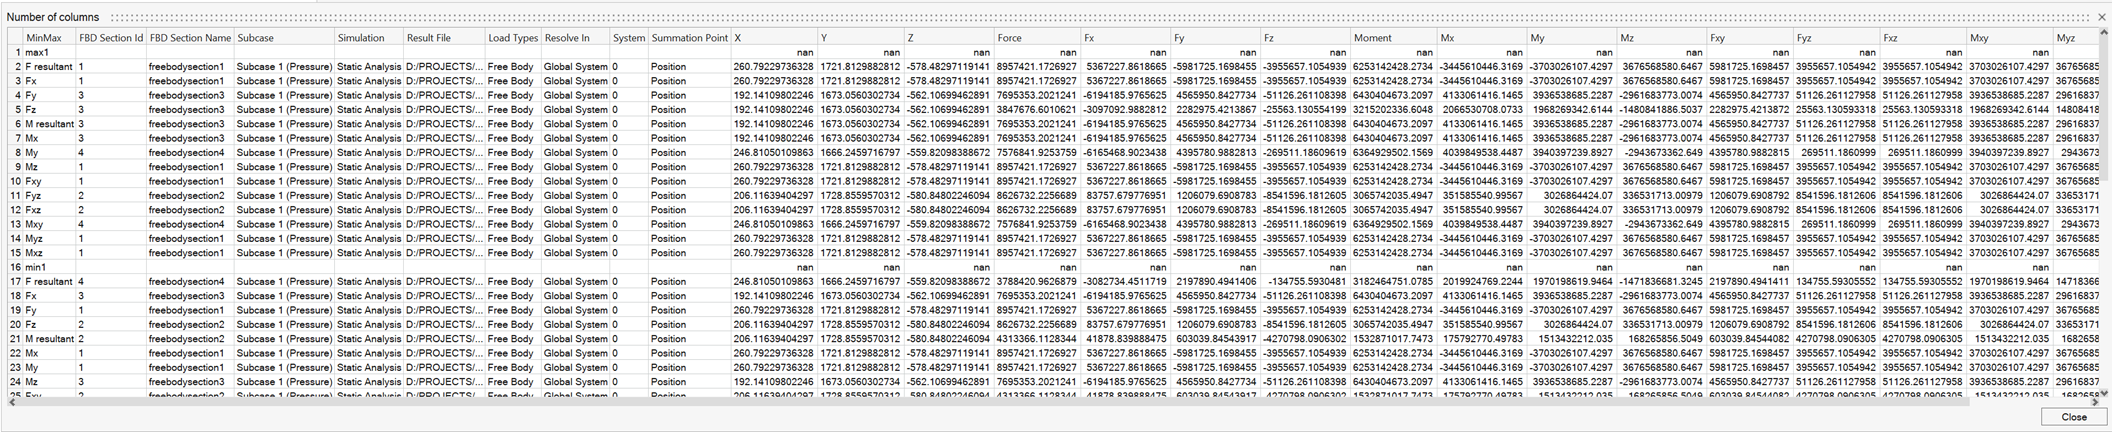
The summary table is created.
.
The summary table is created.Figure 2. 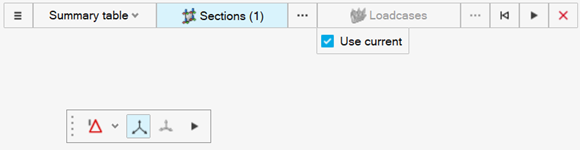
Tip: To write displacements in Analysis System, use a Mesh based free-body section and set Resolved-In to Analysis System. Then select Free Body System.The table shows the proper system and ID per node ID.
Restriction: Plane based section project displacement components in plane local system so results appear as FreeBody System for Resolve in, but there is no system ID written in the table.
Create Summary Table with Force and Moment
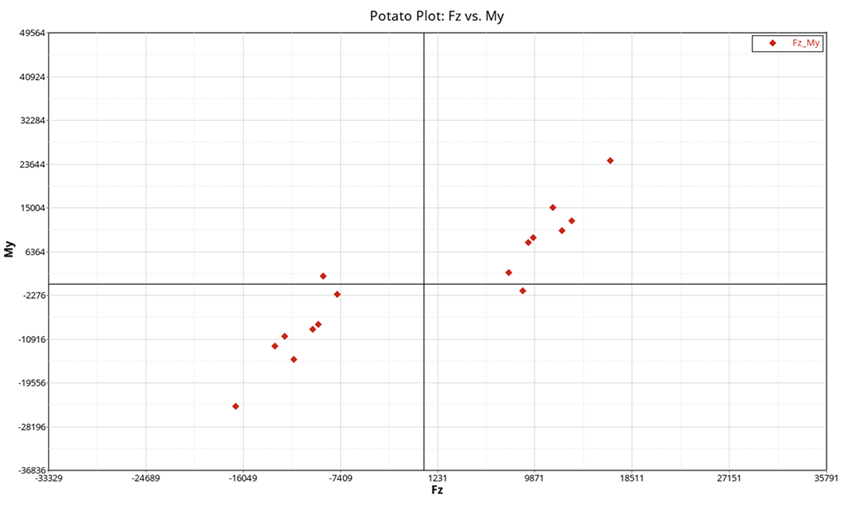
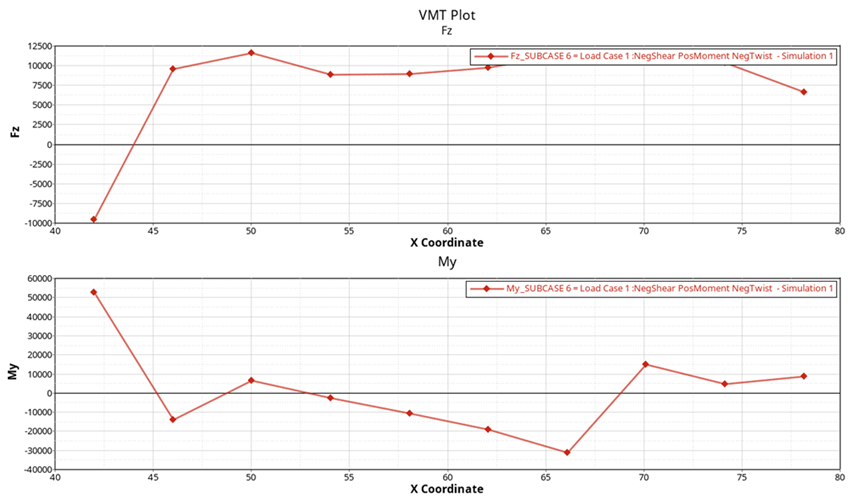
Use the FBD Manager tool to create summary tables and/or write *.csv files to the disk with free-body forces and moments for one or multiple sections and loadcases. The summary table, and summary table summation points, can be used to create Potato/VMT plots.
-
From the Post ribbon, Plot group, select the FBD Manager
tool.
Figure 3.
The FBD Manager context opens. - From the first drop-down menu on the guide bar, select Summary table.
- Select free-body sections.
-
Select loadcases to consider.
- Keep the Use current option selected to consider only active loadcases.
-
If you select a loadcase with multiple simulation steps, you can
control if the selector takes all simulations or only the last by
changing the value of subcase steps under Options,
.
-
From the microdialog, select force and
moments,
 , to create a summary table of forces and
moments.
, to create a summary table of forces and
moments.
-
Click
 to create a summary table of summation points or
all nodes.
to create a summary table of summation points or
all nodes.
- (Off) Summary Table: Displays all forces and moments for nodes and summation points.
- (On) Summary Table Summation Points: shows all forces and moments at summation points only.
-
Turn on/off the System button to choose the resolved-in
option.
- Use Free Body System (“on”)
- Turn off System to resolve in the global/user system.
- Select System to resolve in the user system.
Figure 4. 
-
From the guide bar, click to select options.
- Define the Tolerance under which forces are not considered.
-
Select the force contribution: Free body forces/moments
or Grid point forces/moments.
- Optional: If Grid point forces/moments is selected, select the relevant contributions to consider.
- For multiple loadcases, select the number of smaller sections to split tables or CSV files into. This has no impact on the number of sections; the division is made based on the simulation steps selected. This tends to increase the performance for a large number of simulations.
- Select the working directory for file export.
- Select Create table to create a summary table.
-
Select Export csv to write the
*.csv files.
The summary table is created.
-
Click Play, .
The summary tables and/or *.csv files are created.
Create Min/Max Summary Table
Use the FBD Manager tool to create ranking summary tables and/or write *.csv files to the disk with free-body forces and moments for one or multiple sections and loadcases.
- Resultant force (mag).
- Fx, Fy, Fz (force components in selected system).
- Fxy, Fyz, Fzx: The three shear magnitudes in the selected system.
- Likewise, applies to moments.
-
From the Post ribbon, Plot group, select the FBD Manager
tool.
Figure 6.
The FBD Manager context opens. - From the first drop-down menu on the guide bar, select Min-Max Table.
- Select free-body sections.
-
Select loadcases to consider.
- Keep the Use current option selected to consider only active loadcase.
- If you select a loadcase with multiple simulation steps, you can control
if the selector takes all simulations or only the last by changing the
value of subcase steps under Options, .
- From the microdialog, define the min/max quantity.
-
Turn on/off the System button to choose the resolved-in
option.
- Use Free Body System (“on”)
- Turn off System to resolve in the global/user system.
- Select System to resolve in the user system.
Figure 7. 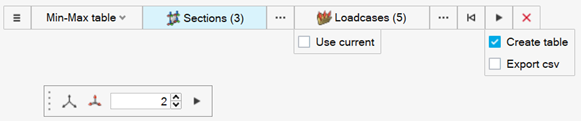
-
From the guide bar, click to select options.
- Define the Tolerance under which forces are not considered.
-
Select the force contribution: Free body forces/moments
or Grid point forces/moments.
- Optional: If Grid point forces/moments is selected, select the relevant contributions to consider.
- Select the working directory for file export.
- Select Create table to create a minimum/maximum table.
- Select Export csv to write the *.csv files.
-
Click Play, .
Generate an FBD File
Summary tables, from the FBD Forces tool, are required to create Potato/VMT plots.
- Select the summary table created by the FBD Forces tool.
-
From the context menu, select .
This defines where the *.fbd file is saved.
The *.fbd file is created.