Capture Views
![]()
Description
Capture Views enables you to save the current/customized model view based on visible entities for future reference and easy access to stored views.
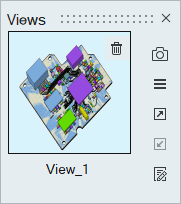
Save Custom Views
- Click the icon
 on the View Toolbar.
 - In the dialog, use the "Capture Current View" icon
 to save the view with current model orientation
or the "Capture Defined View" icon
to save the view with current model orientation
or the "Capture Defined View" icon  to save the view in the defined
orientation.
to save the view in the defined
orientation. - Enhanced the option to capture the view with entities transparency and display it back once it is activated.
Manage Saved Views
Perform various actions like updating, renaming, deleting, and saving images by right-clicking on a view.
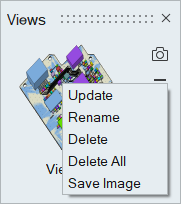
- Update: It suggests the ability to modify or adjust the orientations of the selected view.
- Rename: Users can modify the view names by using this option or by double clicking on the selected view names.
- Delete: This operation allows users to remove the selected view.
- Delete All: User can delete all the saved views.
- Save Images: Users may have the capability to save the view as an image file (such as JPG, PNG, etc.).
Recall Saved Views
Retrieve a previously saved view.
- Click the icon on the View Toolbar.
In the dialog, select your desired view, then the graphics area will get updated with the entities and orientation based on the selected view.
Export / Import Saved Views
-
To export a saved view, click "Export" icon
 in the dialog.
These views can also be exported in xml format using File > Export > Specification - Graphics.
-
To import views, click the "Import" icon
 in the dialog.
These views can also be imported in xml format using File > Import > Specification - Graphics.
Generate Reports
Save views in the desired presentation format by clicking the “Write Report” icon
![]() in the dialog.
in the dialog.