Results Toolbar
![]()
Introduction

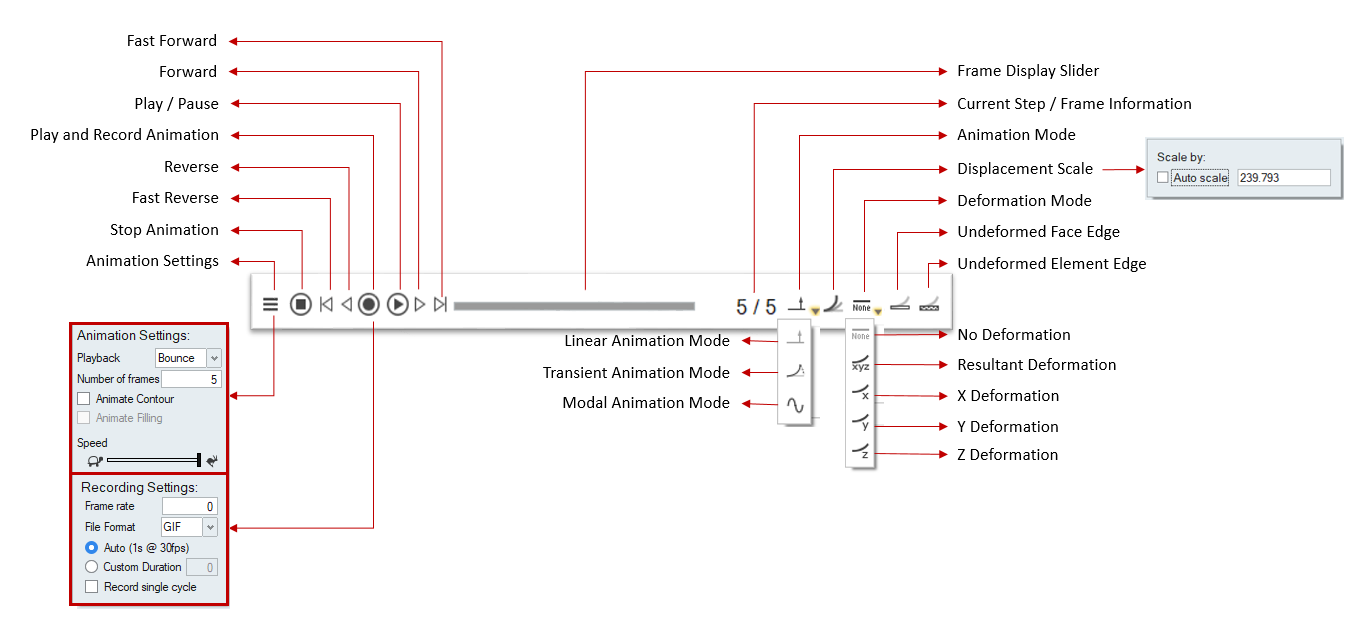
The Results Toolbar appears at the bottom of the graphics area to play, record and configure the animation.
It is also supported to handle deformation options. This toolbar appears only after loading the results.
Animate the Results
 Animation Settings: Settings will have the options and methods to control the
animation sequences. Refer the following link about the details of Animation Settings.
Animation Settings: Settings will have the options and methods to control the
animation sequences. Refer the following link about the details of Animation Settings.
 Stop: Stop or reset the animation sequence to initial position.
 Fast Reverse: It stops current play and show the initial position of
animation sequence.
Fast Reverse: It stops current play and show the initial position of
animation sequence.
 Reverse: It stops play and move one step back in the animation sequence.
 Play and Record/Stop Recording: Records the animation.
 Start Animation / Pause Animation: Plays/pause the animation.
 Forward: Stops play and move the next step in the animation sequence.
 Fast Forward: It stops the current play and shows the final position in the
animation sequence.
Fast Forward: It stops the current play and shows the final position in the
animation sequence.
Frame Display Slider: 
Drag the slider on the toolbar to view a particular point during the analysis. Use the arrow keys to move frame-by-frame through the animation.
Current Step: 
Displays the current frame. You can also enter a value to go to the nearest frame
Record the Results

Capture to a video in .mp4 or .gif format by clicking the button on the animation toolbar. Default format is MP4.
Click the button to begin recording the results. The icon changes to red to indicate that it is recording. Click the icon again to stop recording.
When the recording is finished, the video is saved in the user mentioned directory by using the default format option selected in Animation settings.
Note that the video recorder captures everything in the region of the Graphics area. Avoid obscuring or minimizing that window during the recording process.
The minimum graphics card driver version required for MP4 recording. If the hardware is not supported, the recording fallbacks to GIF type.
Recording is supported only on Windows OS.
Animation Mode
 Linear Animation Mode: This mode is to animate with actual deform value for
current displaying loadcase.
Linear Animation Mode: This mode is to animate with actual deform value for
current displaying loadcase.
![]() Transient Animation Mode: This mode is to visualize the contour variation of
all time steps. Supported only for Abaqus and H3d files.
Transient Animation Mode: This mode is to visualize the contour variation of
all time steps. Supported only for Abaqus and H3d files.
 Modal Animation Mode: This mode is to animate from reverse to actual deform
value for current displaying loadcase.
Modal Animation Mode: This mode is to animate from reverse to actual deform
value for current displaying loadcase.
Deformation Tools
 Default displacement scale:
Scale Factor is used to scale the deformation of the results model. SimLab has "Default displacement scale" feature, which computes the best scale factor automatically to visualize the deformation. By disabling the Default displacement scale, user can set the desired scale factor for the deformation.
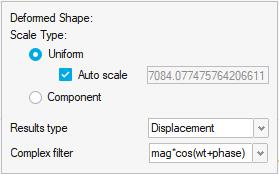
Uniform scale type: Single scale factor will be used for X, Y, and Z deformation.
Component scale type: Separate scale factors will be used for X, Y, and Z deformation respectively.
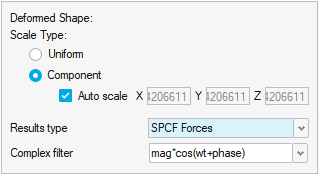
Results type: This option is used to select the deformation component.
Complex filter: In modal animation mode, the available complex filters are:
- mag * cos (ωt- phase) - the response with varying angle or ωt (in degree).
- mag* cos (ωt + phase) - the response with varying angle or ωt (in degree).
Display contour on model with deformation:
 :
This option is used to view the deformation in the any one or all of the three
axes.
:
This option is used to view the deformation in the any one or all of the three
axes. No Deformation: The model is displayed without deformation.
 Undeformed Face Edge:
If this option is turned ON, the face edge will be drawn for the undeformed model. The face edge for the deformed model is handled under Render mode | Edge Display | Face Edge.
 Undeformed Element edge:
If this option is turned ON, the element edge will be drawn for the undeformed model. The element edge for the deformed model is handled under Render mode | Edge Display | Element Edge.
Turn on the element edge toggle in RenderMode to display the element edges in the undeformed model and use invert transparency option in UI Right click menu for transparent view.
Scripting is supported for all deformation options.
Click on the link will show a results toolbar demo - Demo.