PostgreSQL Installation and Configuration
Also referred to as Postgres, PostgreSQL is an object-relational database management system with emphasis on extensibility and standards compliance.
PostgreSQL can handle workloads ranging from small single-machine applications to large Internet-facing applications, or for data warehousing, with many concurrent users. PostgreSQL is ACID-compliant and transactional. PostgreSQL has updatable views and materialized views, triggers, foreign keys, supports functions and stored procedures, and offers other expandability.
PostgreSQL is developed by the PostgreSQL Global Development Group, a diverse group of many companies and individual contributors. It is free and open-source, released under the terms of the PostgreSQL license, a permissive software license. For more information, visit postgresql.org.
Prerequisites
System Requirements
| Platform | 64 Bit | 32 Bit |
|---|---|---|
| Windows Version | 2022, 2019 |
PostgreSQL Installer
Use the following installer to set up PostgreSQL: postgresql-16.2.1-1-windows-x64.exe or later version. The PostgreSQL executable is installed as part of the HyperMesh software installation. You will see another installer along with Altair HyperWorks products for installing PostGresDB.
Install PostgreSQL
In this section you will learn how to install PostgreSQL.
It is recommended to perform the installation using the values and options as detailed below. Also, when prompted for a Windows admin password, create a new password.
- Open a command prompt in admin mode.
-
Launch the installer (postgresql-16.2.1-1-windows-x64.exe)
from the command prompt.
Note: You should launch the installer from the command prompt only. This will auto-resolve the path to Windows native utilities needed for PostgreSQL to install and work correctly.
-
Launch the pgAdmin 4 tool (included with the installation) in admin mode, and
add one user with full rights:
-
Expand the Servers node until you see the Login/Group Roles node, as
shown in the following image.
Figure 1. 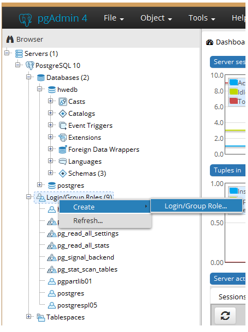
-
Click the Privileges tab and set all fields to
Yes.
Figure 2. 
-
Expand the Servers node until you see the Login/Group Roles node, as
shown in the following image.
-
Create a customized pg_hba.conf file:
You will use this file in the next step.
- Using Windows Explorer, locate the pg_hba.conf file that you created in the previous step and move it to the <PostGres_INSTALLATION_DIR>/data folder to replace the file already there.
- Open the Windows Task Manager, Services tab, and locate the postgresql-x64 service.
-
Restart the postgresql-x64 service by right-clicking on the service name and
selecting Restart from the context menu.
Figure 3. 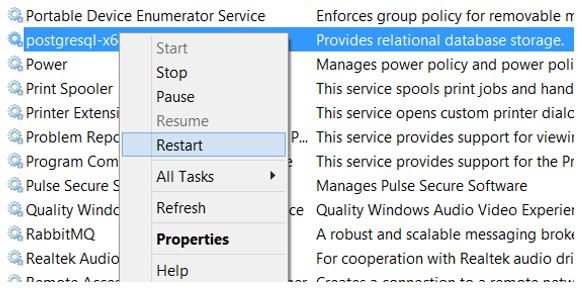
Note: This allows all users to connect without authentication. - Reconnect to the server by clicking on the username, hweuser, and selecting Yes when prompted to reconnect.
- Optional:
If you need to locate the port number for the server connection, click on the
name of the server and then click the Properties
tab.
Figure 4. 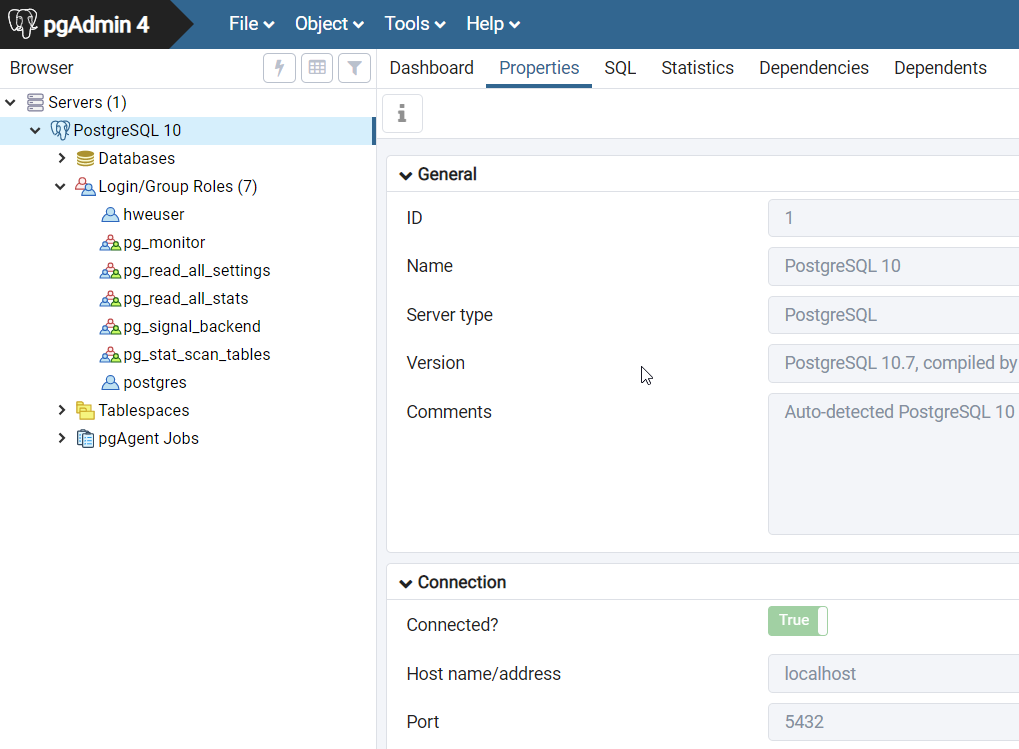
The Port number is listed under Connection, as displayed in the image above. Knowing the Port number allows you to share the connection with other users.
Connect to Shared Library
In this task you will learn how to connect to the PostgreSQL Shared Library.
-
To create a shared library:
-
To add an existing library:
Troubleshooting
In this section you will learn how to resolve potential issues with installing PostgreSQL.
In some cases, you may fail to connect to the library. If this occurs, it is important to check if port 5432 is open on the server by following the steps below.
-
From the client machine, launch the Windows PowerShell.
Note: Windows PowerShell is included in the Windows installation.
-
Use the following command to check if the port is open:
Test-NetConnection <Server Name> -p <Port Number>Figure 5. Example 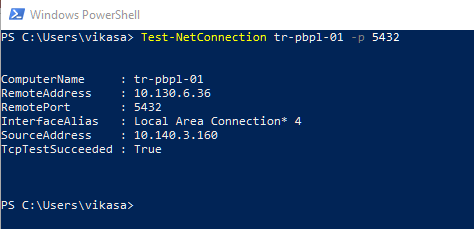
-
Verify C:\Program Files\PostgreSQL\13\bin is present in
the path environment variable.
Important: If C:\Program Files\PostgreSQL\13\bin is not present, you must add it manually.
Recover PostgreSQL Admin Password
If the PostgreSQL superuser password is lost, it can be reset by temporarily allowing trust-based authentication and then setting a new password.
-
Use one of the following processes to find your PostgreSQL installation path
depending on your operating system.
Operating System Process Linux - Enter
ps auxw | grep postgres | grep -- -Dto check the running processes.ps auxw | grep postgres | grep -- -Dshows the-Dflag with the data directory path. - Enter
sudo systemctl status postgresqlvia systemd service and look for Main PID details. - If accessible, enter
psql -U postgres -c "SHOW
                                        data_directory;"
from within psql.
Common locations:- /etc/postgresql/<version>/main/pg_hba.conf
- /var/lib/pgsql/<version>/data/pg_hba.conf
Windows - Check PostgreSQL service properties in services.msc.
- Look in Program Files for your PostgreSQL installation:
- C:\Program Files\PostgreSQL\
- C:\Program Files (x86)\PostgreSQL\
- If accessible, enter
psql -U postgres -c "SHOW
                                        data_directory;"
from within psql.
- Enter
-
If you have a Linux operating system and you're unsure where the PostgreSQL
pg_hba.conf file is located, run the "Find-and-Edit"
command block.
This block does the following:# Find pg_hba.conf, back it up, and open in vi PG_HBA=$(sudo find / -name "pg_hba.conf" 2>/dev/null | head -n 1) && \ echo "Found: $PG_HBA" && \ sudo cp "$PG_HBA" "${PG_HBA}.bak" && \ sudo vi "$PG_HBA"- Searches your entire system for the first pg_hba.conf file it finds
- Prints the location
- Creates a .bak backup file
- Opens the file in vi for editing (universal availability)
-
Complete one of the following processes to reset the postgres password
depending on your operating system.
Operating System Process Linux - Switch to the postgres OS user by entering
sudo -i -u
                                        postgres
. - In pg_hba.conf, change
local all postgres md5tolocal all postgres trust. - Enter
sudo systemctl restart postgresqlto restart PostgreSQL. - In
psql -U postgres, changepostgresto the new password'new_password';. - Restore the original authentication method and restart.
Windows - Back up the pg_hba.conf file by copying C:\Path\to\pg_hba.conf to C:\Path\to\pg_hba.conf.bak.
- In pg_hba.conf, change
local all postgres md5tolocal all postgres trust. - Enter
sudo systemctl restart postgresqlto restart PostgreSQL. - In
psql -U postgres, changepostgresto the new password'new_password';. - Restore the original authentication method and restart.
Important: Always revert to a secure authentication method, like md5, immediately after resetting the password. - Switch to the postgres OS user by entering
Migrate PostGreSQL
In this section you will learn how to migrate PostGreSQL to version 16.2.1.
- Install SqLite Tools from sqlite.org/download.html by downloading sqlite-dll-win32-x86-3430100.zip under Precompiled Binaries for Windows.
- Unzip the folder and rename it as sqlite3.
- Place the sqlite3 folder on the C drive and add the C:\sqlite3 path to the path environment variable.
-
Open the command prompt in admin mode and enter sqlite3
to see if it's recognized.
Note: If it's recognized, it is set properly.
-
Copy and save the content below as PostGresMigration.bat
to your working directory.
:: Migration of PostGres to New Version (Need to check script using host name ) @echo off :: User Inputs :: OLD_POSTGRES_PORTNO - Please enter the port number used by old PostGres Version :: CURR_POSTGRES_PORTNO - Please enter the port number used by new PostGres Version set OLD_POSTGRES_PORTNO=5433 set CURR_POSTGRES_PORTNO=5432 set LIB_VERSION=2021 :: Variable Section set WORKING_DIR_PATH=%cd% set WORKING_DIR_PATH=%WORKING_DIR_PATH:\=/% set ALTAIR_LIB_FILE_PATH=%UserProfile%/AltairLibraries/%LIB_VERSION%/main/main.db set ALTAIR_LIB_FILE_PATH=%ALTAIR_LIB_FILE_PATH:\=/% set CURR_POSTGRES_BACKUP_DIR=%WORKING_DIR_PATH%/Output set SQL_SCRIPT_PATH=%WORKING_DIR_PATH%/Output/SqlMigrationScript.sql set OUTPUT_FILE_PATH=%WORKING_DIR_PATH%/Output/PostGresMigrationLog.txt echo "Creating the Output Directory" mkdir "%WORKING_DIR_PATH%/Output" echo "Creating the Output Log File" echo.>%OUTPUT_FILE_PATH% echo Output Log File %OUTPUT_FILE_PATH% Created Successfully! %DATE% %TIME%>> %OUTPUT_FILE_PATH% echo "Creating the SQL Script File" echo.>%SQL_SCRIPT_PATH% echo Script File %SQL_SCRIPT_PATH% Created Successfully! %DATE% %TIME%>> %OUTPUT_FILE_PATH% ::echo %ALTAIR_LIB_FILE_PATH% ::echo %WORKING_DIR_PATH% :: ------------------------------------------------------------------------- :: STEP 1 . Create a databack up file name with current date :: ------------------------------------------------------------------------- set CUR_YYYY=%date:~10,4% set CUR_MM=%date:~4,2% set CUR_DD=%date:~7,2% set CUR_HH=%time:~0,2% if %CUR_HH% lss 10 (set CUR_HH=0%time:~1,1%) set CUR_NN=%time:~3,2% set CUR_SS=%time:~6,2% set CUR_MS=%time:~9,2% set SUBFILENAME=%CUR_YYYY%%CUR_MM%%CUR_DD%-%CUR_HH%%CUR_NN%%CUR_SS% set FILENAME=postgresbackup_%SUBFILENAME%.sql :: ------------------------------------------------------------------------- :: STEP 2. First take the back up from the old server into a file :: ------------------------------------------------------------------------- pg_dump -C -p %OLD_POSTGRES_PORTNO% -U hweuser -d hwedb > %CURR_POSTGRES_BACKUP_DIR%\%FILENAME% echo Data back up for %CURR_POSTGRES_BACKUP_DIR%\%FILENAME% Created Successfully! %DATE% %TIME%>> %OUTPUT_FILE_PATH% :: ------------------------------------------------------------------------- :: STEP 3 : Import the backed up file into the new server :: ------------------------------------------------------------------------- psql -U hweuser -d hwedb -p %CURR_POSTGRES_PORTNO% -1 -f %CURR_POSTGRES_BACKUP_DIR%\%FILENAME% echo Data import into new POSTGres for %CURR_POSTGRES_BACKUP_DIR%\%FILENAME% Done Successfully! %DATE% %TIME%>> %OUTPUT_FILE_PATH% :: ------------------------------------------------------------------------- :: STEP 5 : Change the port number into the main Altair DB to connect :: ------------------------------------------------------------------------- break>%SQL_SCRIPT_PATH% echo .open "%ALTAIR_LIB_FILE_PATH%" >> %SQL_SCRIPT_PATH% echo SELECT * FROM reposettings WHERE value=%OLD_POSTGRES_PORTNO%;>> %SQL_SCRIPT_PATH% echo UPDATE reposettings SET value=%CURR_POSTGRES_PORTNO% WHERE value=%OLD_POSTGRES_PORTNO%; >> %SQL_SCRIPT_PATH% sqlite3 < %SQL_SCRIPT_PATH% echo SQL Script %SQL_SCRIPT_PATH% Executed Successfully! %DATE% %TIME%>> %OUTPUT_FILE_PATH% -
Open PostGresMigration.bat in a text editor and provide
the following inputs:
- Open the command prompt in admin mode and run PostGresMigration.bat.
-
Verify the following:
- An Output folder has been created at the location of the PostGresMigration.bat script.
- The Output folder contains data back up files that are properly created.
- SqlMigrationScript.sql has been properly created.
- The old libraries have been migrated to the new POSTGresSQL version 16.2.1.