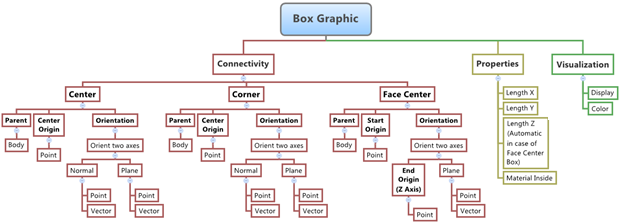
There are three ways in which a box graphic (or cuboid) can be defined based on the
location of the graphic reference frame about which the graphic is being created. The
dimensions for the graphic are also specified using this reference frame.
The figure below shows the various box graphic options and settings that are
available in MotionView:Figure 1.
If the Graphics panel is not currently displayed, select the desired graphic by
clicking on it in the Model Browser or in the modeling window.
The Graphics panel is automatically displayed.
From the Connectivity tab, use the Type drop-down menu to select a type for the
box graphic.
Option
Description
Center
The center box graphic has its origin of the reference frame about
which the box is defined located at the geometrical center of the
box.
Corner
The corner box graphic has the origin of the reference frame located
at any one of the eight corners of the box.
Face Center
The face center box graphic has its origin located at the center of
one of the faces.
Note: If the selected graphic is a pair entity, first distinguish between the
Left and Right tabs in the
panel, and then edit the properties. When defining a pair graphic, use pair
entities for Body, Origin, etc.
Click the Body collector and
select a body from the modeling window, or double click
the Body collector to open the Model Tree (from which the desired body can be selected).
Click the Point
collector (under Origin) and select a point from the modeling window, or double click the
Point collector to open the Model Tree (from which the desired point can be selected).
Use the orientation options to orient the
coordinate system.
Define the graphic properties.
Click the Properties tab.
Enter the dimensions of the box graphic by providing values for
LengthX, LengthY, and LengthZ.
In the case of a face center box, LengthZ is automatically determined
by the distance between the origin and reference point for the Z axis
(the two points that define the Z axis of the reference frame).
Select the material property to be associated with the graphic.
Tip:
Activating the Material inside check box sets
the normals such that the graphic will act like a solid object. For
contacts outside of the box, activate on this option. If the contact
is to be detected from inside the box, deactivate this option.
The refinement level sets the mesh
coarseness level for HyperMesh. HyperMesh will use a tessellation scheme to
represent the graphic object during solution. Refer to the <Post_GraphicMotionSolve statement for additional
information.
Click the Inertia Properties
tab and review the mass and center of mass coordinates for the graphic.