PM Card
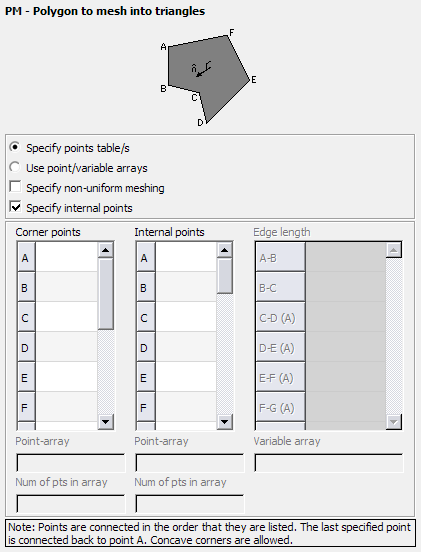
A surface mesh of triangles in the shape of a polygon is created by using the PM card. The PM card also allows the specification of interior mesh points. The PM card should generally be used in favour of other cards that create flat surface meshes with straight edges.
On the Construct tab, in the Surfaces group,
click the ![]() Polygon icon. From
the drop-down list, click the
Polygon icon. From
the drop-down list, click the ![]() Polygon (PM) icon.
Polygon (PM) icon.

Parameters:
- Specify points table/s
- This option allows data entry in a table with a maximum of 13 points.
- Use point/variable arrays
- This option allows data entry using arrays without a limit on the number of corner points.
- Specify non-uniform meshing
- Check this item to enable the table in which edge lengths for each edge can be entered.
- Specify internal points
- Check this item to enable the table in which internal points can be specified.
- Corner points
- Enter the points, previously defined with the DP card. The points can be entered in the rows or as point (node name) arrays.
- Internal points
- Any points internal to the structure where mesh points are required can be entered here. This is particularly useful for the connection points between surfaces and wires. The points can be entered in the rows or as point (node name) arrays.
- Edge length
- The mesh length on each edge can be set separately in this table. The edge lengths can be entered in the rows or as variable arrays. When using the table entry, any blank entries in this table will be meshed with the parameters set in the IP card. There may not be more entries in this table than in the first one. When using the array entry method, the variable array has to be the same length as the corner point array.
The polygon is defined by entering the points (previously defined with the DP card) on the corners of the polygon. A maximum of 13 corner points are allowed using the table entry method, but there is no restriction on the number of points when using the array entry method. The points are connected in the order that they are entered in the PM card. The array entry method allows specifying the number of elements, say n, in the array that should be used. Only the first n elements of the array is then used. Concave corners are allowed. The user can also specify a smaller or larger mesh size along certain edges.
Examples of PM card usage
Shown in Figure 2 is a plate with a concave corner created with the PM card — note the finer mesh along the edges from B to C and C to D.
A plate with three internal points, generated using a PM card is shown in Figure 3. Note that there are node points at Q1, Q2 and Q3.

