OS-T: 1380 Computation of Equivalent Radiated Power
Computation of the equivalent radiated power (ERP) is a simplified method to gain
information about maximum dynamic radiation of panels for excitations in frequency response
analysis. This tutorial demonstrates how to set up the computation request of ERP on an existing
frequency response analysis.
Before you begin, copy the file(s) used in this tutorial to your
working directory.
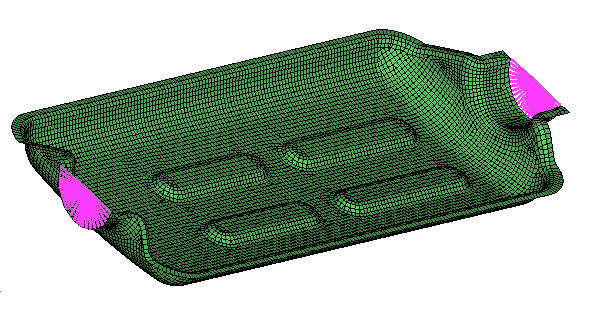
The model is a front cover of catalytic converter in a car exhaust system, as shown in
Figure 1. The frequency analysis setup is already made for this model
where the cover is constrained at two ends, and the excitation loading is applied at the
center of the cover. The loading frequency is defined by FREQ1 card; from
120.0 to 400.0 Hz with an interval of 1.0. You need to define ERP panels (ERPPNL) and ERP
output request.Figure 1. Model Review
Launch HyperMesh and Set the OptiStruct User Profile
Launch HyperMesh.
The User Profile dialog opens.
Select OptiStruct and click
OK.
This loads the user profile. It includes the appropriate template, macro
menu, and import reader, paring down the functionality of HyperMesh to what is relevant for generating models for
OptiStruct.
Open the Model
Click File > Open > Model.
Select the cover.fem file you saved to
your working directory.
Click Open.
The cover.fem database is loaded
into the current HyperMesh session, replacing any
existing data.
Set Up the Model
Create ERPPNL Set
ERPPNL is defined as a set of elements. An element set ERP_elem has been predefined
in the model. It can be reviewed in HyperMesh.
Go to the entity sets
panel on Analysis page.
Click review and select
ERP_elem.
The elements should be highlighted on
the screen.
Click return to go back to the main menu.
In the Model Browser,
right-click and select Create > Set.
A default set template is now displayed
in the Entity Editor below
the Model Browser.
For Name, enter
ERPPNL.
For Card Image, select
ERPPNL and click
Yes to confirm.
For Entity IDs, click Unspecified > Sets.
In the Select Sets dialog.
select the ERP_elem set and
click OK.
Define ERP Output Request
You will request the ERP output in control cards panel.
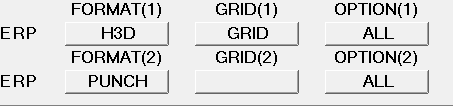
From the Analysis page, click control cards.
Go to the GLOBAL_OUTPUT_REQUEST panel.
Check the box in front of ERP and enter 2 in the ERP_NUM
field.
Set FORMATs, GRIDs, and OPTIONs for the ERP output, as shown below.
Figure 2. ERP output
The grid contribution of each grid in addition to the ERP results for the
panel is output to an .h3d file. ERP panel results are
output to punch format.
Click return twice to return to the Analysis page.
Submit the Job
From the Analysis page, click the OptiStruct
panel.
Figure 3. Accessing the OptiStruct Panel
Click save as.
In the Save As dialog, specify location to write the
OptiStruct model file and enter
cover_ERP for filename.
For OptiStruct input decks,
.fem is the recommended extension.
Click Save.
The input file field displays the filename and location specified in the
Save As dialog.
Set the export options toggle to all.
Set the run options toggle to analysis.
Set the memory options toggle to memory default.
Click OptiStruct to launch
the OptiStruct job.
If the job is successful, new results files
should be in the directory where the cover_ERP.fem was written. The cover_ERP.out file is a good place to look for error messages that could help
debug the input deck if any errors are present.
Post-process the ERP Results in HyperView
From the OptiStruct panel, click HyperView.
HyperView is launched and the results are
loaded. A message window appears to inform of the successful model and result
files loading into HyperView.
Select Subcase 1 (frf) as the current
load case in the Results
browser.
Select the last load step where frequency is 50.0Hz.
On the Results toolbar, click to open the
Contour panel.
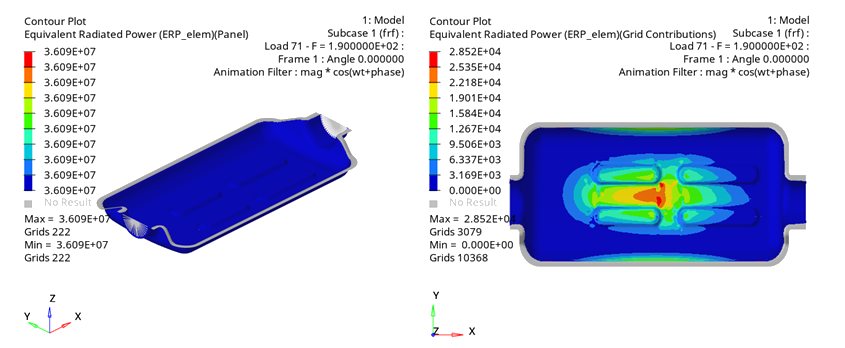
Select Equivalent Radiated Power
(ERP_elem) as Result type and then
select Panel.
Click Apply.
ERP results on panel should be plotted.
Select Equivalent Radiated Power
(ERP_elem) as Result type and then
select Grid Contributions.
Click Apply.
The contour of grid contributions to ERP should be
loaded.Figure 4. ERP Results in HyperView
Post-process the ERP Results in HyperGraph
Launch
HyperGraph.
Click Build Plots.
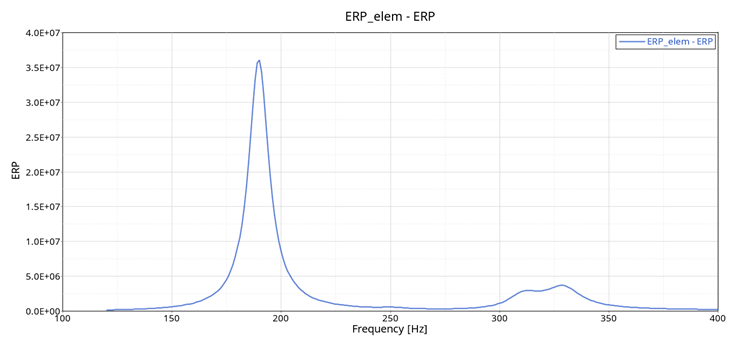
Load cover_ERP.pch file in Data file.
Check that X Type is set to Frequency [Hz].
Check that Y Type is set to Subcase 1 ERP.
Select Frf ERP_elem in Y Request and
ERP in Y Component field.
Click Apply.
The plot of ERP panel results versus loading frequency should be loaded,
as shown below. The ERP (dB) results are available, as well.Figure 5. ERP Results in HyperGraph


 to open the
Contour panel.
to open the
Contour panel.