
Pipe
Create a pipe along one or more edges/lines. The pipe has a uniform cross section that can be circular, square, rectangular, or triangular.
-
On the Geometry ribbon, select the Pipe tool.

Note: The tool may be hidden in the dropdown menu. To access the dropdown menu, you can do one of the following:- Select
 at the lower right corner of the
currently displayed tool.
at the lower right corner of the
currently displayed tool. - Click and hold the currently displayed tool.
Tip: To find and open a tool, press Ctrl+F. For more information, see Find and Search for Tools.The guide panel appears.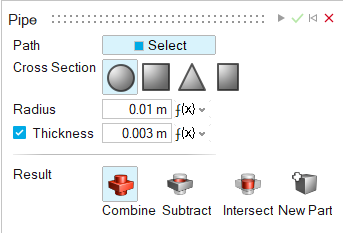
- Select
- Select one or more Paths, such as the edge of an existing part or a line.
-
Define the cross section:
- Select a type:
Option Description Circular (default) Create a pipe with a circular cross section. Square Create a pipe with a square cross section. Triangular Create a pipe with an equilateral triangular cross section. Rectangular Create a pipe with a rectangular cross section. - Adjust the size:
Option Adjust the Cross Section Circular (default) In the guide panel, enter the Radius. Square In the guide panel, enter the Length. Triangular In the guide panel, enter the Length. Rectangular In the guide panel, enter the Length and Width. By default, a solid pipe is created.
- Optional: To create a hollow pipe, turn on Thickness, and then enter the Thickness of the pipe wall.
- Optional: To select all the tangent edges when
clicking an edge, in the microdialog turn on Tangent
Propagation
 .
. - Optional: To rotate the cross section:
- In the microdialog, select the Move tool.
- Drag the arrow.
- Select a type:
-
Choose a Result type:
- Combine (default): Combine the pipe with the existing parts.
- Subtract: Carve out the pipe shape from the existing parts.
- Intersect: Retain only the intersecting portions of the pipe and the existing parts.
- New Part: Create a new part from the pipe.
- Click Apply.
- Right-click and mouse through the check mark to exit, or double-right-click.