
Multi Sweep
Sweep multiple profiles along a path to create a solid or surface. Create a new part or combine, subtract, or intersect the swept shape with existing parts.
-
On the Geometry ribbon, select the Multi
Sweep tool.

Note: The tool may be hidden in the dropdown menu. To access the dropdown menu, you can do one of the following:- Select
 at the lower right corner of the
currently displayed tool.
at the lower right corner of the
currently displayed tool. - Click and hold the currently displayed tool.
Tip: To find and open a tool, press Ctrl+F. For more information, see Find and Search for Tools.The guide panel appears.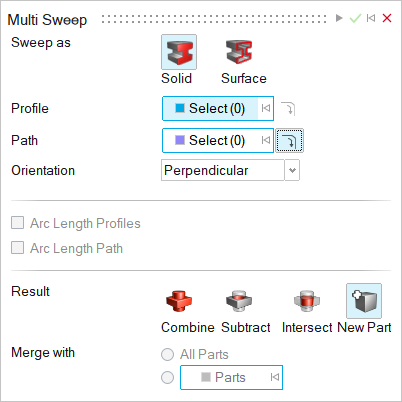
- Select
-
Choose the entity type that you'd like to create:
- Solid: Sweep as a solid.
- Surface: Sweep as a surface.
-
Select a Profile. By default,
Select is automatically turned on. Do one of the
following:
- If you selected Solid in the last step, click the Select collector and select a closed sketch or a planar surface.
- If you selected Surface in the last step, select a planar edge, closed/open sketch, or a planar surface.
- (Optional): Select
 so that clicking an edge will also select
edges connected to the profile.
so that clicking an edge will also select
edges connected to the profile.
Note: To deselect, hold down Ctrl while clicking. -
Choose a Path:
-
(Optional): Select so that clicking an edge will also select
edges connected to the path.
-
(Optional): Select
-
Choose a profile Orientation:
- Perpendicular (default): Orient the swept shape perpendicular to the path.
- Parallel: Orient the swept shape parallel to the path.
- Normal to Surface: Orient the swept shape so its cross section maintains a fixed relationship to its direction and the normal of the selected surface. Use the Normal to Surface collector to select the surface.
-
Choose the type of sweep:
- Arc Length Profiles: If the parametrization of the profiles is uneven, evenly space the isoparms of the surface between the profiles for a less stretched shape.
- Arc Length Path: If the parametrization of the path is uneven, evenly space the isoparms along the path for a less stretched shape.
-
Choose a Result type:
- Combine/Merge: Combine or merge the swept shape with the existing parts.
- Subtract (only available for Solids): Carve out the swept shape from the existing parts.
- Intersect (only available for Solids): Retain only the intersecting portions of the swept shape and the existing parts.
- New Part: Create a new part from the swept shape.
-
Choose a Merge method:
- All Parts (default): Merge the swept shape with all parts that touch the swept shape.
- Selected Parts: Select the radio button to merge the swept shape with selected parts. Then select the parts that you’d like to merge the swept shape with.
-
If you selected Combine, choose how to combine the swept
shape:
- Target: Select the checkbox and use the collector
to select the part you want to merge into.Note: When the Selected Parts radio button is selected, the target part must be one of the selected parts before you can apply the change. When All Parts is selected, you can select any part as the Target.
- Target: Clear the checkbox to merge parts automatically.
- Target: Select the checkbox and use the collector
to select the part you want to merge into.
-
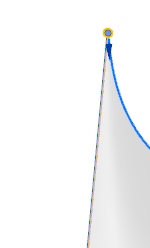
Edit a profile.
- Select a vertex on the profile, which is displayed in blue with a small
arrow.
- You can then do the following:
To Do this Note If surface edges were used for profiles or guide curves, modify the constraint to fine-tune the shape of the sweep In the microdialog, select a Constraint type: - None: Don't constrain the sweep.
- Surface: The swept shape is made tangent to the surface edge.
- Magnitude: Change the magnitude of the constraint for the selected profile.
To invert the direction of the profile's tangent, select Invert Tangent
 .
.Change the tangent magnitude for the profile In the microdialog, enter the Magnitude. Invert the orientation of the profile Invert Orientation The direction of the arrow on the profile indicates its orientation. In most cases, the optimal orientation of each profile is internally calculated so that the resulting surface is not twisted. In some cases, inverting a profile's orientation will cause the sweep to fail. Change the twist type Choose a Twist Type: - None: Don't add a twist to the selected profile.
- Angle: Add a twist to the selected profile by defining the Twist Angle.
- Number of Turns: Add a twist to the swept profile by defining the No. of Turns.
To reverse the twist direction, from clockwise to counterclockwise or vice versa. select Reverse Twist Direction .Refine the shape when the selected profile or edge is a periodic curve Drag the seam along the profile or edge. - Select a vertex on the profile, which is displayed in blue with a small
arrow.
- Click Apply.
- Right-click and mouse through the check mark to exit, or double-right-click.