
Pattern
Create a linear or circular pattern of parts or faces.
Circular Pattern
Pattern parts or faces around an axis.
-
On the Geometry ribbon, select the Circular
Pattern tool.

Note: The tool may be hidden in the dropdown menu. To access the dropdown menu, you can do one of the following:- Select
 at the lower right corner of the
currently displayed tool.
at the lower right corner of the
currently displayed tool. - Click and hold the currently displayed tool.
Tip: To find and open a tool, press Ctrl+F. For more information, see Find and Search for Tools.The guide panel appears.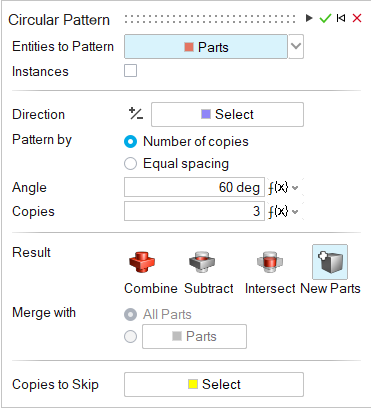
- Select
-
Choose the type of Entities to Pattern:
- PartsNote: To make all of the parts in the pattern instances of the original part, turn on Instances.
- Faces
- Parts
-
In the modeling window, select one or more parts or faces.
Note: To deselect a feature, hold down Ctrl while clicking. To clear all selected features, in the microdialog click Clear Selection.
-
Define the direction of the pattern:
- In the guide panel, next to Direction, click the Select button.
- In the modeling window, select a reference line, edge, or axis to which the pattern will be parallel.
- (Optional): To reverse the direction, click
 in the microdialog.
-
Select a pattern method:
- Number of copies: Select this option to specify the Angle between each copy and the Number of Copies.
- Equal spacing: Select this option to equally space the copies within a specified Angle.
-
(Parts only) Adjust the pattern:
To Do this - Change the angle between each copy (Number of copies method)
- Specify the angle within which the copies are equally spaced (Equal spacing method)
Enter an Angle. Change the number of copies Enter the number of Copies. Pattern symmetrically about the selected center Turn on Symmetry. -
(Parts only) Choose a Result type:
- Combine: Combine the patterned parts with the existing parts.
- Subtract: Carve out the patterned parts from the existing parts.
- Intersect: Retain only the intersecting portions of the patterned parts and the existing parts.
- New Part: Create new parts from patterned parts.
-
(Parts only) If you selected Combine,
Subtract, or Intersect, choose
a Merge method:
- All Parts (default): Merge the patterned parts with all touching parts.
- Parts: Select the radio button to merge the patterned parts with selected parts. Then select the parts that you’d like to merge the patterned parts with.
- Optional:
Select the copies to skip:
- Next to Copies to Skip, click the Select button.
- Select the copies to exclude from the pattern.
- Click Apply.
- Right-click and mouse through the check mark to exit, or double-right-click.
Linear Pattern
Pattern parts or faces in a linear direction.
-
On the Geometry ribbon, select the Linear
Pattern tool.

Note: The tool may be hidden in the dropdown menu. To access the dropdown menu, you can do one of the following:- Select at the lower right
corner of the currently displayed tool.
- Click and hold the currently displayed tool.
Tip: To find and open a tool, press Ctrl+F. For more information, see Find and Search for Tools.The guide panel appears.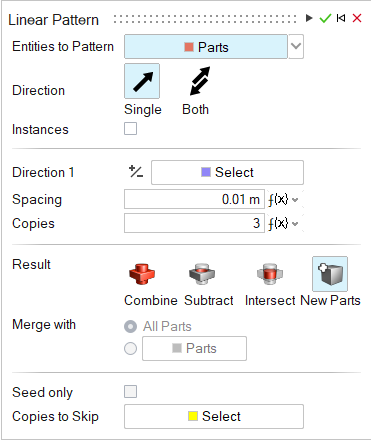
- Select
-
Choose the type of Entities to Pattern:
- PartsNote: To make all of the parts in the pattern instances of the original part, turn on Instances.
- Faces
- Parts
-
In the modeling window, select one or more parts or faces.
Note: To deselect a feature, hold down Ctrl while clicking. To clear all selected features, in the microdialog click Clear Selection.
-
Choose a Direction:
- Single (default): Create the pattern in one direction.
- Both: Create the pattern in both directions.
-
Define Direction 1 or Direction 2
of the pattern:
- In the guide panel, next to Direction 1 or Direction 2, click the Select button.
- In the modeling window, select a reference line, edge, or axis to which the pattern will be parallel.
- (Optional): To reverse the direction, click in the microdialog.
-
(Parts only) Adjust the pattern along Direction 1 or
Direction 2:
To Do this Change the distance between two copies In the microdialog, enter the Spacing. Change the number of copies In the microdialog, enter the number of Copies. Pattern symmetrically along direction 1 or 2 In the guide panel, for Direction 1 or 2, turn on Symmetry. -
(Parts only) Choose a Result type:
- Combine: Combine the patterned parts with the existing parts.
- Subtract: Carve out the patterned parts from the existing parts.
- Intersect: Retain only the intersecting portions of the patterned parts and the existing parts.
- New Part: Create new parts from patterned parts.
-
If you selected Combine,
Subtract, or Intersect, choose a
Merge method:
- All Parts (default): Merge the patterned parts with all touching parts.
- Parts: Select the radio button to merge the patterned parts with selected parts. Then select the parts that you’d like to merge the patterned parts with.
- Optional:
Select the copies to skip:
- (Optional): To pattern the entities only along the first row and first column, turn on Seed only.
- Next to Copies to Skip, click the Select button.
- Select the copies to exclude from the pattern.
- Click Apply.
- Right-click and mouse through the check mark to exit, or double-right-click.
Along Curve
Pattern parts or faces along a path, which can be an edge, curve, sketch, or wire.
-
On the Geometry ribbon, select the Along
Curve tool.

Note: The tool may be hidden in the dropdown menu. To access the dropdown menu, you can do one of the following:- Select at the lower
right corner of the currently displayed tool.
- Click and hold the currently displayed tool.
Tip: To find and open a tool, press Ctrl+F. For more information, see Find and Search for Tools.The guide panel appears.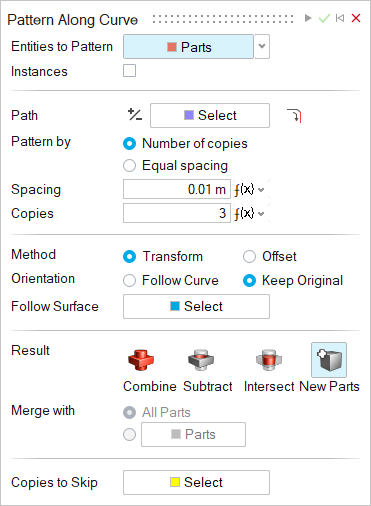
- Select
-
Choose the type of Entities to Pattern:
- PartsNote: To make all of the parts in the pattern instances of the original part, turn on Instances.
- Faces
- Parts
-
In the modeling window, select one or more parts or faces.
Note: To deselect a feature, hold down Ctrl while clicking. To clear all selected features, in the microdialog click Clear Selection.
-
Define the path:
- In the guide panel, next to Path, click the Select button.
- In the modeling window, select an edge, curve, sketch, or wire the pattern will follow.
- (Optional): To reverse the direction, click in the guide panel.
- (Optional): Select
 Tangent Propagation
so that clicking an edge will also select all of its tangent edges.
Tangent Propagation
so that clicking an edge will also select all of its tangent edges.
-
Select a pattern method:
- Number of copies: Select this option to specify the Spacing between each copy and the Number of Copies.
- Equal spacing: Select this option to equally space the copies within a specified Spacing.
-
Adjust the pattern:
To Do this Change the number of copies Enter the number of Copies. Change the spacing between each copy Enter the Spacing. -
Choose a Method for maintaining the distance between the
curve and the original entity:
- Transform: For each copy, maintain the relative distance between the curve and the original entity.
- Offset: For each copy, maintain the normal distance between the curve and the original entity.
-
Choose an Orientation for the copies:
- Follow Curve: Align each copy so that it follows the curve.
- Keep Original: Align each copy to the original entity, so they have the same orientation.
-
To make the pattern follow a surface:
- Next to Follow Surface, click the Select button.
- Select a face to make the copies normal to it.
-
(Parts only) Choose a Result type:
- Combine: Combine the patterned parts with the existing parts.
- Subtract: Carve out the patterned parts from the existing parts.
- Intersect: Retain only the intersecting portions of the patterned parts and the existing parts.
- New Part: Create new parts from patterned parts.
-
(Parts only) If you selected Combine,
Subtract, or Intersect, choose
a Merge method:
- All Parts (default): Merge the patterned parts with all touching parts.
- Parts: Select the radio button to merge the patterned parts with selected parts. Then select the parts that you’d like to merge the patterned parts with.
- Optional:
Select the copies to skip:
- Next to Copies to Skip, click the Select button.
- Select the copies to exclude from the pattern.
- Click Apply.
- Right-click and mouse through the check mark to exit, or double-right-click.
Along Surface
Pattern parts or faces along a surface.
-
On the Geometry ribbon, select the Along
Surface tool.

Note: The tool may be hidden in the dropdown menu. To access the dropdown menu, you can do one of the following:- Select at the lower
right corner of the currently displayed tool.
- Click and hold the currently displayed tool.
Tip: To find and open a tool, press Ctrl+F. For more information, see Find and Search for Tools.The guide panel appears.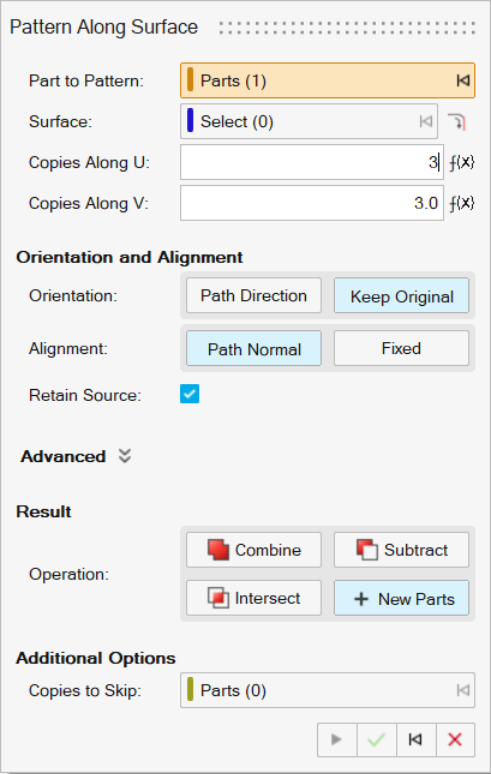
- Select
-
Select the part you want to pattern along a surface:
- In the guide panel, next to Part to Pattern, click the Select button.
- In the modeling window, select the part you want to pattern.
Note: To deselect a feature, hold down Ctrl while clicking. To clear all selected features, click Reset in the guide
panel.
in the guide
panel. -
Define the surface:
- In the guide panel, next to Surface, click the Select button.
- In the modeling window, select the surface the pattern will follow.
- (Optional): Select Tangent Propagation so
that clicking an edge will also select all of its tangent edges.
-
Adjust the pattern:
To Do this Change the number of copies in the U direction Enter the number of Copies Along U. Change the number of copies in the V direction Enter the number of Copies Along V. -
Choose the orientation of the first copy:
- Path Direction: Orient the first copy to follow the surface.
- Keep Original: Orient the first copy to match the source entity.
-
Choose the alignment of the subsequent copies:
- Path Normal: Each copy is aligned along the normal of the surface at that point.
- Fixed: Align copies to match the source entity.
- Optional: Select the Retain Source checkbox to retain the source entity in the same location. Deselect to move the source entity to the first preview location.
- Optional:
Click the Advanced chevron to use the advanced
adjustment controls to adjust the position of the copies:
To Do this Choose how to position the first copied entity. Use the First Copy buttons to choose how to position the first copy: - Select Retain Position and
drag the point on the surface to move the first
copy:
- Select Move Origin and use the Origin collector to choose an origin point on the surface.
- Select Adjust and select UV or XYZ to modify the position of the first copy.
Adjust horizontal spacing Enter the starting and ending locations in Start of U and End of U. For example, to space copies across the full horizontal surface, set Start of U to 0 and End of U to 1.Tip: You can also drag the points on the surface to adjust the start and end points.Adjust vertical spacing Enter the starting and ending locations in Start of V and End of V. For example, to space copies from ¼ to ¾ of the vertical surface, set Start of V to .25 and End of V to .75.Tip: You can also drag the points on the surface to adjust the start and end points. - Select Retain Position and
drag the point on the surface to move the first
copy:
-
Choose a Result type:
- Combine: Combine the patterned parts with the existing parts.
- Subtract: Carve out the patterned parts from the existing parts.
- Intersect: Retain only the intersecting portions of the patterned parts and the existing parts.
- New Part: Create new parts from patterned parts.
-
If you selected Combine,
Subtract, or Intersect, choose a
Merge method:
- All Parts (default): Merge the patterned parts with all touching parts.
- Parts: Select the radio button to merge the patterned parts with selected parts. Then select the parts that you’d like to merge the patterned parts with.
- Optional:
Select the copies to skip:
- Next to Copies to Skip, click the Select button.
- Select the copies to exclude from the pattern.
- Click Apply.
- Right-click and mouse through the check mark to exit, or double-right-click.