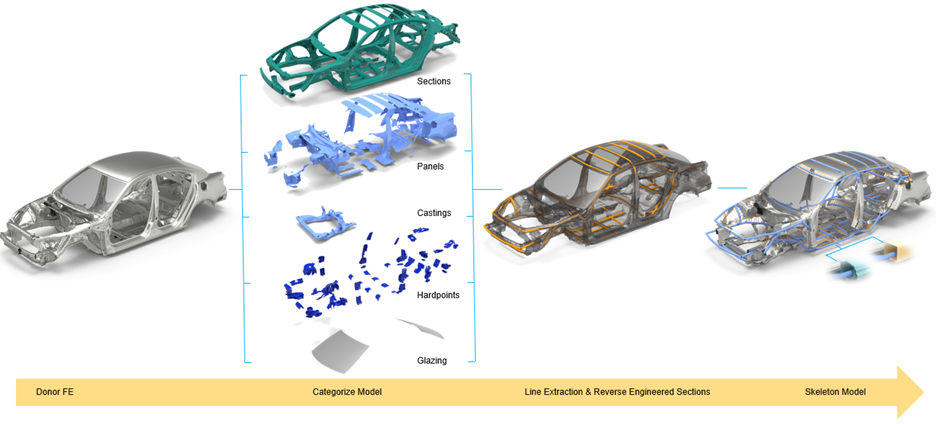
Categorize Model
Use the Categorize tool to streamline the development of reduced order models by automating the detection and categorization of subsections within an automotive model.
It classifies these subsections into four groups: Skeleton, Panels, Castings, Glazings, and Hardpoints, organizing the content into corresponding sets.
After categorization, the next step in creating the reduced order model is extracting a mid-line representation from the skeleton subsection. Once this mid-line is created, the final step is to use skeleton absorb, which converts the mid-line input into a 1D mesh with detailed beam sections applied. The accuracy and organization of these sets are critical, as cleaner categorization reduces manual intervention and clean-up times in later stages, particularly during the line extraction and absorption phases.
- ICE vs EV models
- Different vehicle types (coupe, sedan, SUV)
- Glazing configurations (panoramic vs fixed roof)
- Manufacturing processes (extrusion vs stamped)
- Castings (single part vs megacastings, shell vs solid elements)
- Glazings (shell vs solid)
- Joining techniques (rivets, spotwelds, adhesive)
The categorization output is organized into sets prefixed with DFEM (Detailed Finite Element Model), following a naming convention like DFEM Skeleton 1, DFEM Panels 1, and so on. If Categorize is run multiple times, the numbering increments increase. It is essential to review the sets to ensure everything has been correctly detected, with any necessary manual adjustments made to ensure accurate classification.
-
From the Skeleton ribbon, select the Categorize
tool.
Figure 2. 
- Select components, elements, or parts.
-
Click
 to define options.
- General
-
- Fill holes, max width
- Fill holes in selected input. The default is 10.
- Retain fill holes elements
- All elements created during the fill hole operation are kept.
- Exclude parts with small E, max
- Remove all parts with small Young’s modulus. The default is 20,000.
- Exclude skin elements (thickness <)
- Remove all elements with small thickness. The daefault is < 0.01.
- Exclude parts with low volume (<)
- Remove parts with low volume. The default is < 30,000.
- Hardpoints
-
- Find adjacent
- Detects the rows of elements out from the select hardpoint location and will be categorized as part of the hardpoint.
- Ratio
- The ratio of elements identified by the find adjacent factor to the total number of elements in the entire component that the identified element belongs to is then used to place the entire component into the set.
- Find tied contacts
- Detects hardpoints and surrounding structure via tie connection as opposed to physical connection.
- Glazings
-
- Find adjacent faces
- Find the faces that are adjacent to features. The default is 15x.
- Find only above Z-plane
- Consider glazings above the user defined Z-plane.
- Use CofG
- Consider glazings above the auto-calculated or user defined CofG.
- Find attachments and glazing flange
- Find the rows of elements around and attached to the adhesive on the glazing.
- Find tied contacts
- In addition to physically attached, include tied contacts.
- Castings
-
- Include hardpoints in output set
- Controls the location of the hardpoint information. It will reside in its own set or be included in the castings set.
- Panels
-
- Cleanup area size
- All patches less than the size specified will be removed from the panel set.
- Include hardpoints in output set
- Controls the location of the hardpoint information. It will reside in its own set or be included in the panels set.
- Connect to panelset
- Connects the panel set contents to the surrounding structure found in the hardpoints, glazings, and skeleton output.
- Skeleton
-
- Fill holes, max width
- Fills holes so that the skeleton set can be calculated. The default is 500.
- Tolerance
- Tolerance used to generate the skeleton set. Use a large value for cruder output, smaller for more refined. The default is 20.
- Optional: Select hardpoints.
-
On the guide bar, complete one of the following:
- Click
 to apply and stay in the tool.
 - Click
 to apply and close the tool.
 - Click
 to exit the tool without applying.
- Click