Handles
Handle entities control the shape of domains during morphing.
A handle can be associated with any domain, but must be associated with one and only one domain. When a handle associated with a 1D, 2D, 3D, general, or edge domain is moved, it moves the nodes within that domain along with the nodes in any other domain that the handle is touching. A handle associated with the global domain affects only the nodes in that domain. You can make large-scale changes to your model by moving the handles on the global domain and make small-scale changes to your model by moving the handles on local (1D, 2D, 3D, general, and edge) domains. You can also make both large-scale and small-scale changes to your model and have their effects combined in a logical manner.
Handles can also be dependent on other handles, either in the global domain or in local domains. This allows handles to control, but not restrict, the movements of other handles. A handle dependent on another handle inherits the perturbations applied to its parent handle which are added to any perturbations applied to the dependent handle directly. This allows you to set up a hierarchical control system for the handles in the model, such as making three handles which control the positions of three different holes dependent on a handle in the middle of all of them. When the middle handle is moved, the other handles move the same way, which in turn move all of the holes. Moving any one of the dependent handles moves only the hole it controls. You may also make a handle dependent on multiple handles. The dependent handle will be perturbed an amount equal to the average perturbation applied to the parent handles based on distances between them.
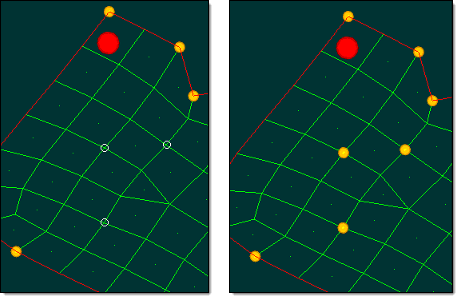
Global handles are red and are associated to global domains. Local handles are orange and are associated to local domains. Both global and local handles can have dependent handles which are of varying colors and sizes.
Handles do not have an active or export state.
Create Handles
Create new handles.
If more than one handle is created, their names will have a number appended to the prefix so that all handle names are unique.
Dependencies assigned during creation apply to all handles being created.
You do not need to select a domain for a handle when using the by nodes option. If you do not select a domain, the handle will be assigned to a domain that contains the node.
- From the Morph ribbon, click the arrow next to the Morph tool set name and select Handles.
- In the Morph: Handles dialog, verify Create is selected for Action.
-
Define parameters.
Parameter Action Name Specify a name for the new handle. A default prefix of handle is used. A number will be appended to the name prefix if you create more handles without changing the name, for example, Handle1, Handle2, and so on.
Attached To Select the domain that you want the new handle to be linked with/part of. If the node selected for a handle is part of a domain, then this field is optional. Dependent On Select one or more existing handles that it is dependent on. This selector may be left empty. Select By - Nodes
- Select nodes from the model that you wish to create handles from.
- Location and System
- Specify the X, Y, and Z coordinates for the desired handle, as well as the coordinate system in which it lies.
Handle Size Specify the handle size. - Click Create.
Load Handles
Load shapes, global handles, or both from a file.
Only global handles and shapes are stored in the file.
When you read in a shape, it searches for the handles it perturbs by name. So if you have global handles with the same names in different models, you can transfer your shapes between them by saving your shapes in one model to a file and then reading that file into another model. For this option, you should only read in the shapes and not the handles when loading the file.
- From the Morph ribbon, click the arrow next to the Morph tool set name and select Handles.
- In the Morph: Handles dialog, select Load for Action.
-
For File, click
 and browse and select the desired
file.
and browse and select the desired
file.
-
Define parameters.
Parameter Action Overwrite Select the Overwrite check box to overwrite the entities in the model with the ones in the file. Clear the Overwrite check box to retain the current state of the model entities.
Note: Overwriting deletes all of the shapes and global handles in the model, not just those that may conflict.Load Handles Select the Load Handles check box to read in handles from the file. Only selected items will be read in from the file; cleared items are ignored. Load Shapes Select the Load Shapes check box to read in shapes from the file. Only selected items will be read in from the file; cleared items are ignored. - Click Load.
Save Handles
Save global handles and shapes to a file.
All of the shapes and global handles are saved to a file. However, only global handles and global handle perturbations for the shapes are saved; local handles and local handle perturbations are not written to the file. If a shape contains both local and global perturbations, only the global ones are written to the file, and constraints that are applied to nodes will not be saved. Only shapes that have been saved as handle perturbations are written to the file.
- From the Morph ribbon, click the arrow next to the Morph tool set name and select Handles.
- In the Morph: Handles dialog, select Save for Action.
-
For File, click . and browse and select the desired
file.
- Navigate to the desired save location and enter the desired file name.
- Click Save.
Update Handles
Update the position or dependencies of handles.
If more than one handle is selected, you can only update the handle dependencies.
- From the Morph ribbon, click the arrow next to the Morph tool set name and select Handles.
- In the Morph: Handles dialog, select Update for Action.
-
Define parameters.
Parameter Action Properties Choose whether to update dependencies or dependencies and location. Select Choose whether to update one handle or multiple handles. Dependent On Select the handle(s) upon which you want to make the selected handle(s) dependent. This selector may be left empty. Location Specify the X, Y, and Z coordinates for the handle. System Specify the coordinate system where the handle is. - Optional: Click Review Dependencies to display the selected handles' dependencies by plotting vectors on the screen pointing from the selected handles to the handles upon which they are dependent.
- Optional: Click Review Symmetry Links to display the selected handle's associated symmetries by plotting vectors between handles which are linked via symmetry.
- Click Update.