Since version 2026, Flux 3D and Flux PEEC are no longer available.
Please use SimLab to create a new 3D project or to import an existing Flux 3D project.
Please use SimLab to create a new PEEC project (not possible to import an existing Flux PEEC project).
/!\ Documentation updates are in progress – some mentions of 3D may still appear.
Import of a curve starting from a formatted file
Introduction
The user can import a curve starting from a formatted file via the command Import 2D curve – formatted file or Import 3D curve – formatted file.
Command access
The dialogue box associated to the command:
- Import 2D curve – formatted file is generic to 3 types of 2D curve and is accessible in the menu Curve by pointing on one of the types-entities 2D curve (path, I/O parameter, material).
- Import 3D curve – formatted file is generic to 3 types of 3D curve and is accessible in the menu Curve by pointing on one of the types-entities 3D curve (2D grid, path + I/O parameter, 2 I/O parameters).
Principle
Here are some rules of operation necessary to understand the use of this command:
- The user chooses a formatted file *.txt (see section below).
- The user chooses the curve name .
- The user chooses the curve type so that the imported curve should be automatically stored in the corresponding type of the 2D Curve entity (path, I/O parameter and material) or the corresponding type of the 3D Curve entity (2D grid, path + I/O parameter, 2 I/O parameters).
- The user specifies the column separator used in the formatted file*.txt if this is different from « tab » , « space » , « ; ».
Formatted txt file
Here is the format to use in the file so that the importing of a curve starting from a formatted file should be possible:
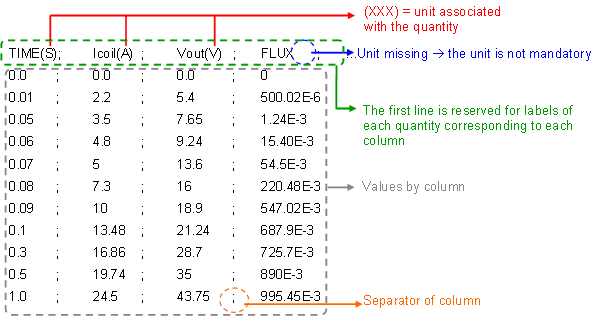
There will be N-1 imported curves for a file containing N columns (the first column being reserved to the parameter in abscissa).
Import a formatted curve
To import a 2D curve or a 3D curve starting from a formatted file:
| Etape | Action |
|---|---|
| 1 | Open the dialogue box Import 2D – formatted file or Import 3D curve – formatted file |
| 2 | Choose the file to import (formatted file*.txt ) |
| 3 | Choose the curve name |
| 4 |
Choose the curve type :
|
| 5 | Choose the used column separator (if it is different from « tab », « space », « ; » ; else directly go to step 6) |
| 6 | Validate by clicking on OK |
| → | The curve is created, displayed and stored in the required type of curve. |