Since version 2026, Flux 3D and Flux PEEC are no longer available.
Please use SimLab to create a new 3D project or to import an existing Flux 3D project.
Please use SimLab to create a new PEEC project (not possible to import an existing Flux PEEC project).
/!\ Documentation updates are in progress – some mentions of 3D may still appear.
Superimposition of 2D curves in Flux
Introduction
The user can superimpose the existing curves of the same type (path or I/O parameter or material) in the Flux project over a new created curve.
The user will be able to easily analyze the results by comparing the curves directly in the Flux environment.
This new curve is created as an entity in one of the entity types of the 2D curves (path or I/O parameter or material).
"One can define a "Superimposition" command by type:
- Superimpose2D curves (path)
- Superimpose2D curves (I/O parameter)
- Superimpose2D curves (material)
Command access
The commands are accessible, respectively:
- In the Curve menu by pointing on one of the entity types 2D curves (path, I/O parameter, material) .
Restrictions
Here are some restrictions:
- This command " superimposition of curves" is only available for 2D curves (impossible with 3D curves).
- As with all curves in the Flux, once the curve has been created, it is no longer possible to modify it (except for the name and the comment).
- Only the superimposition of 2D curve of same type is possible.
Creation context
In order to identify the superimposed curves, the necessary information is added into the tab creation context accessible once the 2D curve has been displayed or by editing the created 2D curve.
Interpolation type
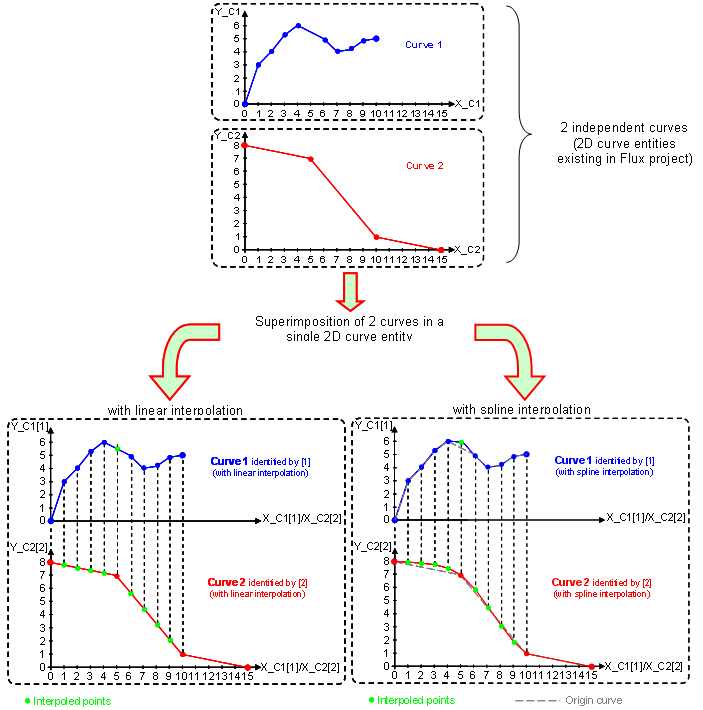
The superimposed curves may not have the same quantity on the abscissa, and they may not have the same sampling rate.
But in Flux a 2D curve entity can have several curves but all of them having the same abscissa (same quantityand same sampling).
To ensure this, when superposing the curves, an interpolation is carried out with the goal to having the same computed step for each curve by respecting the original interval of each of curves.
Principle
The figure below illustrates the operation of the interpolation during the superimposition of curves.
Identifier
The new abscissa becomes common to all superimposed curves and its name replaces the name of each of the original curves abscissas to not lose information.
The identifier 1, 2 … is associated to the label on the abscissas and ordinates axis to permit the user to identify the origin of each curves.
The identifier 1 corresponds to the first curve selected during the choice of curves to be superimposed.
Superimpose curves
To superimpose curves existing in the project:
| Step | Action |
|---|---|
| 1 |
Open the dialog box Superimpose 2D curves (path or I/O parameter or material) (see block: command acces) |
| 2 |
Choose the name of the curve to be created (by default one name is proposed : SuperimpositionCurve) |
| 3 | Choose the interpolation type |
| 4 | Choose among the proposed list, the curves to be superposed |
| 5 | Validate by clicking on OK |
| → | The curve has been created, displayed and stored in the required type of 2D curve. |