PhysicsAI-T: 3040 SER Training on Vector Results
Tutorial Level: Advanced
In this tutorial, you will use the Shape Encoding Regressor (SER) architecture to predict Vector Results
The SER architecture operates on shape encodings of input samples and can only predict KPI/vectors (no contour or field results).
In this tutorial, you will:
- Create and curate a dataset to remove outliers.
- Train a PhysicsAI model to predict Vectors using the SER architecture.
Before you begin, copy the file(s) used in this tutorial to your working directory.
Unzip the project Aircraft_SER and inspect the contents.
-
aircraft.fem files
- aircraft.json files containing the RCS Results(Vector)
Step 1 . Create and Curate a Dataset
- Open SimLab.
- From the menu bar, click File > Extension > PhysicsAI to open the PhysicsAI ribbon.
-
Create a project.
- From the PhysicsAI ribbon, select the Create
Project tool.

The Create Project dialog opens.
-
For Project Name, enter SER_Tutorial.
- For Location, click Choose and select a save location for
the project.Note:
The save location for the project contains all files created by PhysicsAI, but the original files used for training do not need to reside in the project folder.
- Click OK.
- From the PhysicsAI ribbon, select the Create
Project tool.
- Create a database called Aircraft using all the .fem files.
- From the PhysicsAI ribbon, select the Create
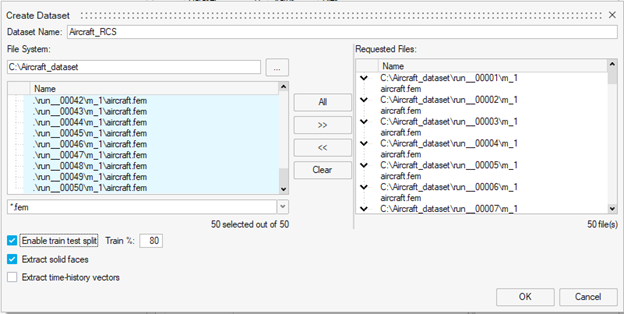
Dataset tool.

The Create Dataset dialog opens.
- For Dataset Name, enter Aircraft.
-
For File System, click
 and navigate to the
Aircraft_SER folder.
and navigate to the
Aircraft_SER folder. - Select and transfer all of the .fem files.
- Select the Enable train test split check box and verify
the Train % is set to 80.Note:
Enabling the 80:20 split will generate two datasets: Aircraft_train with 40 files and Aircraft_test with 10 files.
- Verify the Extract solid faces check box is selected.Note:
Extract solid faces is required for the SER architecture.
-
Click OK.
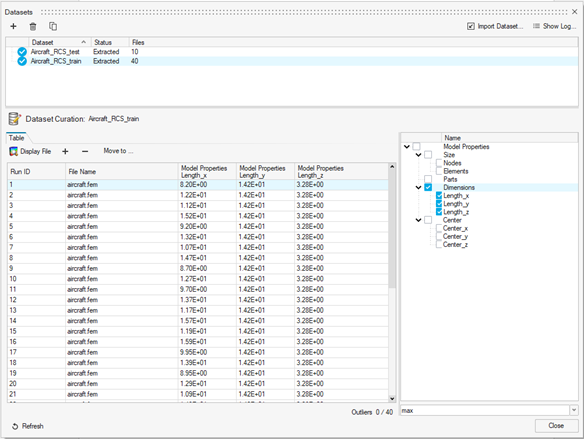
The dataset is extracted and the Datasets dialog opens.
- From the PhysicsAI ribbon, select the Create
Dataset tool.
- Visualize Dataset Results
- Select data from the Train or Test dataset
- Click "Display file"
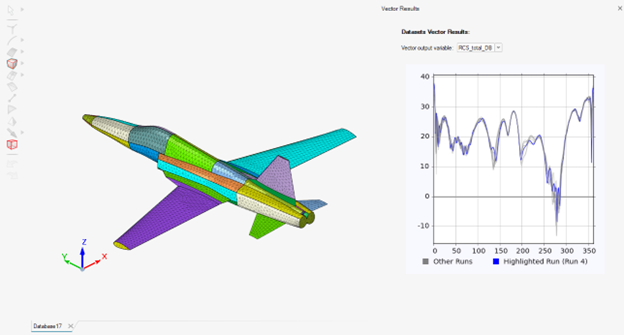
- The .FEM model and Vector results will load in the modeling
window for the selected run ID
Step 2. Train Model Using SER Architecture
In this step, you will train a PhysicsAI model using the SER architecture.
- Create a new model called RCS_aircraft_SER.
- From the PhysicsAI ribbon, select the Train an ML
Model tool.

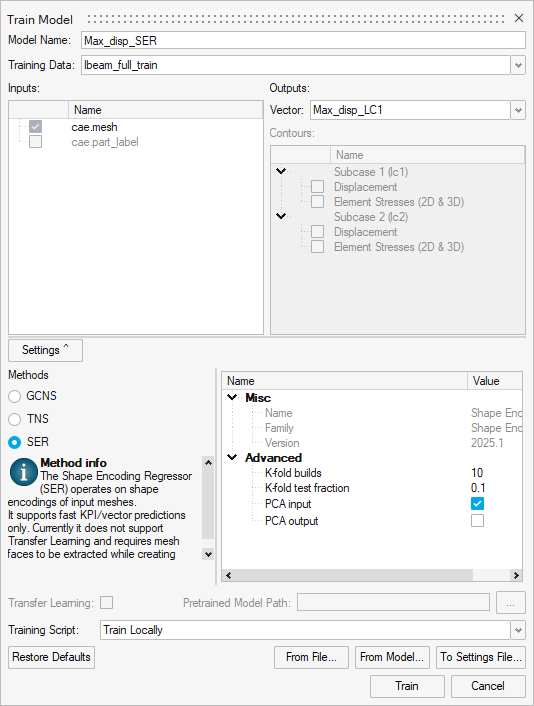
The Train Model dialog opens.
- For Model Name, enter RCS_aircraft_SER.
- For Training Data, verify Aircraft_RCS_Train is selected.
- For Vector, select RCS_total_DB.Note:
Since all the .fem files used in the Ibeam_full_train database have a corresponding .json file, the KPIs from these files are displayed in the Vector Outputs drop-down menu.
- For method, select SER.
- Verify K-folds is set to 10.Note:
This controls the number of random splits for the training and validation sets. This number should be sufficiently large to allow for a well performing model, but not too large to avoid overfitting. The larger the number of K-fold build, the longer the training time.
- Verify K-fold test fraction is set to 0.1.Note:
This is equivalent to the validation fraction and control the percentage of data to be used for validation per K-fold build.
- Verify the PCA input check box is selected to calculate
the principal component of the encodings.Note:
Calculating the principal component of the encodings helps to fasten convergence. The PCA output can be enabled in case of vector (longer than 1) outputs.
- Click Train.
- From the PhysicsAI ribbon, select the Train an ML
Model tool.
- Test the model.Note:
SER is much faster than GCNS and TNS. Only the training loss is available for SER and there is no loss curve.
-
From the PhysicsAI ribbon, select the Test ML Model tool.

The Test Model dialog opens.
- For Models, select RCS_aircraft_SER.
- For Datasets, select Aircraft_RCS_test.
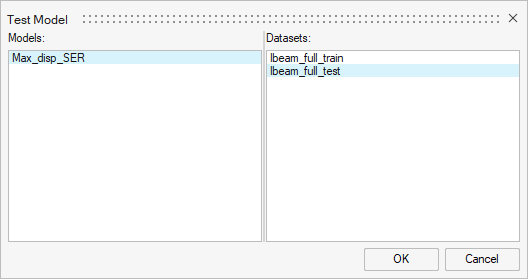
- Click OK.
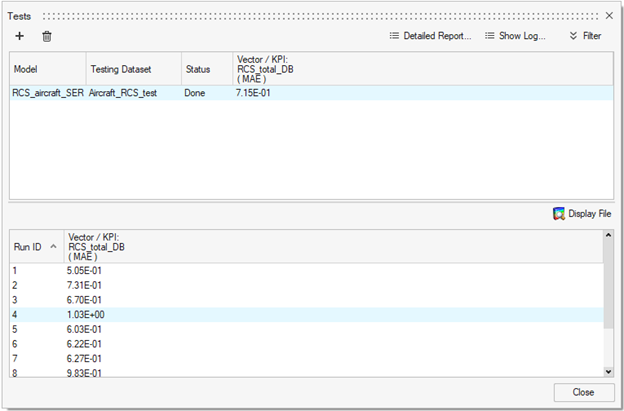
The Model Testing dialog opens.
-
- Select a single data point and click Display File.
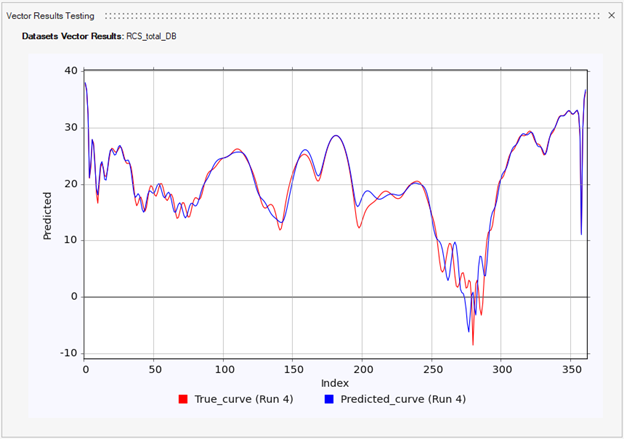
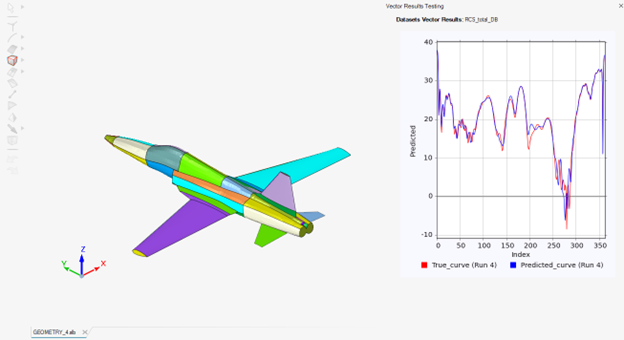
- The mesh model loads in the modeling window (no contour results available)
- The plot window shows True vs. Prediction comparison for the vector result
- This helps you identify which geometry the results correspond to.
Model Performance Comparison
The table below compares three models trained on the same dataset with default Hyperparameter:
| Model | Full Name | Training Time | Test MAE |
|---|---|---|---|
| GCN | Graph Convolutional Network | ~40 minutes | 0.733 |
| SER | Shape Encoding Regressor | ~4 minutes | 0.715 |
| TNS | Transformer Neural Simulator | 1 hour 35 minutes | 0.620 |
Performance results may vary depending on the dataset characteristics and complexity. In general, SER demonstrates the fastest training time across different datasets.