PhysicsAI-T: 3010 Custom Inputs with a Nodal Hook
Tutorial Level: Advanced
In this tutorial, you will use custom nodal input variables (such as varying nodal and elemental forces, boundary loads, and so on) for training.
In Simlab version 2025 and later:
- The nodal coordinates and part IDs are automatically from the .h3d (or equivalent result) files provided. The coordinates are default inputs to the PhysicsAI model. The part IDs can be enabled by selecting the box next to it.
-
A nodal property defined on select nodes such as applied forces and constraints can be input through a .csv file with the same name and in the same location as each of the .h3d files. The nodal_hook.py python script is needed to read the .csv files.
The detailed instructions for each of these cases are provided in this tutorial.
Before you begin, copy the file(s) used in this tutorial to your working directory.
Unzip the project custom_inputs.zip and inspect the contents. The nodal_hook folder contains the nodal_hook.py, .h3d, and .csv files for Use Nodal Hook.
Default Inputs Imported from h3d
If only .h3d files are provided, the nodal coordinates and part ID are imported by default. Only the nodal coordinates are enabled by default.
Default
Step1. Use Nodal Hook
For properties which are applied on selected nodes (such as forces or constraints) or to all nodes with varying values (such as distributed loads) within a model, the nodal hook should be used.
- Open the nodal_hook folder.
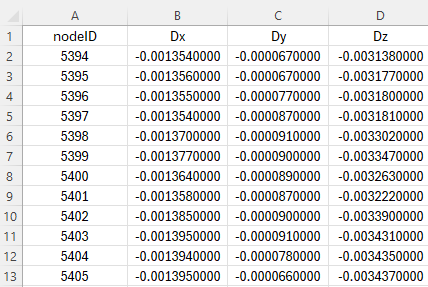
Inside the training_files folder, there are 25 .h3d files named run__00X.h3d and 25 .csv files named run__00X.csv files. Each .csv file contains a list of nodes and the values of the Three custom inputs (Interface Displacement in X, Y, Z directions) along with a header row.
Nodal Property Inputs
- Create a new project called nodal_inputs.
-
From the PhysicsAI ribbon, select the Create Project tool.

- In the Create Project dialog, enter nodal_inputs for Project Name.
- For Location, click Choose and select a save location for
the project.Note:
The save location for the project contains all files created by PhysicsAI, but the original files used for training do not need to reside in the project folder.
- Click OK.
-
- Copy the nodal_inputs_hook.py file into the _hooks folder inside the project folder.
-
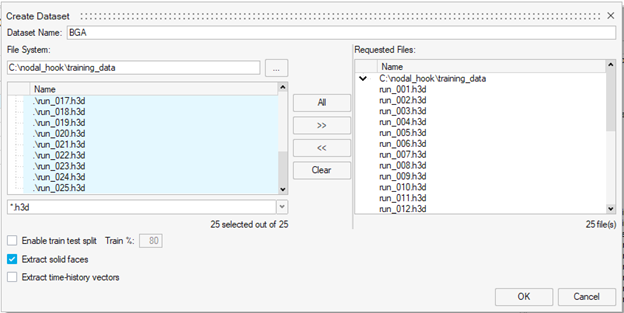
Create a new dataset using all the samples and name it BGA.
- From the PhysicsAI ribbon, select the Create Dataset
tool.

The Create Dataset dialog opens.
- For Dataset Name, enter BGA.
- For File System, click
 and navigate to the training_files
folder.
and navigate to the training_files
folder. - Select and transfer all of the .h3d files.
-
Select the Enable train test split check box and verify 80 is defined for Train %
- Click OK
The dataset is extracted and the Datasets dialog opens.
Visualizing Dataset Results: Follow these steps to visualize data from your dataset:
- Select data from the Train or Test dataset
- Click "Display file" to load the visualization
If custom inputs were defined during dataset extraction, these values are automatically stored as tables in the Material and Property Browser purely for visualization.

To display custom input values as contours:
- Select the body in the modeling window
- In the Material and Property Browser, select your custom input variable under the Tables
-
Right-click on the custom input variable
-
Select "Plot Contour"
The custom input values will now display as contours on the model.
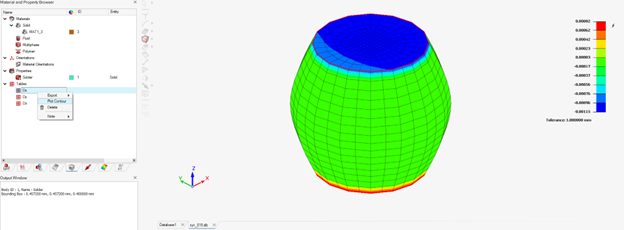
In the above figure shown, "DX", “DY”,”DZ” is a nodal input variable where each node in the model have different value. For the selected dataset, the DX variable is displayed as contour visualization.
- From the PhysicsAI ribbon, select the Create Dataset
tool.
- Train the model.
- From the PhysicsAI ribbon, select the Train an ML
Model tool.

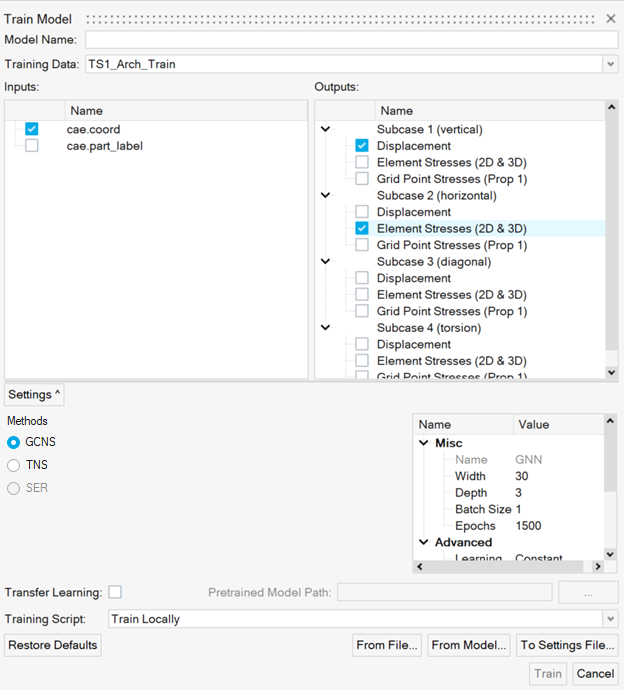
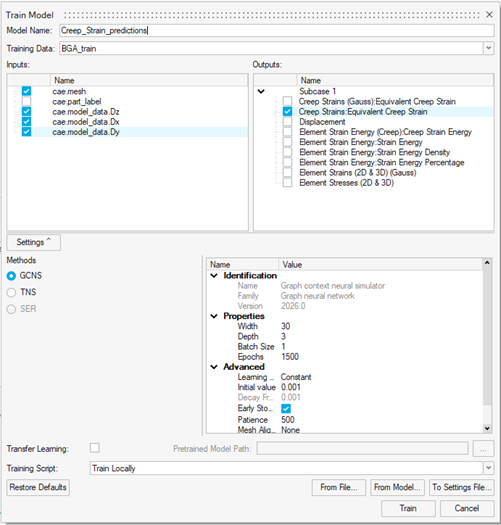
The Train Model dialog opens.
-
For Model Name, enter Creep_Strain_predictions.
-
For Training Data, verify BGA_train is selected.
- For Inputs, select cae.coord, cae.model_data.DX, cae.model_data.DY and cae.model_data.DZ
- For Outputs, select Creep Strain
- Click Train.
Train Property Inputs
The Model Training dialog opens.
Tip:Once the status changes to Running, you can click Show Log view the training logs.
- From the PhysicsAI ribbon, select the Train an ML
Model tool.
-
Test the model.
Ensure that the associated .csv files are also present while creating the test dataset.
-
Once the testing is complete, set the model to active.
Important:Setting a model as active will checkout a stacking license until the model is deactivated.
-
From the PhysicsAI ribbon, select the Manage ML Models tool.

The Model Training dialog opens.
- Click Set Active Model.
-
The prediction feature is available through both the Simlab GUI and batch mode (see Use Batch Mode ). The solver deck to be used for prediction should have an associated .csv file named _predict_inp.csv which should be saved in the _hooks folder.
Note that only the nodes with one or more features defined on them are required in the .csv file. However, it is necessary that each node in the .csv file should have a value for all the input features. For example, if the node does not have any value defined and hence a value of 0 is used as a placeholder in columns DX, DY and DZ. In other words, the rectangular/tabular structure of the input data should be maintained.