PhysicsAI-T: 3020 Hook for Global Input and Output Vectors
Tutorial Level: Advanced
In this tutorial, you will use hook variables for global input and output vectors.
The global hook includes vector inputs and uses a single .json file for both inputs and outputs.
Before you begin, copy the file(s) used in this tutorial to your working directory.
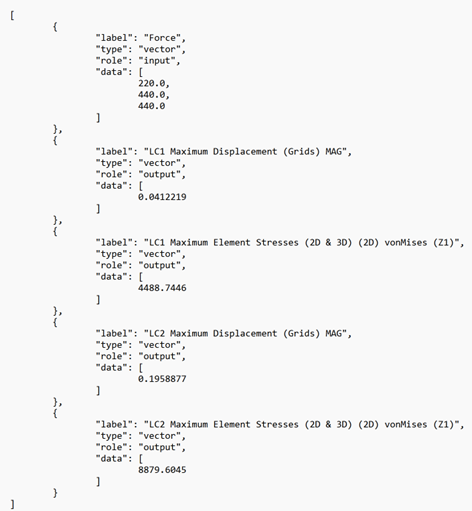
There are a total of 50 data samples. Each sample is composed of three files with matching names, each containing different information; the .h3d files containing the coordinates, part labels, and field results, and the .fem files, and the .json file containing the global vector inputs and outputs. An example .json file is shown in Figure 1. Note an additional attribute role, which distinguishes between input and output vectors. Also, each data needs to have a type attribute set to vector.
Example JSON File
Step 1. Create Project
- Open SimLab.
- From the menu bar, click File > Extension > PhysicsAI to open the PhysicsAI ribbon.
-
From the PhysicsAI ribbon, select the Create Project tool.

The Create Project dialog opens.
- For Project Name, enter Vector_global_inputs.
-
For Location, click Choose and select a save location for the project.
Note:The save location for the project contains all files created by PhysicsAI, but the original files used for training do not need to reside in the project folder.
-
Click OK.
- In the File Explorer, copy the global_vector_inputs_hook.py script that is created in the project location.
Step 2. Create and Curate Datasets
- From the PhysicsAI ribbon, select the Create Dataset
tool.

The Create Dataset dialog opens.
-
For Dataset Name, enter Ibeam_dataset.
- For File System, click
 and navigate to the Dataset folder.
 -
Select and transfer all of the .h3d files.
-
Select the Enable train test split checkbox and verify Train% is set to 80.
- Select the Extract solid faces checkbox for surface
extraction.
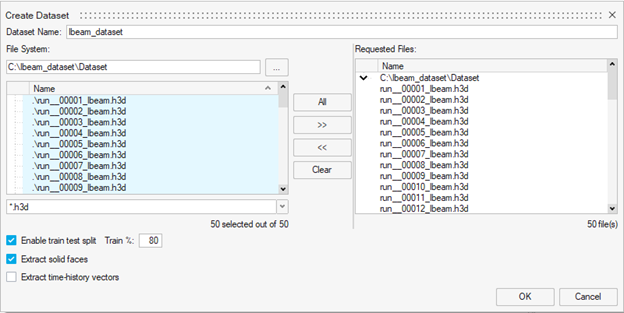
- Click OK.
The dataset is extracted and the Datasets dialog opens.
- Review the created train and test datasets to ensure there are no
outliers.
- Click Close.
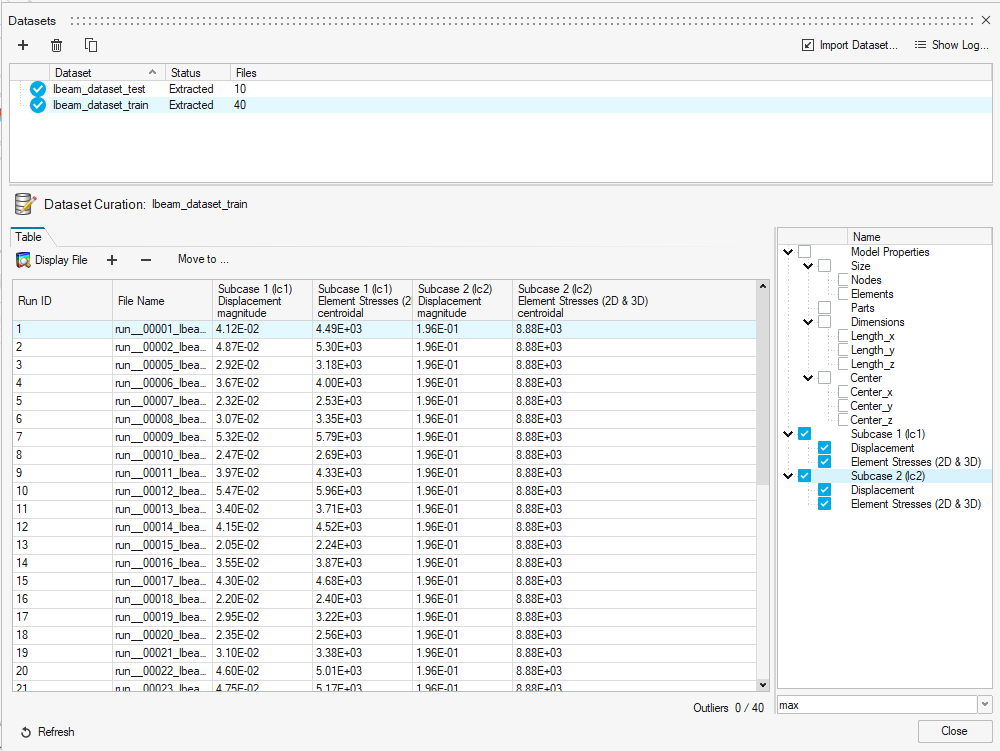
Visualizing Dataset Results
Since this dataset contains both global custom inputs and custom outputs, using the Display File option to inspect data from either the training or testing dataset will:
- Load the corresponding .h3d file.
- Display the extracted custom output as a plot on the right side.
-
Show all custom inputs in tabular form, allowing them to be visualized as contour plots.
Step 3. Train a Model
- From the PhysicsAI ribbon, select the Train an ML Model
tool.

The Train Model dialog opens.
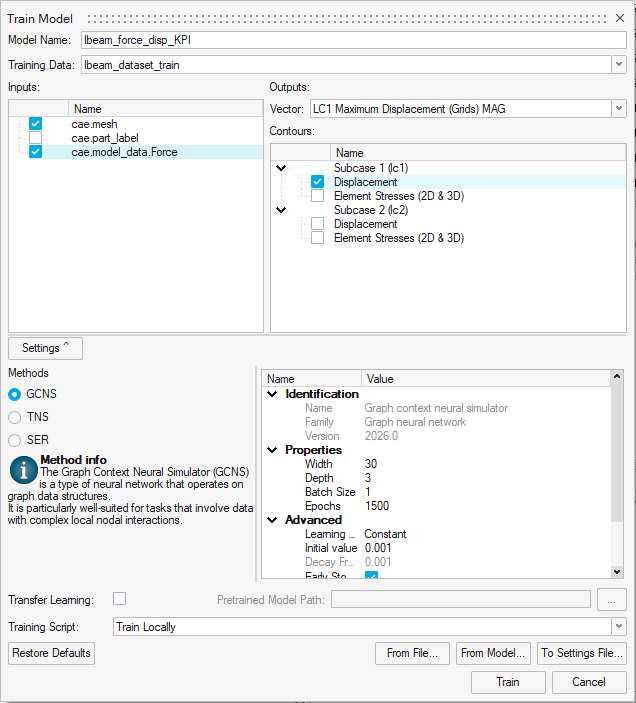
Note:In the inputs section of the Train Model dialog, the mesh and part label are imported from the .h3d file, and the model_data.Force is the global vector input read by the hook. In the outputs section of the Train Model dialog, the contours are extracted from the .h3d file while the vectors are extracted from the .json file. While only the KPIs/vectors with the role attribute as input are displayed in the inputs section, all the vectors regardless of the role attribute are displayed in the output vector drop down.
-
Define the following details and click Train.
- For Model Name, enter Ibeam_force_disp_KPI.
- For Training Data, select Ibeam_dataset_train.
- For Inputs, select cae.mesh, cae.shell_thickness, and cae.model_data.Force.
- For Vector, select LC1 Maximum Displacement (Grids) MAG.
- For Contours, select Displacement.
- For Width, enter 60.
- For Depth, enter 6.
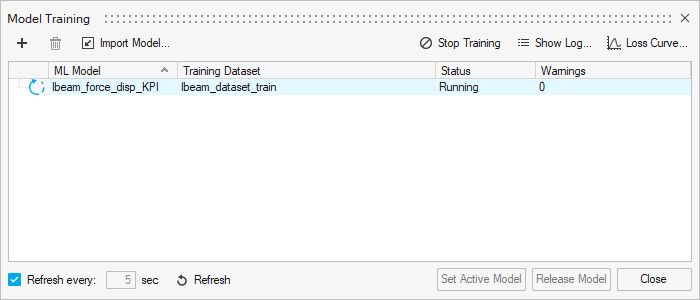
The Model Training dialog opens.
 Tip:
Tip:Once the status changes to Running, you can click Show Log view the training logs.
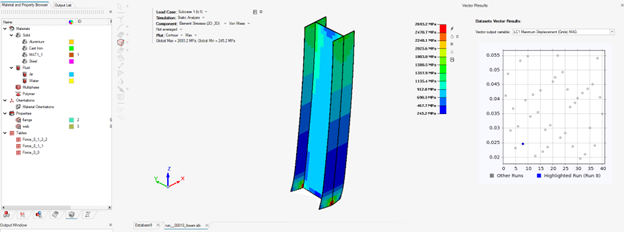
Step 4. Test Model
- From the PhysicsAI ribbon, select the Test ML Model
tool.

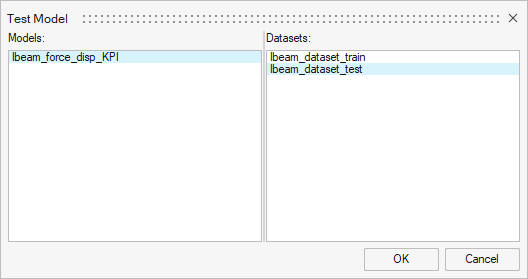
The Test Model dialog opens.
- In the Models area, select Ibeam_force_disp_KPI.
- In the Datasets area, select Ibeam_dataset_test and click
OK.
The Model Testing dialog opens.
-
In the Model Testing dialog, select a Run ID and click Display File to view the results in the modeling window.
- Close the Model Testing dialog.