Since version 2026, Flux 3D and Flux PEEC are no longer available.
Please use SimLab to create a new 3D project or to import an existing Flux 3D project.
Please use SimLab to create a new PEEC project (not possible to import an existing Flux PEEC project).
/!\ Documentation updates are in progress – some mentions of 3D may still appear.
Assign mesh points to points
Assign a mesh point
To assign a mesh point to points:
| Step | Action | |
|---|---|---|
| 1 | Activate the Assign mesh point command (see next block) | |
| → | An assignment box is open. | |
| 2 |
Fill out the assignment box:
|
|
| → | The mesh point is assigned to the points. | |
| → | An assignment box is open. | |
| 3 |
Go on assignment:
|
Quit the assignment sequence:
|
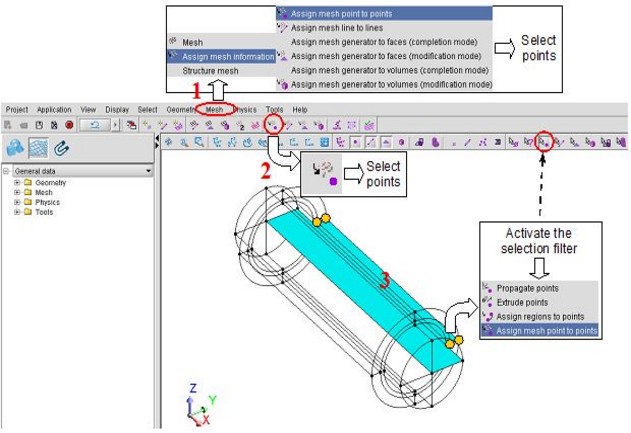
Activate the command
To activate the Assign mesh point command, which requires data selection , choose one of the methods presented in the figure below:
Some advice
Some advice to facilitate the adjustment of the mesh is presented below.
- The number of points of a geometric model can be large, and selecting each point in turn could easily become burdensome. Thus, it makes sense to clearly distinguish areas to be meshed with elements of the same size and then to select the points of these areas by criterion (Selection of points by means of a face, a volume, a region, etc.).
- To facilitate the mesh adjustment, it is also recommended to start by assigning one mesh point, usually the largest value, to all the points before starting the distribution of mesh points. In this way, one can avoid having points with no mesh information (otherwise, the mesh value assigned to such points is arbitrarily chosen by Flux).
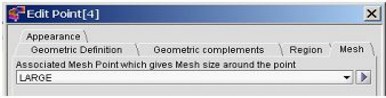
Updating
After a mesh point is assigned to the point, the Mesh tab of the point dialog box is updated.
This is presented in the example below (the LARGE mesh point is assigned to the point n°4).