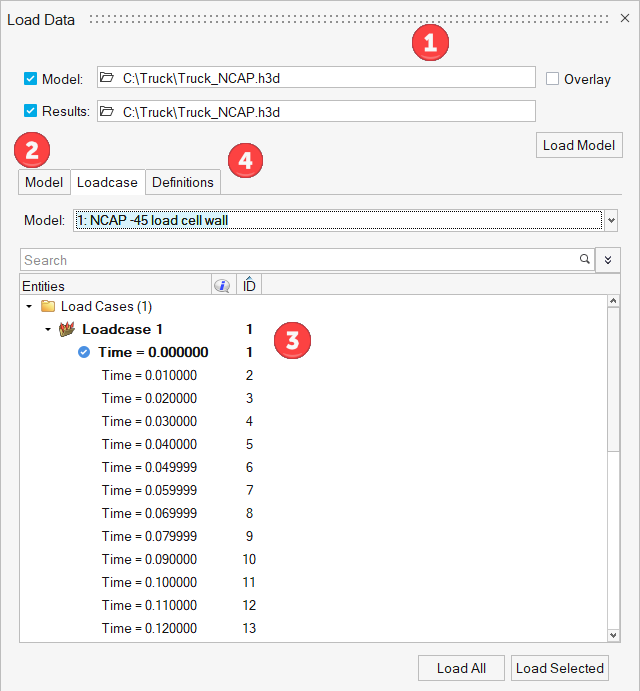
The Load Data dialog is the primary graphical user interface
through which model and results data can be loaded. It consists of four sections, each of
which corresponds with the process order of using the tool (see the figures below).Figure 1. Load Data
Load Model and Results: Choose the model and result file to load into the HyperView window.
Viewing Model Info: Shows key model statistics (for information purposes only).
Loading Steps: Choose the steps to load for viewing animation/deformation.
Loading Results: Select the results to load to be viewed in the form of
contour/vector/tensor/iso plots.
Load Model and Results
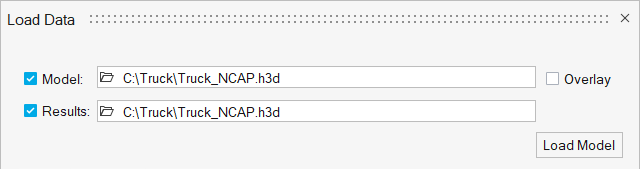
The Load Model and Results section allows you to load model and result files.
Activate the Model and Results check boxes, browse to the desired files, and click the Load
Model button to load model and result files. The progress of the model loading
can be seen in the message prompt.Figure 2.
By default, model and results are loaded from the same file. However, you can load model
and results from different files (for example, an LS-DYNA.key input deck as model with H3D as results), or load only a model or
only results by using the Model and Results check boxes. If you load a result file other
than the one initially selected, it will load new results that will replace the existing
results on the same model file.
Note: Loading an input deck as Model (for example,
*.rad or *.key file), not all of the
information is read from the file. See the Coverage section for more details.
Overlaying Multiple Models
You can load one or more models and their associated results into one window by
activating the Overlay check box. The last model you load automatically becomes the
current model. To make a previous model the current one, you must manually set it as
your current model. From the Results Browser, right-click on the
name of the model file that you would like to set as the current model and select
Make Current from the context menu.
When models are
overlaid, the Loadcase tab has a drop-down menu to switch between the models so that
you can choose steps from a model to load. In the case of result definitions, the
create definitions dialog will display data from all models, allowing you to create
a single definition for data that is available in both models rather than creating
one per model. At the time of loading a definition, HyperView will check if the requested data is available in all
models and if not, it will display a warning message.
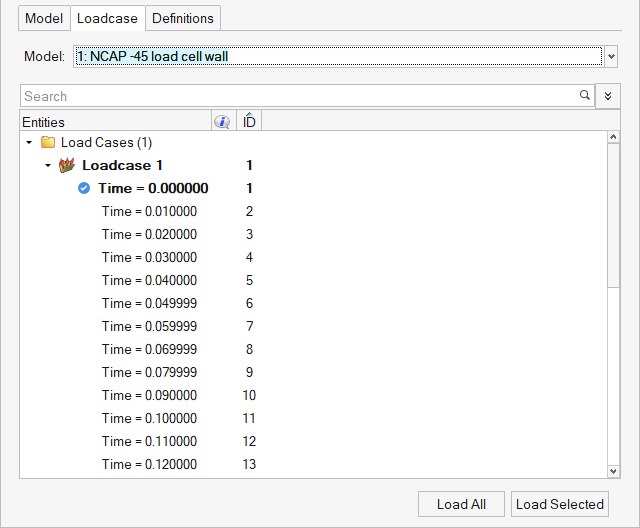
Loading Steps using the Loadcase Tab
The
Loadcase tab allows you to load the desired steps for viewing the animation.
Once the
model/results are loaded, the Loadcase tab automatically populates to show the available
steps in the file.
Figure 3.
You can choose to load all steps or load only selected animation steps of interest.
As the steps are loading, a blue check mark will appear next to the steps that are loaded.
The loaded steps are cached in memory and can be unloaded when no longer needed.
Tip: Memory monitoring is available to warn if usage reaches a certain threshold
allowing you to cancel any ongoing loading. See the Memory Monitoring section
for additional details.
Note: The steps are also shown in the Results Browser and in
the Current Subcase Dialog (bottom right corner of the application) and right-click
context menu options to load additional steps, unload steps, or make a step current are
available.
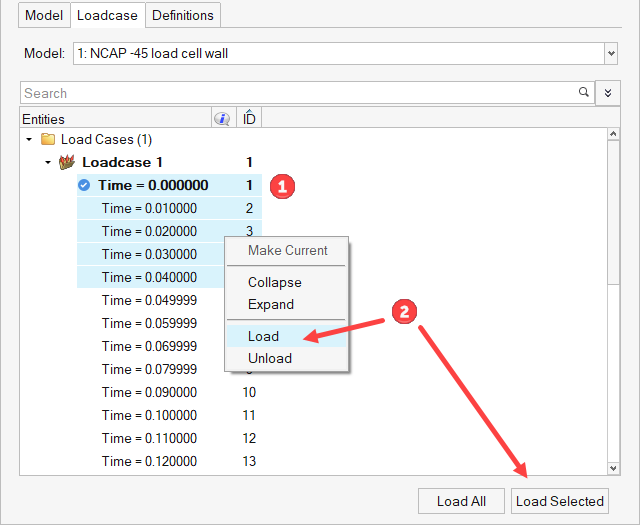
Load Animation Steps
Select the animation frames/steps that you want to load and click the Load
Selected button (or right-click and select Load from
the context menu).Figure 4.
Note: Multi-select is possible using Ctrl and Shift buttons.
Tip: Click the Load
All button to load all the animation steps.
The step entry in bold is
the current active step in the modeling window, however you can change it to another other
step by right-clicking and selecting Make Current from the context
menu.
Click on the Start/Pause Animation button on the
Animation toolbar to animate the loaded steps.
Attention: In the HyperView -
MultiCore profile, only the animation steps that have been loaded through the Load Data
Browser will be animated in the modeling window.
Loadcase Context Menu
Clicking the right mouse
button on a folder or entity/item within the Load Data browser’s tree structure brings up a
menu with a variety of useful options.
The visibility of browser context menu items is
dependent on the current selection. Only menu items belonging to the type of selected items
will appear. Options selected in an empty space apply to all items.
Option
Description
Create
Not used.
Edit
Not used.
Delete
Not used.
Rename
Not used.
Make Current
Makes a selected item current (when more than one is available).
Collapse
Collapses all items in the tree structure so that only the top-most level of
items displays.
Expand
Expands all items in the tree structure, exposing every item nested at every
level.
Model Info
Opens the Model Info dialog for
the current model.
The General tab provides information about the model and
results file, and the Statistics tab displays the model and results files in a
tree-like structure.
Load
Loads the selected animation steps.
Unload
Unloads the selected animation steps.
Loading Results using the Definitions Tab
Once model/results and the required animation steps have been loaded, click on the
Definitions tab. The Definitions tab allows you to choose the
results to load for contour/vector/tensor/iso plotting.
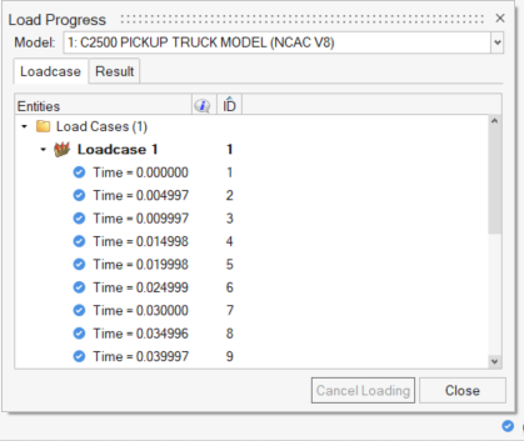
Monitoring Loading Progress and Canceling Loading
Loading progress can be monitored using the Results Browser or a
dedicated dialog that can be displayed by clicking on the corresponding icon in the lower
right corner of the status bar. Figure 5.
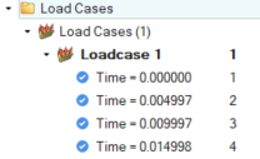
A blue check mark will appear next to a loadcase or step once it is fully loaded.Figure 6.
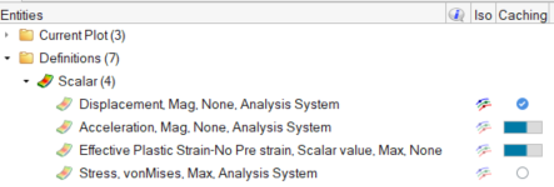
Similarly, a blue check mark will appear next to a result definition that is fully loaded,
and a progress bar will be shown for a definition that is loading or is partially loaded.
Figure 7.
Loading of data can be cancelled at any time by clicking on the red X button that will be
displayed at the bottom of the Load Data browser or by clicking Yes
on the Memory Usage Warning dialog. It can also be cancelled through the loading
notification pop-up located in the lower right corner of the status bar.Figure 8.
Note: All ongoing loading will be cancelled, it is not possible
to cancel the loading of selected steps or definitions.