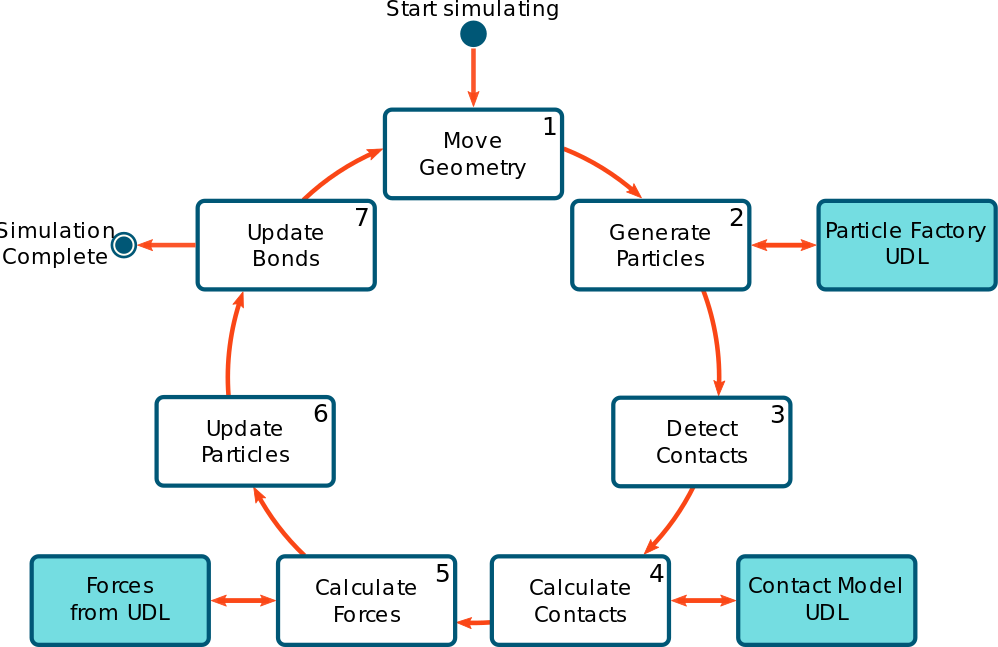
Define the EDEM Simulation Sequence
Depending on where the UDL lies in the chain, each stage connects to the relevant UDL (if applicable) before performing its main function (such as calculating contacts).
- Move the Geometries.
-
Generate new particles by calling each registered particle factory in turn
(some of which may be UDLs).
A Custom Factory typically uses the Material and Particle Prototype defined in EDEM Creator and can determine the position, scale, and properties (such as velocity and orientation) of the material in the EDEM simulation.
-
Detect the contacts.
Contacts are of Particle-Particle or Particle-Geometry type. A single particle can have multiple contacts at any Time Step.
-
Invoke the Contact Model chain for each contact.
Each Contact Model in the chain is executed in order from top to bottom, irrespective of whether it is a UDL or built-in model.Note: Two different contact model chains are available: one for Particle-to-Particle contacts and one for Particle-to-Geometry contacts. Your UDL can be loaded into one or both of these as required.
-
For any given model EDEM particle, ensure that the
material and Geometry data is passed to the Contact Model API, which includes
information such as the particle positions and velocities.
The following diagram represents UDL libraries when they are called during EDEM's simulation sequence:
- Depending on the API version used, calculated forces from other APIs or in-built models may be also provided to the custom model.
- In EDEM 2018.2 Contact Model API version 2.6.0, additional Contact Model chaining was implemented. The in-built Contact Models will receive the calculated force from the model above and provide this information to the contact model in the following chain.
- API models created with the Contact Model API version 2.5.0 or earlier will not receive forces from models in the chain above. However, they will provide forces for any Contact Models in the following chain.
- API models created with the Contact Model API version 2.6.0 or later will receive forces from models in the chain above and provide forces for any models in the following chain.
-
Apply the Particle Body Force chain to each particle in the system.
Particle Body Force models in the chain are executed in order, irrespective of whether it is a UDL or built-in model.
- Update the particles based on the forces applied on them in this Time Step.
- If there are more Time Steps, repeat from Step 1 or click Finish.