Export Motion Results
Export motion analysis results using the Export button on the Run Motion Analysis window.
You can also export plots and other data in CSV format by selecting a plot.
Export the Motion Model
Export the motion model with analysis settings as a MotionView (.mdl), MotionSolve py (.py), nanoFluidX position (.txt), Twin Activate Co-Sim (.py), or FMU block (.fmu) file.
-
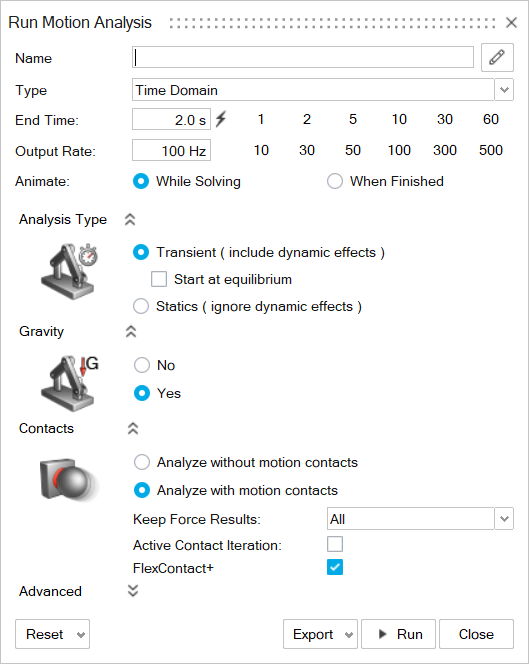
Hover over the Analyze tool and click the Run
Settings icon.

Tip: To find and open a tool, press Ctrl+F. For more information, see Find and Search for Tools. -
Change the settings in the Run Motion Analysis window as
desired.
-
Choose from the following export options:
To export to... Do this Note MotionView (.mdl) The export will include supplemental .x_t and .png files.
Tip: If a feature is suppressed, it will not be exported with the .mdl file.- Select , and then select a unit system.
- Select .
- Choose a directory, enter a file name, and then select Save.
To launch MotionView and open the Inspire Motion model, select . If multiple versions of MotionView are installed, by default the most recent version will be opened. To open an older version, create an environment variable pointing to the HyperWorks installation. For example: HWX_HW_PATH = C:\Program Files\Altair\2022\hwdesktop\hw
Note: If you are plotting part angular displacements after exporting to MotionView, note that MotionView outputs the angular results as Yaw, Pitch, and Roll by default.In MotionView, you can change this option to Euler Angles:- Open the Global Simulation Settings window.
- Under , select the Measure Rotation dropdown menu arrow, then choose Euler Angles.
MotionSolve (.py) - Select , and then select a unit system.
- Select .
- Choose a directory, enter a file name, and then select Save.
nanoFluidX - Select .
- A guide bar appears. The
Parts selector is
active.

Select one or more parts. - If a system is already defined in the model, the
Reference selector becomes
active. Designate the reference frame:
- To use as a custom reference frame, select a system.
- To use Ground (default), go to the next step.
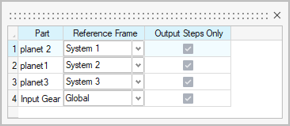
- Click Apply
 .
. - In the Run Motion Analysis
window, select .
A message appears showing the directory where the file is saved.
Why Export to nanoFluidX? nanoFluidX has some limitations with respect to applying rigid body motion to semi-complex systems. This is where the export capability from Inspire Motion can help by providing the output of all components, regardless of the way in which they are constrained. Some examples are a planetary gear system and a drive chain.
Define and Export Input/Output Signals
Define and export Input/output signals in Inspire to set up a Co-simulation with Twin Activate (.py) or exporting an FMU block (.fmu) file.
Inputs receive data from the Twin Activate controller, and outputs send data to the Twin Activate controller. The controller also sends inputs to the multibody model and receives outputs from the multibody model.
-
Hover over the Analyze Motion tool and click the
Motion Run Settings satellite icon.
 Tip: To find and open a tool, press Ctrl+F. For more information, see Find and Search for Tools.The Run Motion Analysis window appears.
 -
In the Run Motion Analysis window, select
Export, then Input/Output
Signals.
 The Signals Setup window appears.
-
Define Inputs.
To Do this Add input channels Select the Input tab, then click +. Note: Entity types are automatically added based on available entities in the model.Edit the Entity Type Select the Entity Type dropdown menu, then choose from the list of available entity types. Supported entity types include: - motors
- actuators
- spring-dampers
Note: The model design determines the availability of entities.Change the Entity Name Select the Entity Name dropdown menu, then choose from the list of available entities. -
Define Outputs.
To Do this Add output channels Select the Output tab, then click +. Note: Entity types are automatically added based on available entities in the model.Edit the Entity Type Select the Entity Type dropdown menu, then choose from the list of available entity types. Supported entity types include: - joints
- contact forces
- linear or angular measures
- proximity measures
- systems
- spring-dampers
Note: The model design determines the availability of entities.Change the Entity Name Select the Entity Name dropdown menu, then choose from the list of entities. Change an Entity Type's Component Type Select the Component Type dropdown menu, then select a new component. -
Select an Export option.
To Do this Export the signals as a (.fmu) file to use as an FMU block in Twin Activate Select FMU Block, then Export. Save the FMU package file (.fmu). Note: A Parasolid file (x_t) that contains the model graphics will also be written.Export the signals as a (.py) file to use in Twin Activate Select Twin Activate Co-Sim, then Export. Export the signals as an (.h3d) file to use in HyperView or HyperView Player
- Select Twin Activate Co-Sim.
- Turn on Include Animation File, then select Export.
- After the Twin Activate Co-Simulation is complete, the animation of the co-simulation results can be reviewed in HyperView or HyperView Player.
Export Plots, Images, Loads, and Locations
Export results data such as plots, images, loads and locations in various formats.
-
Select an object to plot in the modeling window or Model Browser.
The chart will appear.
- Right-click on the chart to see a list of what can be exported. (The list of options will change based on the type of entity selected.)
-
Select what type of data to export.
- Select to export results to .csv format.
- Select to export only the output steps to .csv format (when there are motion contacts in the model).
- Select to export the plot page as a .png.
- Select to export the plot chart as a .png.
- Select to export loads to .csv format. Available for parts only.
- Select to export locations of part connections to .csv format. Available for parts only.
- Right-click to exit the review mode.
- If you make a change to the model that requires running a reanalysis, the check icon disappears, and you will not be able to export plot data until you run another motion analysis.
- Plot settings on the Run Motion Analysis window must be set to All and
Global in order to export loads on parts. Otherwise the Export Loads option
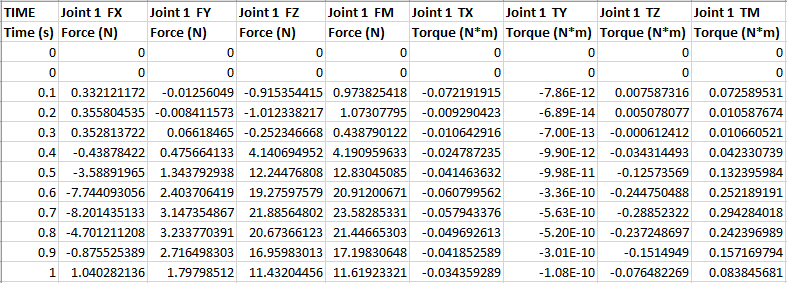
is disabled in the plot context menu for the chart. Below is an example of a sample .csv file.