Set Options
EDEM allows you to set options for additional components, Creator, Analyst, Display, Simulator Engine, and so on.
-
In the Menu Bar, select .
- Specify the following details:
Set Additional Components
EDEM allows you to set options for additional components.
-
In the Options dialog box, select the Additional
Components tab and specify the following:
For Specify Coupling Options Select the RecurDyn Coupling checkbox to view the Import Geometry from RecurDyn option after you right-click Geometries in the Creator Tree. This allows you to read a *.wallfile generated by RecurDyn after which you can import a Geometry from RecurDyn.Once the Geometry is imported and the coupling interface is enabled, RecurDyn can control the Geometry motion. The forces experienced by these Geometries are passed back to RecurDyn, which then calculates any motions resulting from these forces.
Select the Enable FlexTire checkbox to display the FlexTire options in the Geometry section. This functionality requires an additional license as it is a product developed by one of Altair's partners. For more information, contact your Altair Sales representative.
Experimental Options Select the Contact Models checkbox to show the experimental models in the Physics section. These models have been built into the software, but are not considered to be widely suitable for industrial applications. It is recommended to exercise caution when using these models.
Suppress Warning Messages Select the Suppress Deprecated Contact Model Warning Messages checkbox to hide warning messages about deprecated contact models. This reduces the number of times you will see a warning message if you are using these deprecated contact models for simulations. However, you will not see any future warnings about them being removed or other models which are marked as deprecated. - Click OK.
Set Analyst Options
EDEM allows you to set options for Analyst.
-
In the Options dialog box, select the Analyst Options
tab and specify the following:
Timestep on File Load Select the Load Last option to load models into EDEM Analyst with the last Time Step appearing first. Select the Load First option to load models into EDEM Analyst with the first Time Step appearing first. Display Select the Auto Update Display checkbox to automatically toggle between updating the display when changing display properties. Select the Axis Key checkbox to turn the display of the Axis key in the Viewer on or off. Select the Domain Box checkbox to turn the display of the boundary box (marking the domain edges) in the Viewer on or off. Select the Timestamp checkbox to turn the display of the time stamp in the Viewer on or off. Data Export Defaults Select the default format from the Notation dropdown list when exporting data using the data export tool. Options are Smart, Fixed-Point, and Scientific. Select the corresponding default precision from the Precision dropdown list when exporting data using the data export tool. Defaults Click Defaults to revert to the default settings. - Click OK.
Set Creator Options
EDEM allows you to set options for Creator.
-
In the Options dialog box, select the Creator Options
tab and specify the following:
For Specify Timestep on Switch Select the Load Last checkbox to automatically load the last Time Step when you switch to the Creator automatically. Hide Options Select the Hide Electrostatics checkbox to hide the options specific to the Electrostatics model in EDEM Creator. Gravity Select the X, Y, and Z values to specify the acceleration due to gravity. Defaults Click Defaults to revert to the default settings. - Click OK.
Set Data Browser
The Data Browser is an .html page that displays detailed information
about your model. The information displayed is different in the Creator, Simulator, and
Analyst. Right-click the Data Browser and select Save to save the
information in an .html file.
-
In the Options dialog box, select the Data Browser tab
and specify the following:
For Specify Color Options Select the Text, Link, and Background colors to configure the color of the data browser text and background. Defaults Click Defaults to revert to the default color options. - Click OK.
Set Display Options
EDEM allows you to set options for display.
-
In the Options dialog box, select the Display Options
tab and specify the following:
For Specify Default View Projection Select Perspective to change the default 3D view to use the perspective projection automatically. The option to change the view to orthographic is available in the View toolbar. Select Orthographic to change the default 3D view to use the perspective projection automatically. The option to change the view to perspective is available in the View toolbar. Background Color Select the Single Color checkbox and the required color for the Viewer background, either with a single color or gradient fill. The color change will affect EDEM Creator, Simulator, and Analyst. User Logo Select the Enable checkbox to display a custom logo in the Viewer window. Logo File Path Click … to browse to the path of the logo file. Scaling in Width Set the image width in the Viewer by scaling relative to the original image size. Scaling in Height Set the image height in the Viewer by scaling relative to the original image size. Right Margin Set the image offset from the right-hand edge of the Viewer window. Top Margin Set the image offset from the top edge of the Viewer window. Image Opacity Move the slider to set the image opacity from transparent (left) to opaque (right). Display As Select the Foreground or Background option to display the imported image in front or behind the 3D view. Defaults Click Defaults to revert to the default display options. - Click OK.
Set File Locations
EDEM allows you to set the file locations for the Materials Database, Plugins, Particles, and so on.
-
In the Options dialog box, select the File Locations tab
and specify the following:
For Specify Materials Database Click Browse... to browse to the location of the Materials database used to store and transfer materials to and from simulations. GEMM Database Click Browse... to browse to the location of the Generic EDEM Material Model database used to import to EDEM. Plugins Click Browse... to browse to the location of user-defined Plugins such as Contact Models and Particle Body Force Models. Particles Click Browse... to browse to the location of particles saved independently of the model for reuse in other projects. Geometry Import Temporary File Location Override Select the checkbox to change the temporary file location used during the Geometry import process. Use this option only if there is an issue with using the default TEMP file location. Geometry Import Location Click Browse... to set a path where the user account has complete read and write permissions. Alternate Windows import method Select the checkbox when you import a file using Windows. A command line window is displayed and the command hmbatch importis executed, and you can view the output. However, the import operation is executed as normal.Defaults Click Defaults to revert to the default file locations. - Click OK.
Set Help Options
EDEM allows you to set the help options to access the offline version of the Help.
-
In the Options dialog box, select the Help Options tab
and specify the following:
For Specify Help Location Select the Use Offline Help checkbox to use the locally stored help files installed with EDEM instead of accessing the internet. - Click OK.
Set Mouse 3D Configuration
EDEM provides extended support for SpaceBall or SpaceMouse devices from 3DConnexion.
-
In the Options dialog box, select the Mouse 3D
Configuration tab and specify the following:
For Specify Enable 3D Mouse Control Select the checkbox to turn on the use of a 3D mouse within EDEM. Translation Settings These options allow you to modify the sensitivity of the 3D mouse translation in EDEM. You can adjust how much the model will move or invert the direction of the space mouse. Rotation Settings These options allow you to modify the sensitivity of the 3D mouse rotation in EDEM. You can adjust how much the model will rotate or invert the direction of the space mouse rotation. Defaults Click Defaults to revert to the default mouse 3D configuration. Note: Before running EDEM, ensure that the current drivers for your device are installed. EDEM will automatically detect and enable the use of the SpaceMouse once the device is connected and working properly. The '6 degrees-of-freedom' input on the SpaceMouse devices do not require any special configuration before being used within EDEM. However, you can use the Mouse 3D Configuration control panel to adjust the device's sensitivity and learn how the axes respond to input. - Click OK.
Set Mouse Configuration
EDEM allows you to set the mouse and camera options.
-
In the Options dialog box, select the Mouse
Configuration tab and specify the following:
For Specify Camera Actions Change the mouse button and modifier key to pan, track, zoom, and rotate the camera. Modifier keys assign keys to perform the specified camera action. Note: Select any unique combination of three mouse buttons and three keys for each motion. For more information about mouse configuration options, see Camera and Mouse actions.Rotate on Axis Change the mouse button and modifier key used to rotate on an axis. You can also set rotation on the model or screen axis for both horizontal and vertical rotations. Bin Control Select an option from the Bin Control Modifier dropdown list to change the color from blue to green. Select the Pan, Track, Axis Locked Rotation, and Free Rotation options using the Bin Control Modifier (default Ctrl) to move the bin. Mouse Sensitivity Select the Invert Zoom checkbox to switch the direction in which the scroll wheel zooms in or out. Select the Track and Zoom options to alter the mouse sensitivity independently. You can also specify modifier keys for each sensitivity setting. Defaults Click Defaults to revert to the default mouse configuration. - Click OK.
Set Rendering Options
EDEM allows you to set options for rendering the display.
-
In the Options dialog box, select the Rendering Options
tab and specify the following:
For Specify Render all using legacy display Select the checkbox if EDEM cannot use the Computer Graphics Card. This is applicable when using Remote Desktop or EDEM on computers with out-of-date graphics card drivers. Reduce new template details during camera movement Select the checkbox to speed up the manipulation of the EDEM Viewer when using particle templates. Particles will be visualized as spheres while the view is being adjusted and then switch to templates when the view is fixed. Display Templates You use templates as a guide (outline) to help define the shape of your particle in EDEM Creator as well as providing, if required, the shape for calculation of the Center of Gravity and mass moments of inertia, or as a display option in EDEM Analyst. When a model containing a particle template is saved, an extra file
(.ptf)is created. If this file is deleted, the template information will no longer be stored within the model.Name Click Import to select the 3D CAD files to be used as particle templates. Defaults Click Defaults to revert to the default rendering options. - Click OK.
Set the Simulator Engine
EDEM allows you to set the simulator engine default options.
-
In the Options dialog box, select the Simulator Engine
tab and specify the following:
For Specify Engine Default Settings Select an engine from the Default Engine dropdown list. Options are: CPU Solver and GPU CUDA Solver. Note: In EDEM Simulator, you can modify the default engine after which this information is stored for every simulation in thesimulation_name.dfgfile. While opening existing simulations, the engine that is displayed will have the last saved setting for the simulation.Default Number Of Cores allows you to specify the default number of cores. When starting a new simulation, EDEM uses the default number of the Maximum Cores available on the local PC. This can be specified once for every user after which EDEM will use the default setting.
Simulator Options Select the Compress Data checkbox to compress the simulation data as it is saved to minimize file size. Unselecting this option will reduce the time taken to save the simulation data but increase the file size. Select the Show Licensed Data checkbox to Select the checkbox to show the number of CPUs available on the license. These may be CPU’s that the machine has (indicated by the values colored red) and allows you to set up a simulation to run on a machine with more CPU cores than the machine used to create the simulation. Timestep on Switch Select the Load Last checkbox to view the last Time Step when switching to the Simulator. By default, the current Time Step is displayed. Particle Size Distribution Solver Graph Select Enable the Particle Size Distribution Solver Graph in the Solve report. This is updated during the simulation and displays the defined factory particle size distribution versus the actual size distribution in the model. Number of Histogram Bars Select the number of Histogram bars to be displayed in the dropdown list. Defaults Click Defaults to revert to the default Simulator engine settings. - Click OK.
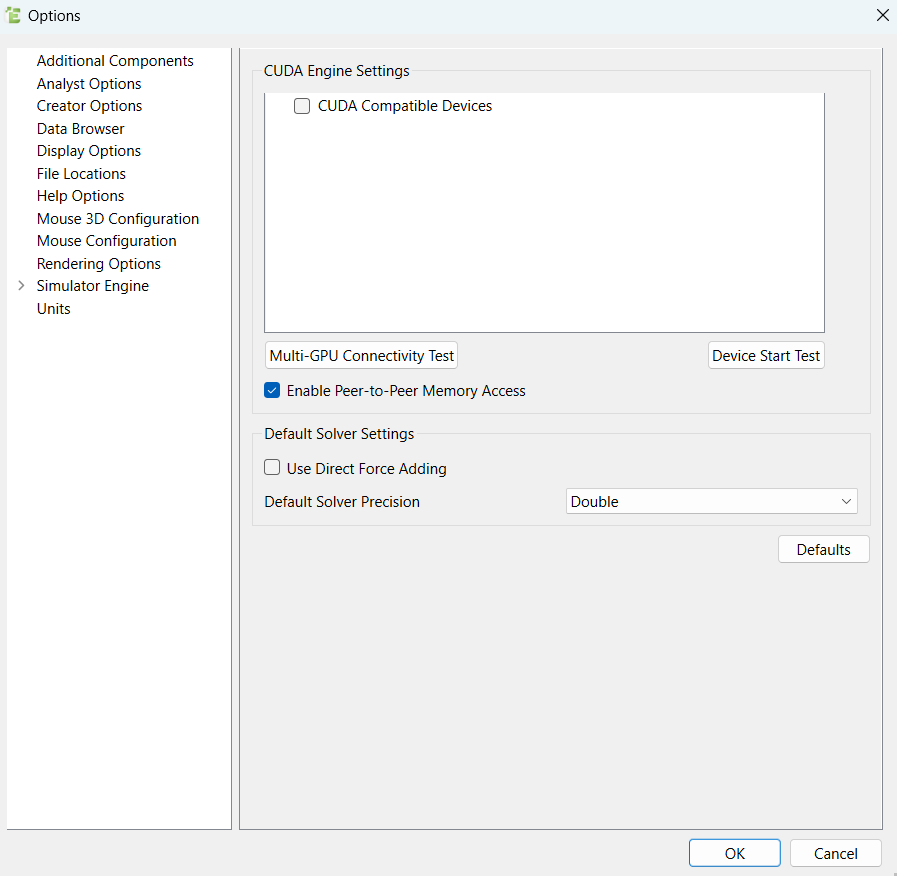
Set the CUDA Engine
EDEM allows you to set the CUDA engine default options.
-
In the Options dialog box, select the CUDA tab and
specify the following:
For Specify CUDA Engine Settings Select the CUDA Compatible Devices checkbox to enable cards for use within EDEM. Enable Peer-to-Peer Memory Access GPU Solver will attempt to use direct peer-to-peer memory access (NVIDIA NVLink) when available. It is recommended that this option must only be disabled for fault diagnosis if advised. Default Solver Settings Select the Use Direct Force Adding checkbox to stop the sorting of force values before being added. This improves performance and memory usage but as a result, repeatability may be not be as consistent. Default Solver Precision Select the default solver precision from the list to adjust the precision at which numerical operations are performed on the GPU Solver. - Double precision provides more accurate results, but the cost of more memory usage and solver performance may not be as desired.
- Single precision is faster and uses less memory, but produces less accurate results.
- Hybrid precision helps optimize performance and accuracy. Certain calculations that require more accuracy are performed in double precision, while the remaining operations are performed in single precision.
Defaults Click Defaults to revert to the default CUDA engine settings. - Click OK.
Set Units
EDEM allows you to configure and select the units of measurement, individually, or otherwise.
| For | Specify |
|---|---|
| Units | Select Set All to SI to use the Système International Units System throughout EDEM. |
| Select Set All to CGS to use the Centimeter–Gram–Second system throughout EDEM. |
- By default, all quantities are measured in standard SI units (Système International d'Unités).
- Changes are applied throughout EDEM*.
| Property | Available Units | SI Unit |
|---|---|---|
| Acceleration | mm/s2, cm/s2, m/s2, in/s2, ft/s2, fpm/s, μm/s² | m/s2 |
| Angle | rad, deg | rad |
| Angular Acceleration | rad/s2, deg/s2 | rad/s2 |
| Angular Velocity | rad/s, deg/s, rpm | rad/s |
| Charge | nC, C | C |
| Density | g/cm3, kg/m3, lb/in3, lb/ft3, slug/ft3 | kg/m3 |
| Energy | J, erg, kwh, btu, ft-lbf, in-lbf | J |
| Force | N, dyn, kgf, lbf, ozf, pdl, gf | N |
| Frequency | Hz, kHz, mHz | Hz |
| Heat Flux | W, J/S | W |
| Length | mm, cm, m, in, ft, μm | m |
| Mass | mg, g, kg, lb, oz | kg |
| Mass Flow Rate | mg/s, g/s, kg/s, lb/s, oz/s, mg/min, g/min, kg/min, lb/min, oz/min, kg/h, uk ton/h, us ton/h, metric tonne/h | kg/s |
| Moment of Inertia | lb/ft2, kg/m2, g/cm2, lb/in2, slug/ft2 | kg/m2 |
| Pressure | Pa, N/m2, dyn/cm2, kp/cm2, atm, Torr, lb/in2 | Pa |
| Shear Modulus | Pa, ksi | Pa |
| Stiffness | N/m, lb/ft | N/m |
| Stress | Pa, Nm2, lb/in2 | Pa |
| Temperature | K, oC, oF | K |
| Time | s, min | s |
| Torque | Nm, Dyne.cm, gf-cm, kgf-m, lbf-in, lbf-ft | Nm |
| Velocity | mm/s, cm/s, m/s, in/s, ft/s, ft/min, μm/s | m/s |
| Volume | mm3, cm3, m3, in3, ft3, L , μm³ | m3 |
| Work Function | J, eV | J |
*Graphs are not automatically updated when units are changed. Once units have been changed, click Create Graph to regenerate graphs.