Torques
A torque is a twisting force. It is a type of load and can be applied either to a face or the center of a hole, in which case it acts on the interior face of the hole. Use the Apply Torque tool on the Loads icon to apply a torque.

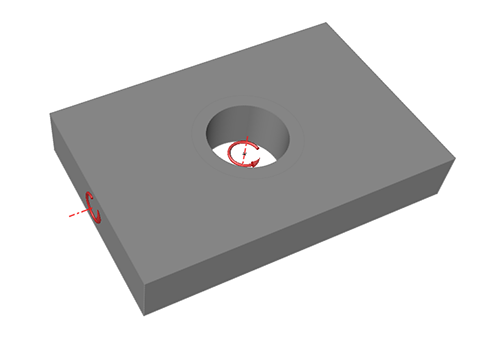
Torques are represented as curved arrows and always act around an axis of rotation, which is drawn as a centerline as shown below.

Apply a Torque
Select the Torque tool, click on a face or hole, and enter a magnitude.
-
On the Structure ribbon, select the Torque tool on the
Loads icon.

Tip: To find and open a tool, press Ctrl+F. For more information, see Find and Search for Tools. -
Click on the desired face or hole.
- Hold the Shift key as you click to apply the torque to a point on the interior of a hole.
- Hold the Ctrl key to apply the torque to multiple features on the same part.
-
Enter the magnitude of the torque in the text field of the microdialog and
press Enter.

Tip: Use f(x) to create or assign variables for Design Explorer studies. -
Click the
 icon to reverse the direction of the torque.
-
Use the options on the microdialog to change the
alignment of the torque, using one of the following methods:
- Select either direction torque mode
 or
component torque mode
  , then click the
  to define a
direction or component vectors.
 - Use the X, Y, Z buttons to align the torque to the X, Y, or Z axis. Click a second time to reverse the direction.
- Use the Move tool on the microdialog.
- Select either direction torque mode
- Right-click and mouse through the check mark to exit, or double-right-click.
Tip:
- A torque represents a twisting force across the entire face, centered around the point where it is applied.
- When created, torques are automatically assigned to the current load case.
- Use the Property Editor to change the name, magnitude, mode, direction, and appearance of the torque.
Microdialog Options
Double-click a torque arrow to enter editing mode, which opens the Torque microdialog.
|
|
Change the direction of the torque. |
 |
Enter a magnitude for the torque. The magnitude of a torque is equal to force multiplied by distance. |
| f(x) | Create or assign a torque variable. |


|
Click the icon to switch between direction torque mode and component torque mode. |
|
|
Click the icon to enter/exit Multi-Selection mode. In this mode, you can click a feature to add/remove it from the selection. Outside of this mode, you need to hold down Ctrl while clicking. |
|
|
Translate or rotate the torque using the Move tool. Use to place a torque at a distance. |
|
|
Align the torque to the x, y, or z axis. |
|
|
Align the torque normal (perpendicular) to the face. |
|
|
Align the torque to the centerline of a hole. (This button only appears if the torque is applied to the center of a cylindrical hole.) |
|
|
Click the chevron to orient the torque by entering either vector torques (X, Y, and Z) or component torques (Tx, Ty, Tz). |
Mouse Controls and Keyboard Shortcuts
| Ctrl | Apply the torque to multiple features on the same part. |
| Shift | Apply the torque to a point on the interior of a hole. |
| Right-click and mouse through the check mark to exit, or double-right-click. | Exit the tool. |


