Use mesh controls to assign an element size to parts or faces.
The element size dictates the quality of your analysis or optimization
results. In general, the smaller the element size, the more accurate the result.
Use the Mesh Control tool to define a default global element size. You
can also use it to create mesh groups and assign an element size to the group. When
running a topography optimization, only one mesh control group can be used per design
space.
Define a Global Element Size
Use mesh controls to define a default global element size.
Note: To improve overall performance, when a CAD file is
imported the mesh sizes are not calculated and are shown as Auto. Click the
Calculate button to display the Element Size.
Create a Mesh Group
Use mesh controls to create a mesh group and assign an element size.
Open the Mesh Control tool:
Select the Mesh Control tool.
Select a face on a part.
Tip: Hold down Ctrl to select multiple faces,
or use the Model Browser to select an entire
part.
Enter an Element Size.
Press Enter or click Create to create the mesh
group.
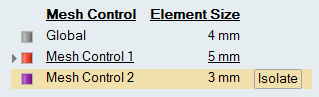
Mesh Control Legend
Select and edit mesh control groups.
The mesh control legend is shown whenever the Mesh Control tool is
active.
Click a row in the legend to make it active and editable.
Hover over a row in the legend and click Isolate to show
only the entities included in the mesh group. Hover and click
All to show all entities.
Keyboard Shortcuts
To
Do this
Add/remove face from selection
Hold down the Ctrl key and click an unselected
face.
Exit the tool
Right-click and mouse through the check mark to exit, or double-right-click.