Evaluate Explorations
Export files to the output directory then run the exploration simulations.
-
From the Design Explorer ribbon, Evaluate tool group, click the
Evaluate tool.
Figure 1. 
The Evaluate dialog opens. -
Enter or modify dialog values per Table 1.
Tip: To only run a nominal run, set the number of runs to 0 for an optimization or set DOE Type to MELS and set the number of runs to 0.
Table 1. Field Description DOE Type DOE specification to be used. The design explorer will propose a default based on the number of independent design variables. It is recommended to use the default. Restriction: Only available for DOEs.Design Type Choose between Nominal Run and Bound Check. Selecting Nominal Run runs a single run. Selecting Bound Check runs three runs where all design variables are set to their minimum, nominal (or baseline), and maximum values. Restriction: This is only available for DOEs and Optimizations if a Check Run is added. See Create Explorations for more information.Number of runs The design explorer will propose a default number of runs for the exploration. Changing this number of runs may impact the exploration by not allowing enough runs to find a global optimal or not having enough runs to adequately fill a DOE design space. Multi-Execution Change Multi-Execution to the number of solver jobs to run concurrently. Note: For optimizations, the number of runs will affect the initial sampling points runs. However, runs per iteration will be capped at two.Stopping R2 Represents the quality of the Sampling Fit. The evaluation will stop when the desired R2 value is reached. Restriction: Only available for Sampling Fits.Initial Points Number of initial sampling points. Restriction: Only available for Sampling Fits.Solver By default, explorations will be evaluated using the solvers installed with HyperMesh. You may optionally register and use your own solver scripts. The default solver and any registered solver scripts will appear in the Solver field of the Evaluate dialog. Solver Arguments Any arguments to be passed to the solver. Restriction: Only applicable for HyperWorks installed solvers.Write solver files only If selected, when the exploration is Run, solver files will be generated for each run, but they will not be evaluated, and no results will be available. This option is useful if you want to evaluate your solver runs outside of the design explorer workflow.
Optimize If selected, a DOE-based optimization will be run once the DOE evaluation is complete. Requires an objective to be enabled for the given DOE. Restriction: Only available for DOEs.Generate Reports If selected, once the exploration evaluation is complete, additional reports will be generated. Field Prediction: A predictive model will be built using advanced machine learning techniques. The results of this model will be available in the Results Explorer.Restriction: Only available for DOEs and Optimizations.Include Options For the purpose of include file management in the context of the Design Explorer, we will consider include files to be “static” if they do not contain any output used by a design variable and to be “dynamic” if they do contain any output used by a design variable. - None
- All include files will be written to the run folder for each run in the exploration.
- Copy includes
- Static include files will be written one time to a DEIncludes folder under the exploration’s study folder and then copied to each individual run folder during the exploration evaluation.
- Update includes
- Static include files will be written one time to a DEIncludes folder under the exploration’s study folder.
Include nominal run If selected, a nominal run will be run before running the exploration. Purge Purge specified files during exploration evaluation. - Optional:
Select Purge to purge specified files during the
exploration evaluation.
-
Click
 .
.
- In the Purge Filters field, enter file extensions of the files you wish to be deleted during the evaluation.
- Select Only purge after successful evaluation so the specified files are not removed if the evaluation fails.
-
Click
-
To register your own solver scripts:
- Optional:
Click Export.
Output files are written to the exploration directory.
-
Click Run.
The Evaluation Status dialog opens. Here, you can track the progress of each run.
Figure 2. 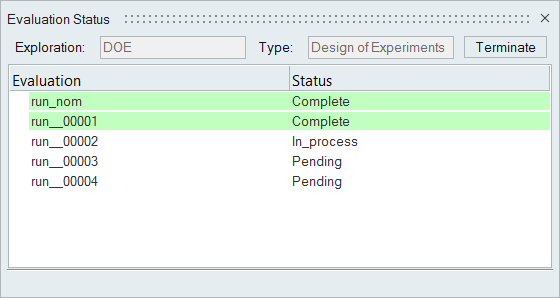
HyperMesh creates run files in the approaches directory.Tip: You can hover over failed runs for specific error information.