
Part Controls
When you have large CAD models, such as a full vehicle model - it can be difficult to bring the entire model into the session. Use the Part Controls tool to shatter CAD files for each part, allowing you to mesh those parts in batch without bringing them into the session.
-
Import a CAD file as lite rep.
-
Define the meshing settings.
-
From the Assembly ribbon, click the Part
Controls tool.
Figure 1. 
-
In the Representation Control Manager, click
 .
.
-
Set the Type to CFD 2D Mesh or Rigid
Body Mesh.
Figure 2. 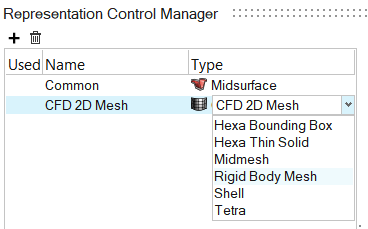
- CFD 2D Mesh
- Mesh the boundary surface of parts. CAD representation is taken as input.
- Rigid Body Mesh
- Create a mesh to represent the topology of a rigid object. The rigid body mesh focuses on accurately modeling the shape of a part rather than on producing a high-quality mesh. CAD representation is taken as input.
-
From the Assembly ribbon, click the Part
Controls tool.
-
Submit parts for batch meshing.
-
From the Assembly ribbon, click the
Representation tool.
Figure 3. 
-
Click
 on the guide bar and
select the Create Representation option.
on the guide bar and
select the Create Representation option.
This submits meshing jobs in batch mode and loads mesh once done. -
From the Assembly ribbon, click the
Representation tool.