Since version 2026, Flux 3D and Flux PEEC are no longer available.
Please use SimLab to create a new 3D project or to import an existing Flux 3D project.
Please use SimLab to create a new PEEC project (not possible to import an existing Flux PEEC project).
/!\ Documentation updates are in progress – some mentions of 3D may still appear.
Creation tools: arcs
Arcs
There are several creation modes for the « Arc » :
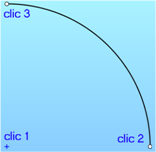
- Arc 2 points, with a center defined by a center point and the two points of the arc extremities (the point center is a reference point symbolized by a cross)
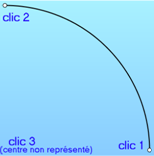
- Arc 2 points, without a center, defined by two points extremities
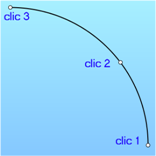
- Arc 3 points, defined by two points extremities and an intermediate point
Access / Cursor
The different accesses and the personalized cursor for this mode of creation are presented in the following table:
| Type | Access | Cursor | |
|---|---|---|---|
| Arc 2 points with center | icon: |
|
|
| Menu: | |||
| Arc 2 points without center | Icon: |
||
| Menu: | |||
| Arc 3 points | Icon: |
||
| Menu: | |||
Creation of Arc 2 points with center
The creation process of an arc 2 points with center is presented in the table below.
| Stage | Description | Illustration |
|---|---|---|
| 1 | Activation of the mode |
|
| 2 | 1 st click left : sets the center point of the arc | |
| 3 | Motion of mouse : gives the data for the creation (radius, coordinates of the future point) | |
| 4 | 2 nd click left : sets the first point extremity of the arc | |
| 5 |
Motion of mouse :
|
|
| 6 |
3 rd click left :
|
|
| → | The mode is always activated and the user can connect it to another creation of an arc by performing again in the same order steps starting from step 2 | |
| → | The right click, permits the deactivation of the mode |
Creation Arc 2 points without center
The creation process of an arc 2 points without center is presented in the table below.
| Stage | Description | Illustration |
|---|---|---|
| 1 | Activation of the mode |
|
| 2 | 1 st click left : sets the first point extremity of the arc | |
| 3 |
Motion of the mouse :
|
|
| 4 |
2 nd click left :
|
|
| 5 |
Motion of the mouse :
|
|
| 6 |
3 rd click left :
|
|
| → | The mode is still activated and the user can continue with the creation of another arc, by performing again in the same order, the steps starting from step 2 | |
| → | The right click, permits the deactivation of the mode |
Creation Arc 3 points
The creation process of an arc 3 points is presented in the table below.
| Stage | Description | Illustration |
|---|---|---|
| 1 | Activation of the mode |
|
| 2 | 1 st click left: sets the first extremity of the arc | |
| 3 | Motion of the mouse : gives the coordinates of the next point | |
| 4 |
2 nd click left : sets the intermediate point of the arc |
|
| 5 |
Motion of the mouse :
|
|
| 6 |
3 rd click left :
|
|
| → | The mode is still activated and the user can continue creating another arc by performing again, in the same order, the steps starting from step 2 | |
| → | The right click, permits the deactivation of the mode |
Information during the creation
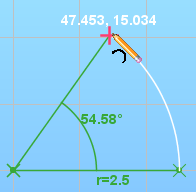
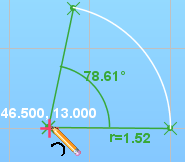
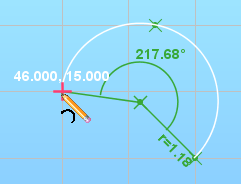
During the creation of an arc with or without a centre point, several data are available :
- Coordinates of the point to be set (position of cursor)
- Radius of the arc
- Angle of the arc
| Preview of the arc with information displayed during the creation | ||
|---|---|---|
| Arc 2 points with center | Arc 2 points without center | Arc 3 points |
 |
 |
 |
Shortcuts
During the creation of an arc 2 points with or without a centre point, it is possible to reverse at 180° the view of the arc to be created by using the key Ctrl .
Priorities of arcs
The Flux sketcher has three types of arcs: two extremity points without a centre point, two extremity points with a centre point and three points.
It is necessary to set a priority of the arcs for a certain number of operations :
- Creation of an arc by superposition over another arc of the same radius but of a different type
- Displacement of an arc in superposition over another arc of the same radius but of different type
- Fusion of two superposed arcs of the same radius but of different type
- Simplification of two adjacent arcs of different type
The established priorities are as follows :
- Priority 1: an Arc 2 points with a centre gets priority over an Arc 2 points without a centre and an Arc 3 points
- Priority 2: an Arc 2 points without a centre gets priority over an Arc 3 points.