EDEM Simulator - Run the Simulation
Once you have set up the model, learn how to run fast and efficient simulations using EDEM Simulator.
Set the Time Options
The first step in running the simulation is to set the Time Step. The Time Step is the amount of time between iterations (calculations). The Time Step value is based on the material properties, and is usually set between 20% and 40% of the automatically calculated Rayleigh Time Step.
-
Set a Time Step of 0.00015 s which should be
approximately ~19% of the Rayleigh Time Step.
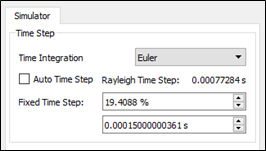
- Ensure that the Auto Time Step checkbox is not
selected.Note: The Auto Time Step automatically adjusts the Time Step to 20% of the Rayleigh Time Step throughout the simulation. However, for this tutorial, we will use a Fixed Time Step.
- Set the Fixed Time Step to 0.00015 s.
The percentage of the Rayleigh Time Step will be calculated automatically.
- Ensure that the Auto Time Step checkbox is not
selected.
-
Set the Simulation Time and data Target Save
Interval.
The simulation time is the amount of real time your simulation represents.
- In the Simulation Time dialog box, set the Total Time to 10 s.
- Set the Target Save Interval to 0.02
s to specify the write-out frequency.
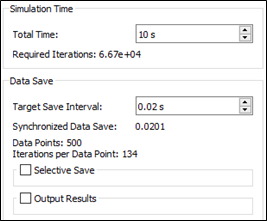
Note: It is not usually recommended to create a data point for every iteration in a simulation. Doing so would result in a slower simulation and a very large amount of collected data.
Set the Grid Options
The next step in running the simulation is to set the grid options that can be used to optimize the simulation.
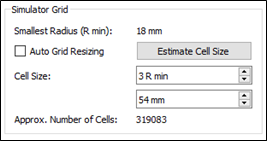
The simulation results are not affected by the number of grid cells.
The more grid cells a simulation uses, the more system RAM is required.
It is recommended to find a balance between RAM usage and simulation performance. For simulations with a narrow size distribution, the ideal value will be between 2 – 3Rmin, but for wider size distributions this value is likely to increase.
Click Estimate Cell Size to get an estimate of the optimal grid setting.
Run the Simulation
The last step is to run the simulation.
-
Select either CPU Solver or GPU CUDA
Solver from the Selected Engine dropdown
list.
Note: As this tutorial has relatively few particles, a four-core CPU solver is recommended. However, for larger simulations, a larger number of CPU cores and/or the GPU CUDA solver is recommended.
-
Click the Start Progress
 icon in the Simulation window.
-
In the Viewer Controls, click the Refresh Viewer
 icon or the enable Auto Update
  icon
at any point to update the Viewer and view the progress of the simulation.
icon
at any point to update the Viewer and view the progress of the simulation.