Drawing Glass Windows
Define the glass windows in the building.
-
Verify that the X/Y window is active, or activate it by
clicking in it.
The X/Y symbol in the top-left of the window is red when the window is active.
- On the Edit menu, click Default Values.
-
Specify the upper and lower coordinates of the windows in the X/Y window.
- Under Geometrical Parameters for Orthogonal Drawing Mode, select Upper and lower coordinate defined individually (and absolute) field.
- In the Min. Coord field, enter a value of 1.
- In the Max. Coord field, enter a value of 2.5.
-
Specify the material properties for the windows.
- Under Material Properties, from the Material Properties of new Subdivisions drop-down list, select Glass; thickness: 5 mm.
Figure 1. The Default Values for New Objects dialog. 
- Click OK to close the Default Values for New Objects dialog.
-
Create a window in the X/Y window.
Note: Create several windows. An exact layout is not important for this example.
-
On the Objects toolbar, click
the
 Add Objects Orthogonal icon.
- Click twice in the X/Y window to specify the start point of the window.
- Click again to specify the end point of the window.
The Insert Subdivision dialog is displayed.Figure 2. The Insert Subdivision dialog. 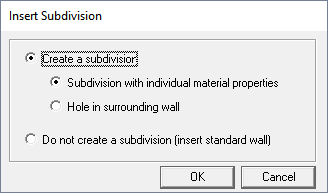
-
On the Objects toolbar, click
the
- Click OK to insert the window and to close the dialog.
