Once you have set up the model, learn how to run fast and efficient simulations using
EDEM Simulator.
To run the simulation:
Click the
icon on the toolbar to open EDEM Simulator.
Set the Time options
The first step in running the simulation is to set the Time Step. The Time Step is
the amount of time between iterations (calculations). The Time Step value is based on the
material properties, and is usually set between 20% and 40% of the automatically calculated
Rayleigh Time Step.
To set the Time Step:
In this simulation, ensure that the Auto Time Step
checkbox is selected and the default Time Integration method is
Euler.
Set the simulation time and data write-out frequency.
The simulation time is the amount of real time your simulation represents.
In the Simulation Time section, set the
Total Time to 10
s.
Set the Target Save Interval to 0.01
s to specify the write-out frequency.
Note: It is not usually recommended to create a data
point for every iteration in a simulation. Doing so would result in
a slower simulation and a very large amount of collected
data.
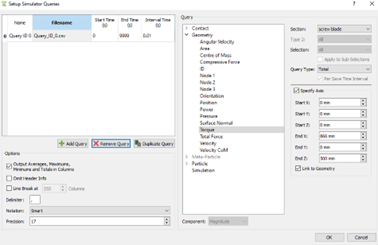
Set up Simulator Queries
You can set up Simulator queries with a unique Start Time, End Time, and Interval
Time. The previous step outlines the full save intervals (every 0.01 s). You can also export
data during simulation at a higher frequency than the standard save.
To set up Simulator queries:
Select the Simulator Queries checkbox and then select
Setup Simulator Queries.
Note: Since we are only saving the required data rather
than a full save, this does not occupy a large file space. However, to edit
this query, the simulation has to be re-run or the data has to be exported
from the 0.01 s save points.
Navigate to Add Query and select Geometry > Torque > Section:screw blade > Query Type: Total.
Ensure that the Interval Time (s) is set to 0.001
s.
Select the Specify Axis checkbox and set the same end
point as previously defined with the kinematics.
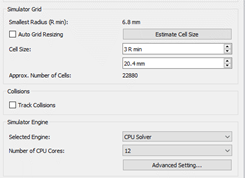
Set the Grid options
The next step in running the simulation is to set the grid options that can be used
to optimize the simulation.
To set the grid options:
Set the Cell Size to 3Rmin. (Rmin = the smallest particle
radius in the simulation).
Note: The CPU Solver uses a grid to optimize the particle
contact detection. This influences the speed of the solver and not the
results. Typically, 2-3 Rmin is optimal with larger values
required for larger particle size distributions. The GPU CUDA solver does
not use the grid option, and the domain is automatically split using a
Bounding Volume Hierarchy (BVH) type method that does not require any user
input.
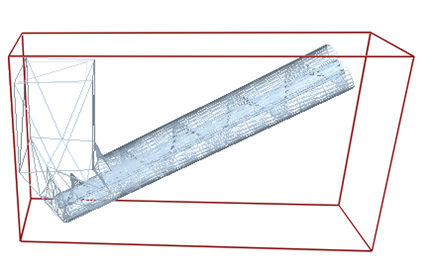
Run the Simulation
The last step is to run the simulation.
To run the simulation:
In the Toolbar, set the Display Mode to Mesh and Opacity
to 0.7 to clearly view your simulation.
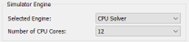
Select the appropriate number of CPU cores for your simulation.
The total number available depends on your license and hardware. This
simulation can also be run using the GPU Engine which will typically be 10-100
times faster than the CPU solver. However, the GPU solver is recommended for
simulations with a greater numbers of particles.
Click the Start Progress
icon in the Simulation window.
In the Viewer Controls, click the Refresh Viewer
icon or the enable Auto Update icon
at any point to update the Viewer to view the progress of the simulation.
Note:
During simulation, Query_ID_0.csv will be written
to the same folder as the saved simulation files.
The torque query will be automatically written to this file and
updated during the simulation run.

 icon in the Simulation window.
 icon or the enable Auto Update
  icon
at any point to update the Viewer to view the progress of the simulation.
Note:
icon
at any point to update the Viewer to view the progress of the simulation.
Note: