For installation on bare metal (64-bit Intel/AMD CPU) an installer image can be
created in Altair IoT Studio. This installer image can be used for all
Assets of the Fleet.
The image contains the OS, K3s and scripts to create a new cluster on the cloud and install the ECP Management Service at first boot. Each new Asset
of the Fleet will automatically show up in Altair IoT Studio.
The following requirements must be met:
The hardware device must be connected to the internet.
Optional inbound ports: 8080, 8888 (REST API via http)
The installer image needs the Client ID and Client Secret of an App (see Apps) with the "cluster" scope and role
Root as Policies. It is recommended to create a new App specifically for this
purpose.Figure 1.
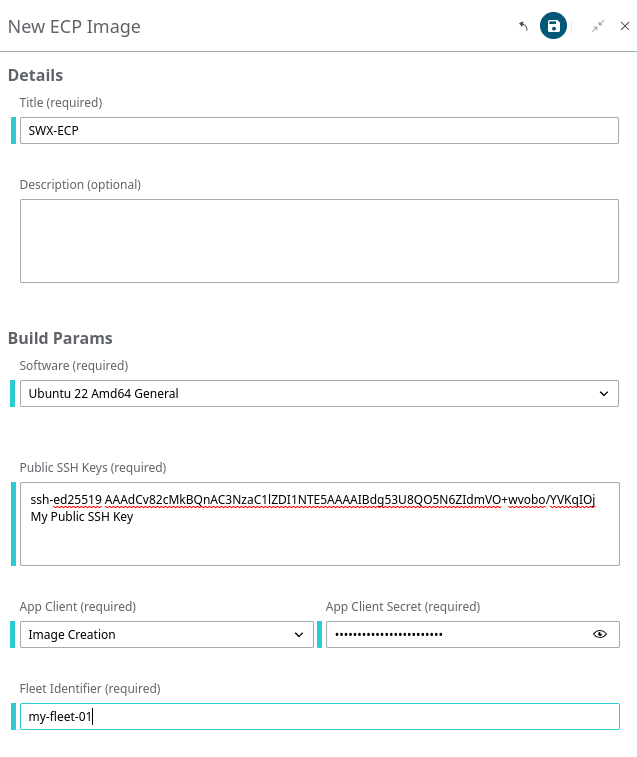
Follow the steps below to create a new installer image.
From the menu on the left, click Edge Ops > Images.
Click New ECP Image in the upper right corner.
Select the desired software option from the drop-down menu, fill in the public
SSh key(s) (each on a new line) for local access to the cluster (username:
Altair) and add the Fleet identifier. If an existing Fleet identifier is reused
any Asset flashed from this installer image will be added to that Fleet.
Figure 2.
Once the installer image has been created (this takes a few minutes) it
will be available to download.
Use either the pre-installed "disk imaging" utility on your computer or
download balenaEtcher to flash the downloaded image onto a
USB drive (minimum size 2GB).
Note: The USB drive should now be used to boot the asset (gateway).
When the installation process finishes the gateway will power off. An 8
character password for local SSH access is randomly generated and saved to the
/root/crypt_passwords.txt file on the USB drive. This
can be used in addition to the SSH key.
Power on the gateway to bring the asset online in Altair IoT Studio.
Note: Each Asset in EdgeOps Fleet Management is
represented in AnythingDB automatically, so you can interact with it. For
every Asset you provision, you will find a corresponding record in the
Cluster category.
Create an SSH Key on Ubuntu
To create a new SSH key run the following commands (if you have already created
one, go to Step 3):
ssh-keygen
Output:
Output
Generating public/private rsa key pair.
Enter file in which to save the key (/your_home/.ssh/id_rsa)
Click Enter to save the key pair under the directory
.ssh/.
Output
Enter passphrase (empty for no passphrase):
The following information will
appear:
Output
Your identification has been saved in /your_home/.ssh/id_rsa
Your public key has been saved in /your_home/.ssh/id_rsa.pub
The key fingerprint is:
SHA256:/hk7MJ5n5aiqdfTVUZr+2Qt+qCiS7BIm5Iv0dxrc3ks user@host
The key's randomart image is:
+---[RSA 3072]----+
|                .|
|               + |
|              +  |
| .           o . |
|o       S   . o  |
| + o. .oo. ..  .o|
|o = oooooEo+ ...o|
|.. o *o+=.*+o....|
|    =+=ooB=o.... |
+----[SHA256]-----+
To view your public SSH key, run the following command:
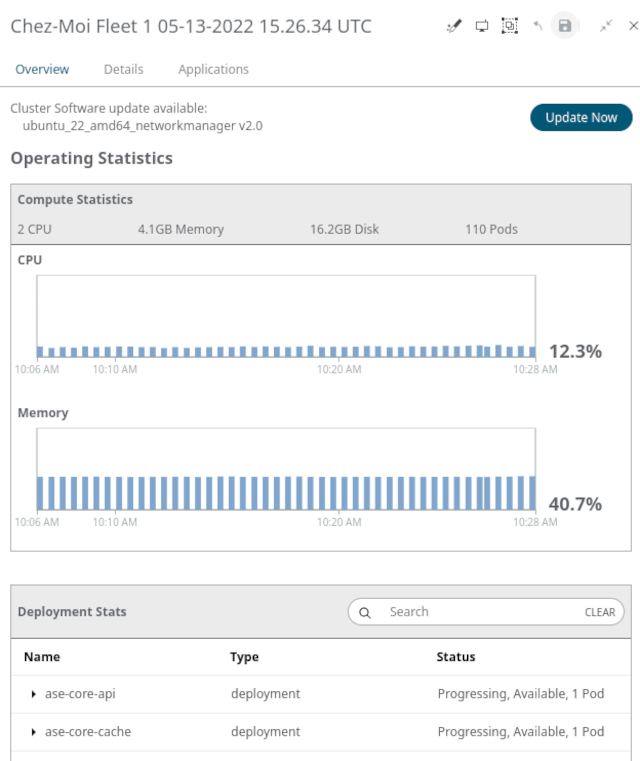
When a software update becomes available for an Asset created from an installer
image, it will be shown on the Edge Ops > Fleet Management > Asset Overview and Details panes.
Clicking the Update Now button will install the update. Note
that this process can take up to 15 minutes for large OS updates.Figure 3.