Component Spacing
Check the clearance between component classes.
Depending on the component class combinations, PollEx DFM can assign different clearance values.
The Component Spacing dialog contains the following
sections:
- Target Components’ Placed Layer: Select the target components placed layer.
- Class Division: At the table, set the component class combination and their
clearances.
- Default Reset: Reset all set statuses.
- Set All Clearance To: Set all class combinations clearance values as the given value.
- Keep other Values While Adding new Classes Combination: Even if adding new class combinations, keep previous setup clearance values.
- Hide Unselected Item on Display: At the table, hide all unselected class combinations.
- Recognize as pass when the clearance between objects is zero, unless they are overlapped.
- Exception Option: Here, PollEx DFM provides some
void-checking options.
- Except for SMD pins, not having Metal Mask: For a SMD components pin that doesn’t have metal mask data, PollEx DFM skips checking it.
- Except for components, having same properties: This is also a
void-checking option. PollEx DFM doesn’t
check for components having the same specified properties.
- Property: Use the
 button to
select property.
button to
select property. - Value: Selected property contents.
- Property: Use the
- Except for components, having different Property Values: This is
also a void-checking option. PollEx DFM
doesn’t check for components that have different specified
properties.
- Property: Use the button
to select property.
- Property: Use the
- Except for overlapped components with selected at reverse side: This
is another void-checking option. PollEx DFM
doesn’t check for components that have different specified
properties.
Figure 1. 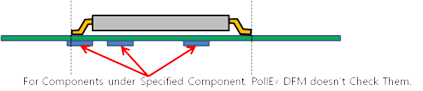
- Select: Select a component group from the list.
- Area: Select a measurement base that will be used when PollEx DFM is used to calculate the component occupying area.