
Snap Objects to Points
Align objects to snap points when translating or rotating parts, pushing and pulling faces, or sketching curves.
There are three types of snaps, some of which take precedence over others. In order of highest to lowest precedence:
- Point snaps: Predefined points on your model including end, middle, center, center arc, intersection, and quad points.
- On snaps: Points on a sketch curve that move with the mouse cursor (only available in sketch mode).
- Grid snaps: Points on the grid (available when sketching or translating). Grid spacing can be changed in the Preferences.
All snaps are active by default, although you can suspend grid snapping temporarily by pressing the Alt key. You can customize which snaps are active in the Snap Filter Menu.
Working with Snaps
When you move or push/pull an object, it automatically snaps to snap points such as end points, center points, quad points, and midpoints.
- When push/pulling faces and subfaces, they will automatically snap to snap points. This
technique can be used to align to faces or subfaces so they are at the same level, or to make
one face flush with another.Note: As you pull, you need to drag the cursor towards a particular hotspot on the part you want to align to, or the face won't snap. If the right hotspot isn't activated as you drag, try rotating the view slightly.
- In Free move mode, you can align the origin of the tool to a snap point by holding down the Shift key and dragging. This is useful when you want to change the pivot point for rotations.
- You can also precisely align two parts with the Move tool by selecting a snap point on the selected part, dragging the part to translate it, and then releasing the mouse button near a snap point on a second part.
- When placing or dragging end points and other interactive hotspots in sketch
mode, the snap selector
 appears and continually snaps to the closest grid point as you change
the position of the cursor. As the cursor approaches an existing sketch curve, the grid snap
changes to an "on" snap, allowing you to snap to any point on the curve. Snap hints appear as
the cursor passes over snap points such as end points, center points, quad points, and
midpoints.
appears and continually snaps to the closest grid point as you change
the position of the cursor. As the cursor approaches an existing sketch curve, the grid snap
changes to an "on" snap, allowing you to snap to any point on the curve. Snap hints appear as
the cursor passes over snap points such as end points, center points, quad points, and
midpoints.
Enable and Disable Snaps
Enable, disable, and reverse snaps.
-
At the lower right of the application window, click
to open the Snap Filter menu.
-
Choose from the following options:
Option Description Note 
Enable all snaps. 
Disable all snaps. 
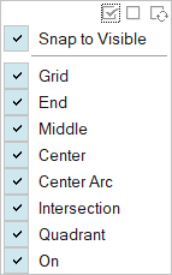
Reverse snaps. This enables the disabled snaps and vice versa. Snap to Visible Only snap to visible geometry. This helps prevent snapping to objects that are behind other objects. Grid Snap to the closest point on the grid when sketching or translating. Grid spacing can be changed in the Preferences window under Drawing. End Snap to end points. Middle Snap to midpoints. Center Snap to center points. Center Arc Snap to center arc points. Intersection Snap to intersection points. Quadrant Snap to quad points. On Snap to any point on a sketch curve with the mouse cursor. Only available in sketching mode. - Press Esc or click an empty space in the modeling window to exit the Snap Filter menu.
Keyboard Shortcuts & Mouse Controls
| To | Do this |
|---|---|
| Temporarily disable snaps | Hold down the Alt key as you select. |