
Free Mode
In Free movement mode, you can use the graphic manipulators to translate and rotate objects, reposition the Move tool, align the tool to a feature, and align parts to features.
Freely Move Objects
Translate and rotate objects using the graphic manipulators or by entering precise values in the microdialog.
-
Select the Move tool, or press
M or T.

Tip: To find and open a tool, press Ctrl+F. For more information, see Find and Search for Tools. -
Next to Entity, the Select button
is active. Select one or more objects.
Tip: Select Show Original Position
 to show the object's most
recent position before it was last moved.
to show the object's most
recent position before it was last moved. -
Choose from the following options:
- Drag the objects.Tip: Grab and release parts by their snap points (end points, midpoints, center points, etc.) to align them precisely. You can suspend snapping by holding down the Alt key.
- For more precision, click a graphic manipulator, and then drag the
graphic manipulator or define values in the microdialog fields.
To Do this Translate along an axis Click the X, Y, or Z arrow. 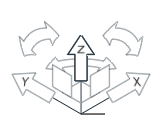
Translate within a plane Click the XY, XZ, or YZ plane. 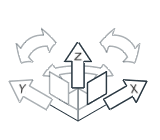
Translate in 3D space Click the origin. 
Rotate Do one of the following: - Drag a curved arrow.
- Select a curved arrow, and then enter an angle in the microdialog.
- Select a curved arrow, and then drag the object.
 Tip: Grab and release parts by their snap points (end points, midpoints, center points, etc.) to align them precisely. You can suspend snapping by holding down the Alt key.
- Drag the objects.
- Right-click and mouse through the check mark to exit, or double-right-click.
Tip: When you move parts, they are allowed to pass
through each other by default. To prevent this, turn on collision detection in the
Preferences window.
Videos: Free Mode
Free Translation Along an Axis
Free Translation Within a Plane
Free Translation in 3D
Free Rotation
Reposition the Move Tool
Reposition the Move tool along an axis, within a plane, or in 3D space to change the center of rotation.
-
Select the Move tool, or press
M or T.
Tip: To find and open a tool, press Ctrl+F. For more information, see Find and Search for Tools. -
You can do the following:
- In the guide panel, click the Reposition button.
- Optionally, hold down Shift while dragging a graphic manipulator.
- Follow these steps:
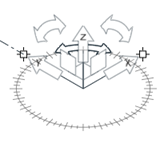
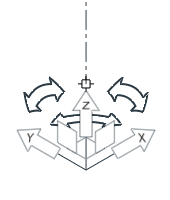
Step A Step B Step C Double-click one of the graphic manipulators to enter editing mode. The Move tool is displayed in orange. Choose from the following options: Right-click to exit editing mode. The Move tool is displayed in white. Reposition the tool along an axis: Drag the X, Y, or Z arrow.Reposition the tool within a plane: Drag the XY, XZ, or YZ plane.Reposition the tool about an axis: Drag a curved arrow.Reposition the tool in 3D space: Drag the origin.
-
To reset the position, click
 next to the Reposition button in the guide panel.
- Right-click and mouse through the check mark to exit, or double-right-click.
Videos: Reposition the Move Tool
Reposition Along an Axis
Reposition Within a Plane
Reposition in 3D Space
Reposition Rotating About an Axis
Snap Tool to Point
Align the Move Tool to a Feature
Align the x-, y-, or z-axis of the Move tool to a point, an edge, or a face.
-
Select the Move tool, or press
M or T.
Tip: To find and open a tool, press Ctrl+F. For more information, see Find and Search for Tools. - In the guide panel, click the Reposition button.
- Select one or more parts and entities.
- Double-click one of the graphic manipulators to enter repositioning mode.
-
Select the tip of the X, Y, or Z arrow on the Move tool.
An axis line appears.
-
Choose from the following options:
To Do this Align the axis to a point Select the point. Align the axis so it is parallel to an edge Select the edge. Align the axis so it is perpendicular to a face Select the face. Align the axis so it is parallel to a hole. Select the face of the hole. - Right-click to exit editing mode.
- Right-click and mouse through the check mark to exit, or double-right-click.
Video: Align the Move Tool to Features
Align Move Tool to Point
Align Move Tool to Edge
Align Move Tool to Face
Align Move Tool to Part
Align Parts to Features
Align parts to features such as points, edges, faces, and holes using the Move tool.
-
Select the Move tool, or press
M or T.
Tip: To find and open a tool, press Ctrl+F. For more information, see Find and Search for Tools. - In the guide panel, click the Reposition button.
- Select one or more parts.
-
Click the tip of an axis manipulator on the Move tool.
- Click a point, edge, face, or hole to align the selected object to that feature.
- Right-click and mouse through the check mark to exit, or double-right-click.
Tip:
- Selecting a face of a cylindrical hole will align the selected part or entity to the axis of the hole.
- Use the icons on the microdialog to align the Move tool to the selected object's local or global axes.