Manage Load Cases
Create load cases to define sets of loads, supports, and other entites that act on a model.
Before running an analysis or optimization, you need to define at least one load case for your model. You may also want to create multiple load cases with different loads and displacements to understand how this impacts the results of an analysis or optimization.

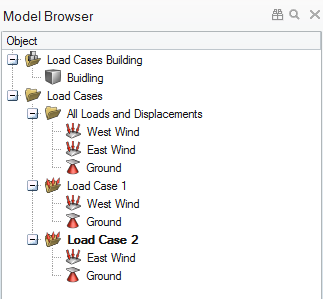
All of the loads and supports, displacements, accelerations, and temperatures in a model are shown in the Model Browser in a folder called All Loads and Displacements. (This folder only appears once a load or support has been applied to the model.) The folders for each load case list only those that are active for the particular load case.
You can create load cases and assign individual loads, supports, etc. to each using the right-click context menu. Any load or displacement can be included in multiple load cases, and therefore may appear multiple times in the Model Browser.
Create Load Cases
Create and manage load cases using the Model Browser.
- Press F2 to open the Model Browser.
-
Choose from the following options:
To Do this Note Create a load case Right-click a load or displacement, and then select . The new load case is automatically made the current load case. Set the current load case Right-click a load case, and then click Current. The current load case is show in bold. When you create a new load or displacement, it is automatically assigned to the current load case. Rename a load case - Click a selected load case and then type a new name.
- Right-click a load case, and then click Rename.
Isolate a load case Right-click a load case, and then click Isolate Loads and Parts. This option will isolate all loads and parts in the selected load case in the modeling window, hiding all others. Delete a load case Right-click a load case, and then click Delete. If you delete a load or displacement, it disappears from every load case and the All Loads and Displacements folder. Copy and paste a load case Right-click a load case, and then click Copy. Right-click again, and then click Paste.
Include or Exclude Entities from Load Cases
Include or exclude entities from a load case.
- Press F2 to open the Model Browser.
-
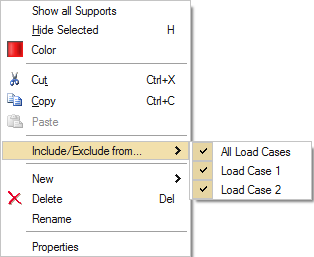
Right-click a load or support, and then click .
Figure 2. Model Browser Context Menu 
Move Entities Between Load Cases
Move or copy an entity from one load case to another.
- Press F2 to open the Model Browser.
-
Drag and drop loads, supports, displacements, accelerations, and temperatures
in the Model Browser from one load case to another with the
left mouse button. The cursor will show a
 symbol if you try to drop the objects on any invalid location within the
browser.
- To create a copy of the dragged object rather than moving it, hold down the Ctrl key while dragging the left mouse button.
- If you drag a load or displacement from the All Loads and Displacements folder to a load case, it remains in the All Loads and Displacements folder, since this folder lists all of the loads and displacements in your model.