Keyboard Shortcuts and Mouse Controls
Default keyboard shortcuts and mouse controls.
Assembly
| To do this | Press |
|---|---|
| Organize | O |
Browser
| To do this | Press |
|---|---|
| Show selection | A |
| Hide selection | H |
| Isolate selection | I |
| Delete | Delete |
| Duplicate | Ctrl + D |
| Rename | F2 |
| Review Mode | Q |
| Organize | O |
Common Across Tools
| To do this | Press |
|---|---|
| Cycle through guide bar selectors | Middle Mouse Click |
| Exit a tool | Right-click and mouse through the exit control Double right-click |
| Move back one level in the tool | Esc Note: If you are at the top level of a tool,
Esc will exit the tool. |
Display
| To do this | Press |
|---|---|
| Show/Hide tool | D |
| Show selection If there is no selection, show all of the current entity type |
A |
| Show entire model | Shift + A |
| Hide selection If there is no selection, hide all of the current entity type |
H |
| Hide everything | Shift + H |
| Hide and clear selection (Idle mode only) |
Ctrl + H |
| Isolate selection and turn off all other entity types If there is no selection, isolate the current entity type |
I Middle Mouse Click with entities selected (Show/Hide tool only) Tip: Middle mouse click again to
reverse the isolated display. This is useful if you want to append to your
selection and isolate more entities. |
| Isolate selection and retain all other entity types | Shift + I |
| Show entities adjacent to selection If there is no selection, show adjacent entities that are the same type as the entity selector (Idle mode only) |
J |
| Reverse display of selection If there is no selection, reverse the display of the current entity type |
R |
| Switch the display from mesh only, geometry only, or both (Idle mode only) |
G |
| Toggle visualization mode | X |
| Find tool | Shift + F5 |
| View simplification | Ctrl + Shift |
| Toggle on/off IDs of a selection (Idle mode only) |
Ctrl + Q |
| Review Mode | Q |
| Toggle between Mesh Lines, Feature Lines, No Lines (HyperView only) |
Shift + M |
| Toggle on/off Transparency (HyperView only) |
Shift + T |
Edit
| To do this | Press |
|---|---|
| Delete | Delete |
| Undo | Ctrl + Z |
| Redo | Ctrl + Y |
| Perform an action This is akin to clicking Apply on a
guide bar.  |
Middle Mouse Click |
| Cut For HyperView, cut the active model |
Ctrl + X |
| Copy For HyperView, copy the active model |
Ctrl + C |
| Paste (into new component) For HyperView, paste the active model |
Ctrl + V |
| Paste (into current component) | Ctrl + Shift + V |
| Quick Edit | F11 |
Elements
| To do this | Press |
|---|---|
| Rebuild | Shift + F12 |
| Split | Shift + F6 |
| Create | F6 |
| Replace | F3 |
Entity Selector
| To do this | Press |
|---|---|
| Set to components/connectors | C |
| Set to elements | E |
| Set to laminates/lines/loads | L |
| Set to materials | M |
| Set to nodes | N |
| Set to plies/points/properties | P |
| Set to segments/sets/solids/surfaces/systems | S |
| Set to attachments | T |
| Set to vectors | V |
| Set to all | Esc + Esc |
File Management
| To do this | Press |
|---|---|
| New | Ctrl + N |
| Open | Ctrl + O |
| Import | Ctrl + I |
| Export | Ctrl + E |
| Save | Ctrl + S |
| Save as | Ctrl + Shift + S |
Geometry
| To do this | Press |
|---|---|
| Create points/nodes | F8 |
Home
| To do this | Press |
|---|---|
| Move | Shift + F4 |
| Measure | F4 |
Selection
| To do this | Press |
|---|---|
| Window select | Left Mouse Drag |
| Append selection | Ctrl + Left Mouse Click |
| Deselect | Shift + Left Mouse Click |
| Select displayed | Ctrl + A |
| Select all | Ctrl + Shift + A |
| Select adjacent | Ctrl + J |
| Select attached | Ctrl + T |
| Select similar (based on type and config if applicable) | Ctrl + M |
| Reverse selection | Ctrl + R |
| Save selection | Ctrl + W |
| Retrieve selection | Ctrl + Shift + W |
| Advanced selection | "." |
| Selection | Alt + Left Mouse Click |
| Quick selection menu | "," |
| Selection search (Entity Editor only) | "/" |
| Adjust feature angle when selecting elements By Face or By Edge | Alt + Scroll |
| Edit | Double Mouse Click |
| Suspend snaps | Alt |
| Clear active selector | Backspace |
| Clear all guide bar selectors | Esc |
2D
| To do this | Press |
|---|---|
| Create elements | F6 |
| Replace | F3 |
| Smooth | Shift + F12 |
| Split | Shift + F6 |
| Normals | Shift + F10 |
| Open BatchMesher tool | F12 |
View
| To do this | Press |
|---|---|
| Rotate | Middle Mouse
Drag Arrow Keys |
| Incrementally rotate clockwise, counter clockwise | Ctrl + Right
Arrow Ctrl + Left Arrow |
| Flip the model | Ctrl + Up
Arrow Ctrl + Down Arrow |
| Set rotation center | Ctrl + Middle Mouse Click on model |
| Reset rotation center | Ctrl + Middle Mouse Click in space |
| Pan | Right Mouse
Drag Left + Right Mouse Drag |
| Zoom | Middle Mouse Scroll |
| Circle zoom | Alt + Middle Mouse
Draw Z, then Left Mouse Draw |
| Fit (and fit selected) | F |
| Go back to previous view | B |
| Save a view | Ctrl + Numeric Key (0-9) |
| Recall a view | Alt + Numeric Key (0-9) |
- Quickly save a custom view by pressing Ctrl + number. For example, pressing Ctrl + 1 creates a custom view and assigns it the name Ctrl + 1. To then recall, press the corresponding number used to save the view. For example, if you pressed Ctrl + 1 to save the custom view, press Alt + 1 to quickly recall this view in the future.
- Right-click on a view to recapture, rename, delete, and control the display state of the view.
Workspace
| To do this | Press |
|---|---|
| Open context sensitive help | F1 |
| Search tool | Ctrl + F |
| Capture the API | Ctrl + F8 |
| Previous page | Ctrl + F1 |
| Next page | Ctrl + F2 |
| Add page | Ctrl + F3 |
| Expand window | Ctrl + F4 |
| Advanced screen capture | Ctrl + F5 |
Topology
| To do this | Press |
|---|---|
| Align/Project | F7 |
| Create Points/Nodes | F8 |
| Split with Lines | F9 |
| Split with Surfaces | Shift + F9 |
Validate
| To do this | Press |
|---|---|
| Edges | Shift + F3 |
| Model Checker | F10 |
Edit Keyboard Shortcuts
Use the Keyboard Shortcuts Editor to introduce new shortcuts or overwrite existing ones to run functions from ribbons and toolbars. It is also possible to run Python or TCL scripts with a shortcut.
The Shortcuts Editor is currently accessible from the View menu in the HyperMesh client.
- Ctrl
- Shift
- Ctrl + Shift
Shortcuts can be exported and imported from an .xml file so that you can save a backup of the latest status or share definitions.
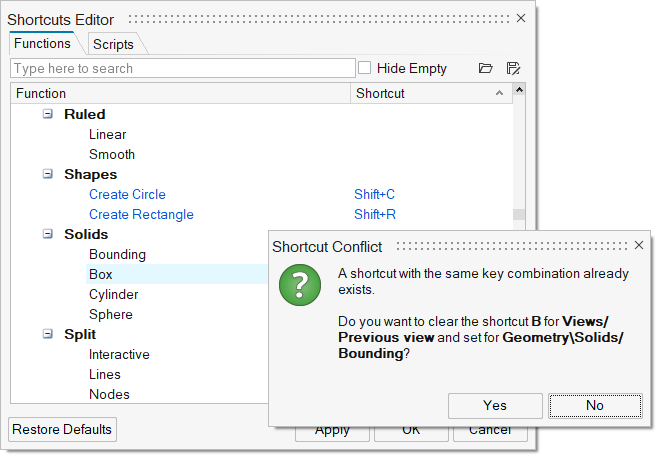
Functions Tab
The Functions tab provides a tree structure of the tools available for shortcut assignment. The Hide Empty checkbox reduces the list to the functions which currently have a shortcut assigned.
To enter a shortcut, highlight the desired function and click on the field in the shortcut column. Then, press the keys you want to use as shortcut.
All newly applied shortcuts are highlighted in blue until you click Apply or OK.
You can search for functions (not shortcuts at this point) and sort alphabetically by clicking on a column header.
A warning is given if you try to overwrite a default shortcut.
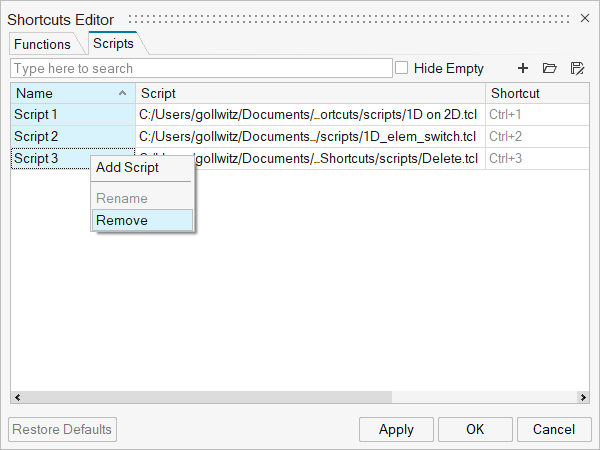
Scripts Tab
In the Scripts Tab, you can register your own Python or TCL scripts by clicking
![]() in the
top, right of the table. Right-click on a script to change its name.
in the
top, right of the table. Right-click on a script to change its name.
You can also delete one or several scripts at a time from the context menu.
Supported Keys
The following can be used with or without the modifier keys Ctrl, Shift, Ctrl + Shift:
- Function keys F2 ... F12
- Numbers 0 – 9
- Letters A – Z
- ~ ` ! @ # $ % ^ & * ( ) - _ = + [ ] { } ; : ’ ” , . < > / ? | \
Protected Keys
For some keys, a warning message is given, while other more exotic characters are not accepted without a warning:
- F1: Online help
- Ctrl + F: Search tool
- Esc
- Delete
- Enter and Return
Known Limitations
- You can overwrite existing shortcuts. The new shortcut will work, but in most cases the old shortcut will keep working, unless used elsewhere. It is intended to enhance this behavior.
- GUI focus: Custom shortcuts only work if the focus is on the GUI, which can be ensured by a click on the GUI. Should a shortcut be used to open a browser, the focus shifts to the browser and the shortcuts there are executed.
- Number keys in combination with Shift are be registered the same as used in a text editor (for example, ‘Shift + 1’ as ‘!’ or Shift + Ctrl + 1 ends up as Ctrl + !)
- There is a limitation to using shortcuts to jump to a different function while already executing another one. For example, using F4 for measure while using meshing will not return to the meshing tool after leaving Measure. A workaround for now is to click on the second function to execute. The product returns to the previously open function after closing the additional function.
- The tooltips and other shortcut hints (for example, in the context menu) will not update to user-defined shortcuts if you overwrite them. This will be addressed in a later release.
- There may be issues sharing an .xml file with others using keyboards of a different nationality.
- Shortcuts need to be defined separately for each Solver Interface.