
Rotate, Pan, Zoom, Fit, Center
Adjust your view of the model in the modeling window.
Rotate the View
Rotate the view to inspect different areas of the model.
-
Rotate the view with keyboard shortcuts and mouse controls.
To Do this Freely tumble Drag the model while middle mouse clicking. Perform turntable rotation (Aerodynamic/Aeroacoustic setup only)
Hold Shift, right-click, and drag the model. Note: Turntable rotation restricts the rotation to the x-y plane, which is useful if your model's vertical direction is aligned with the z-axis.Incrementally rotate Press the arrow keys on your keyboard. -
Rotate the model with the View Cube.
By default, the View Cube appears on the axis triad at the bottom-left corner of the modeling window.
Figure 1. 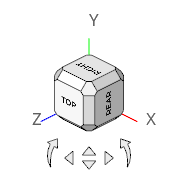
Clicking a major face (Top, Bottom, Right, Left, Rear, or Front) rotates the model to the nearest possible orientation of that face. If that orientation is not the standard, clicking the face again re-aligns the model back to the standard orientation. If the orientation is already standard, repeated clicks on a major face reverses the view.Note: The view is fit anytime a face is selected.Clicking the arrows incrementally rotates the view. Left- and right-clicking increments by + and - 15 degrees while middle-clicking increments by 90 degrees.
Aligning the View Cube to a local coordinate system or your screen vector can be done by right-clicking on the cube.Figure 2. 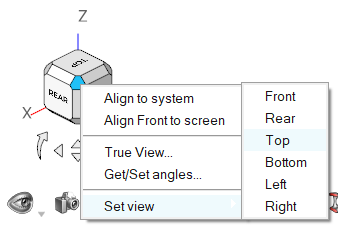
- Align to system
- Allows you to choose a local coordinate system.
- Align Front to screen
- Immediately align the Front face of the view cube with the screen vector.
- Reset to global
- When the view cube is aligned locally, the global system is
shifted to the bottom left of the view cube. This re-aligns
them.
Figure 3. 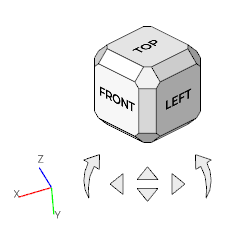
Note: See for other arrangements and configurations. -
Select a standard view by clicking
 on the View Controls toolbar.
-
Rotate the model to the closest principal axes by clicking
 on the View Controls
toolbar.
Note: Only available in the aerodynamics and aeroacoustics setup environment.
on the View Controls
toolbar.
Note: Only available in the aerodynamics and aeroacoustics setup environment. -
Rotate the model so that the sketch plane is normal to the grid by clicking
 on the View Controls toolbar.
Note: Only available in sketch mode.
on the View Controls toolbar.
Note: Only available in sketch mode.
Set the Center of Rotation
Center the view around a selected point.
In the aerodynamics and aeroacoustics setup environment, the center of rotation is determined by your cursor position when you rotate the model. When your cursor is not on the model, the center of rotation defaults to the center of the model or to a point on the model that is closest to your cursor. To manually set the center of rotation, press C then click a point on the model.
- If you click on the model, the center of rotation defaults to your cursor position.
- If you click in empty space and the entire model is within the modeling window, the center of rotation defaults to the center of the model.
- If you click in empty space and a part of your model is outside the view of the modeling window, the center of rotation defaults to your cursor position. However, if you move your cursor far enough away from the model, the center of rotation snaps to either the nearest point on the model or the center of the model.
To manually set the center of rotation, hold Ctrl and middle mouse click on the model.
To reset the center of rotation, hold Ctrl and middle mouse click in empty space or fit the view.
Pan the View
Move the view horizontally and vertically in the modeling window.
- Drag the model while right-clicking.
- Drag the model while right and left clicking simultaneously.
Zoom the View
Zoom in to view specific areas of the model, and zoom out to see a more overall view of the model.
- Scroll the mouse wheel.
The center of zoom is determined by your cursor position.
- Hold down Alt and Right
Mouse Drag.
This performs a smooth zoom about the screen center.
In the aerodynamics and aerocoustics setup environment, use Ctrl + Shift + Right Mouse Drag.
- Draw a circle around the area of the model you want to zoom in on. You
can do this in the following ways:
- Hold Alt and the middle mouse button then draw.
- Press Z then hold left-click and draw.
Fit the View
Adjust the view to fit the model or selected objects in the modeling window.
- Click
 on the View
Controls toolbar.
on the View
Controls toolbar. - Press F on the keyboard .