Model for Flux 2D
1. Overview
The aim of this export is to provide a python file which allows a full parametrized model, ready to be used in Altair® Flux® 2D environment.
In the current version models, can be exported for harmonic application or transient application in Flux® 2D environment.
Two models can be exported to Flux® 2D environment:
| Application | Model family | Package | Convention | Model / Test |
| HARMONIC | Working point | Sine wave | Motor | U-f-N |
| TRANSIENT | Working point | Sine wave | Motor | U-f-N |
| Working point | Sine wave | Motor | U-f-N (Hairpin) |
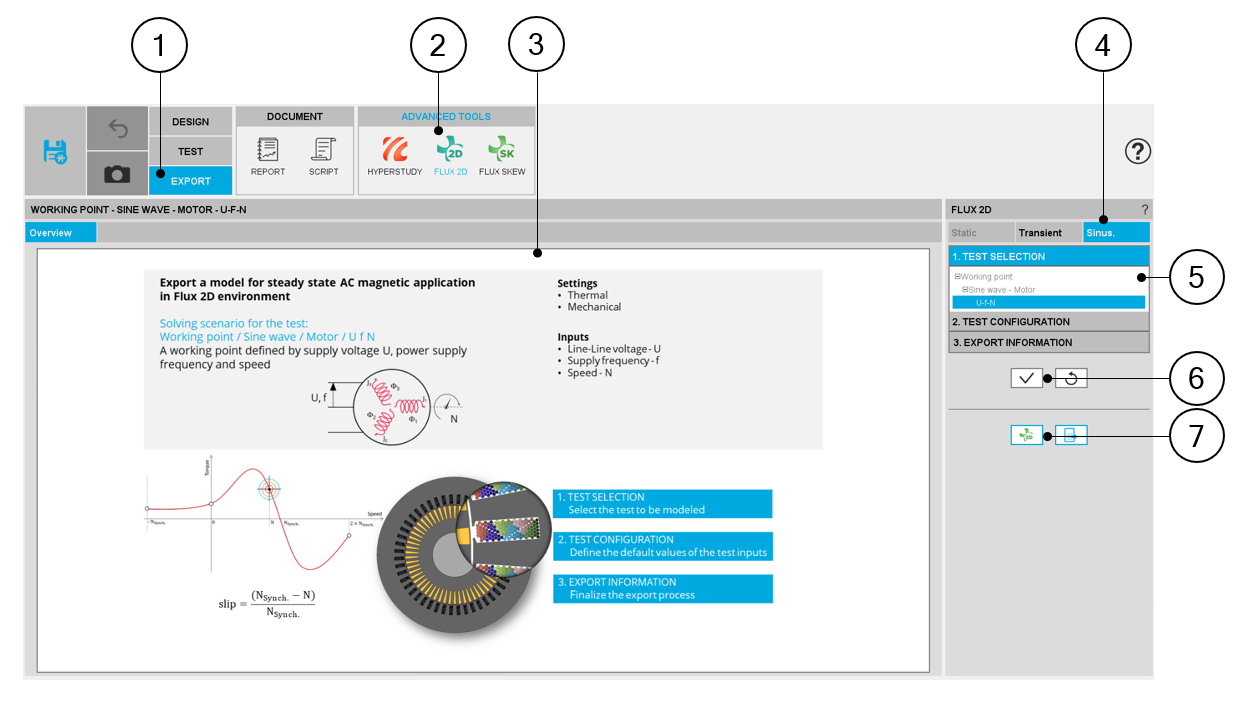
2. Area to build and to export a model to Flux® 2D environment
 |
|
| Motor Factory – EXPORT AREA – Export model for Flux® 2D environment | |
| 1 | EXPORT area of Motor Factory. |
| 2 | Access to the area in which a model for Flux® 2D environment can be made |
| 3 | Zone to visualize the overview of the selected model to be exported |
| 4 | Click on the tab to select the application (HARMONIC or TRANSIENT) |
| 5 | Build the model to be used for exporting in Flux® 2D environment |
| 6 | Button to validate inputs and export the python file for building the model in Flux® 2D environment. |
| 7 | Exports the python file for building the model in Flux® 2D environment or launch the project directly in Flux® 2D. |
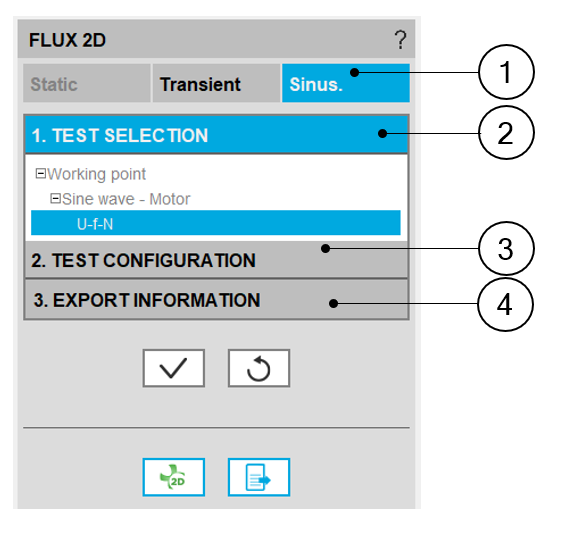
3. Steps to build and export a model to Flux® 2D environment
In EXPORT / ADVANCED TOOLS / FLUX 2D area one must indicate that on which application of Flux® 2D environment, the model must be built: steady state AC magnetic application (SINUS) or transient application (TRANSIENT).
Then, the 3 next steps to be followed are:
-
Define the type of scenario one wants to get in Flux® 2D environment (Test selection).
This means defining the simulation that one wants to perform in Flux® 2D environment for evaluating the electromagnetic behavior of the considered machine.
-
Define the test configuration. This is to give an initial value for the user inputs, which will be set in the scenario of the simulation available in the Flux® 2D model.
Note: For each Flux® 2D model available in the current version, a short description of the user inputs is given. - Define the export information
The resulting models are fully parameterized, and these are built in Flux® 2D environment for Steady state AC Magnetic application or Transient applications.
 |
|
| Motor Factory – EXPORT AREA – Export model for Flux® 2D environment | |
| 1 | Select application (SINUS or TRANSIENT) in which the model must be built in Flux® 2D |
| 2 | Choose one scenario (or test) to be used for testing |
| 3 | Define the initial conditions for the simulation process in Flux® 2D environment |
| 4 | Define export information |
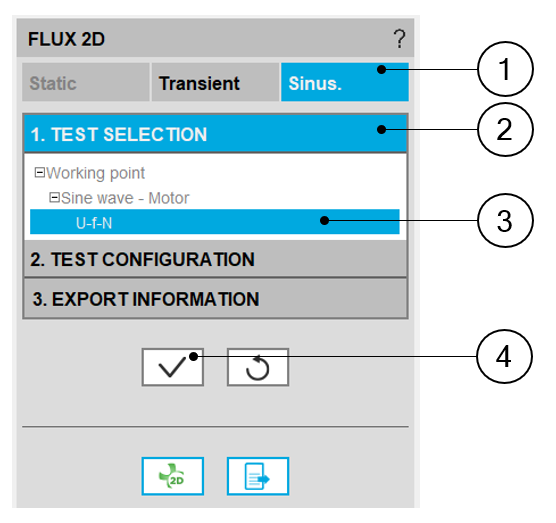
4. Test selection
After having selected an application type (SINUS or TRANSIENT), the corresponding test inputs (settings and user inputs) must be defined. This allow to define the initial conditions for testing.
 |
|
| Motor Factory – EXPORT AREA – Export a model for Flux® 2D – Test selection | |
| 1 | Selection of application (SINUS or TRANSIENT) in which the model must be built for Flux® 2D |
| 2 | Tab to choose one scenario (or test) to be provided |
| 3 | Selection of the scenario (or test) to be provided |
| 4 | Button to validate the previous choices |
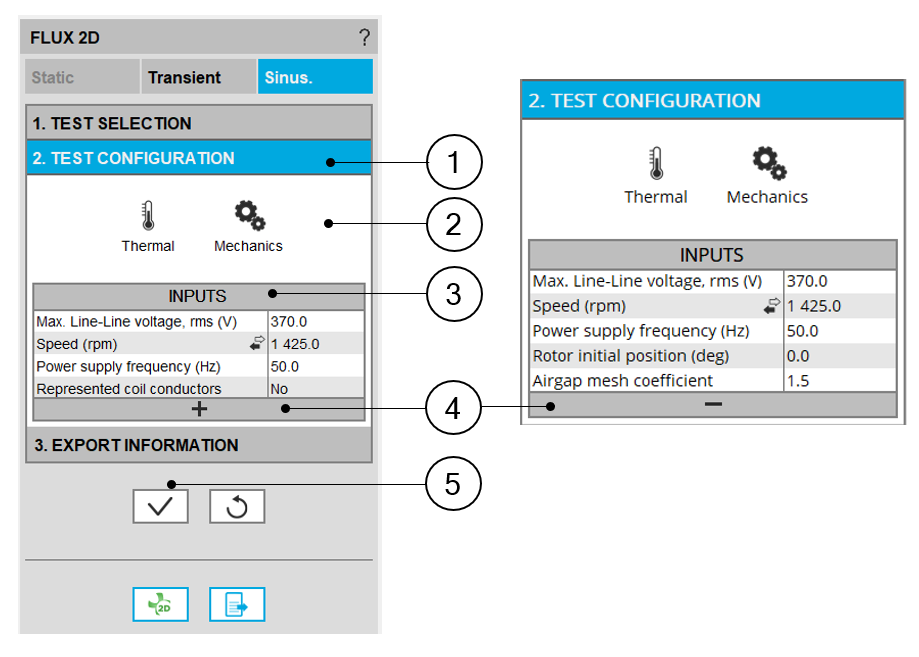
5. Test configuration
After having selected an application type (SINUS or TRANSIENT), the corresponding scenario (or test) inputs (settings and user inputs) must be defined. This allows to define the initial conditions for the simulation process in Flux® 2D environment.
 |
|
| Motor Factory – EXPORT AREA – Export a model for Flux® 2D | |
| 1 | Tab to define the initial conditions for the simulation process in Flux®2D environment |
| 2 | Settings like thermal and mechanical conditions can be defined |
| 3 | User inputs dealing with the considered test can be defined |
| 4 | The tab corresponding to advanced parameters can be expanded.Advanced parameters can also be defined if needed. |
| 5 | Button to validate the previous choices |
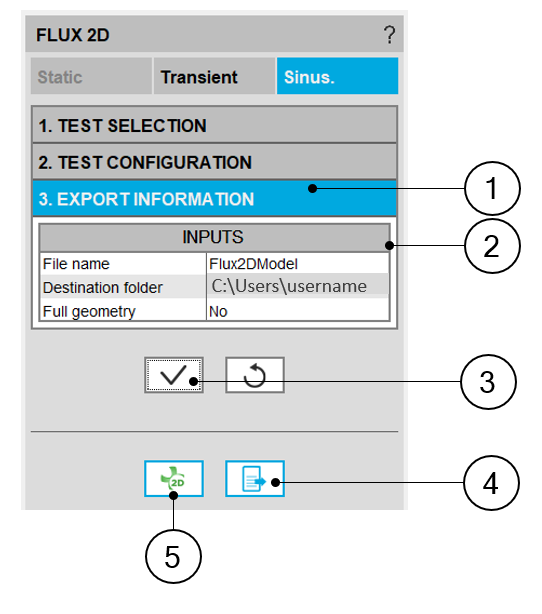
6. Export information
The last step for building a model for Flux® 2D is to define the export information.
There are three data to be defined:
- The name of the python file which will build the model in Flux® 2D environment.
- The folder in which the provided file must be stored
- The “Full geometry“ allows the user to get a full geometry in the provided model even if it is possible to work with a reduced model considering the number of poles, the number of slots and bars.
 |
|
| Motor Factory – EXPORT AREA – Export model for Flux® 2D – Export information | |
| 1 | Tab to be expanded to define export information for Flux® 2D |
| 2 | Area in which the export parameters to be defined are listed |
| 3 | Button to validate the previous choices |
| 4 | Button to finalize the export of the model. When one clicks on this button, the folder gets opened where the python file to build the model is stored. |
| 5 | Button to finalize the export of the model. This button launches Flux® 2D and builds the model. |
-
When data is missing from the third table; “Export information” for instance, an error message is displayed in the red colored font which indicates the missing data. If all the needed information is missing, exporting a model is not allowed.
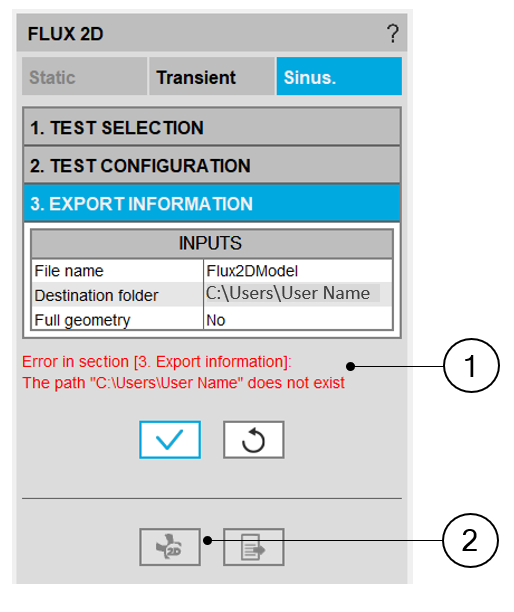
Motor Factory – EXPORT AREA – Export model for Flux® 2D – Error message 1 Error message display in red colored font. 2 The button to export the model is not active if some needed data is missing. -
Exporting a model to Flux® 2D (i.e. provide the python file to build the model) can take a few seconds.