Inputs for exporting to HyperStudy
Steps to build and export a connector
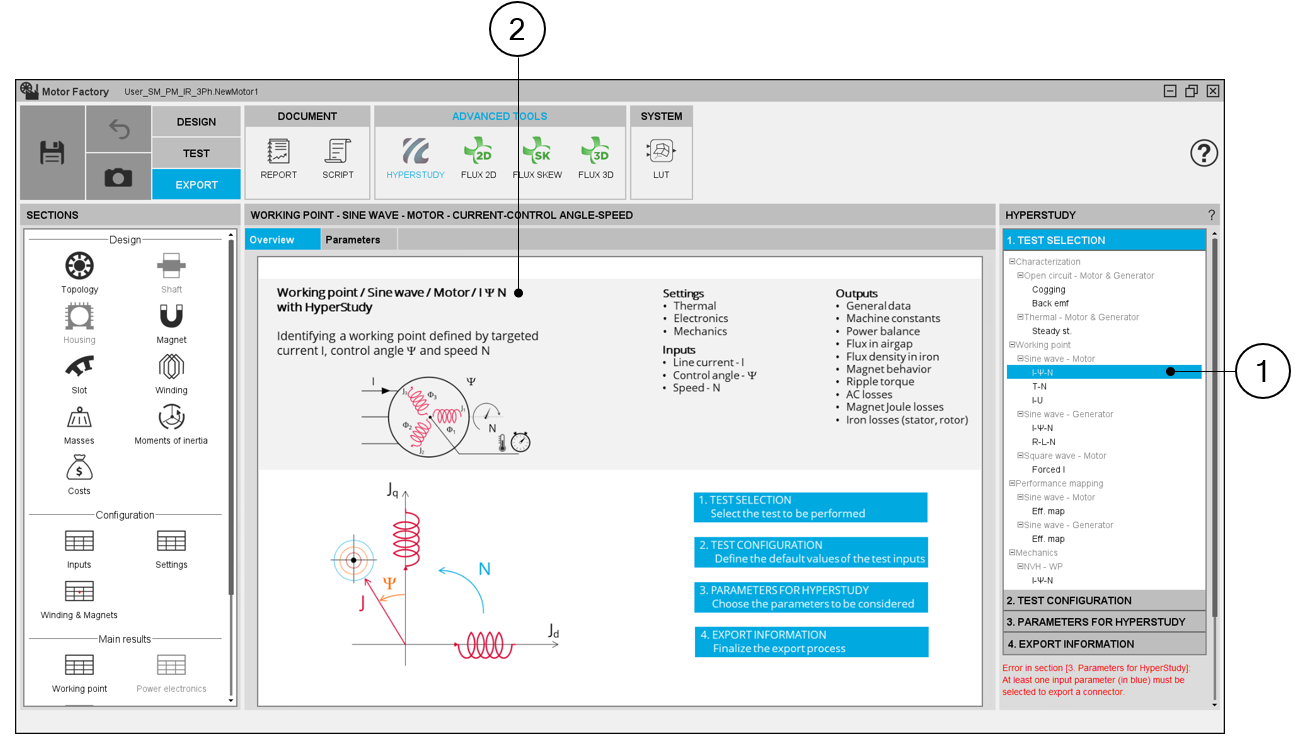
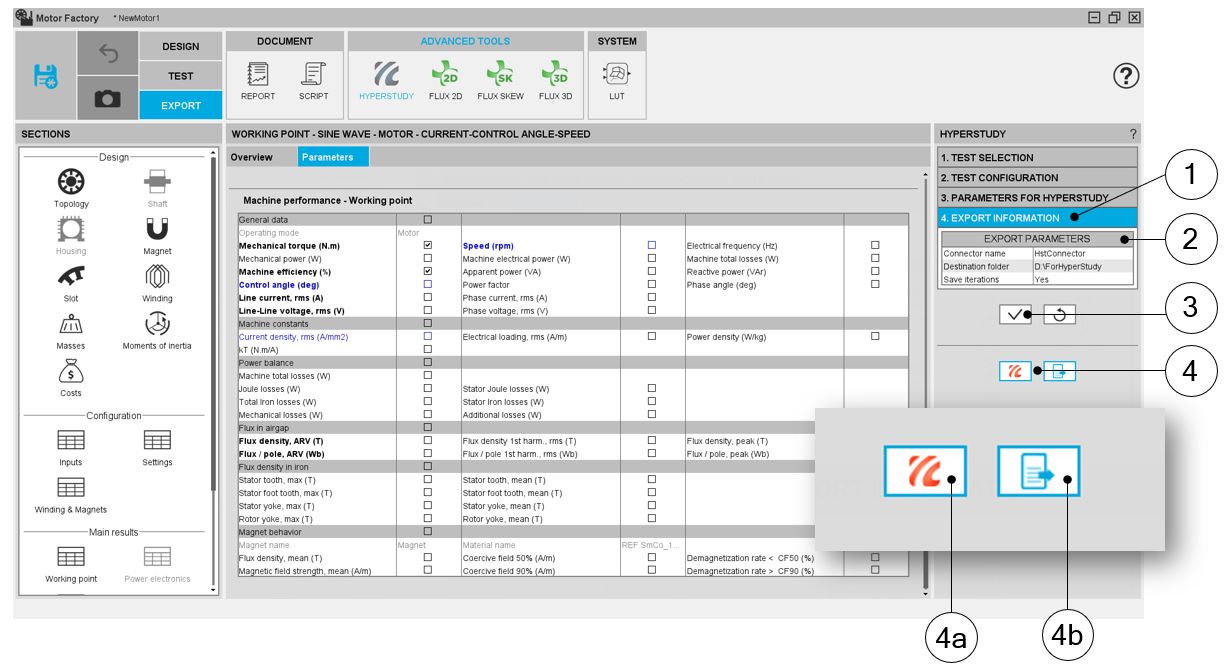
In EXPORT / ADVANCED TOOLS / HYPERSTUDY area 4 steps are needed to build and export a report:
- Select the test which will be performed by Altair® HyperStudy®
- Define the test configuration, that means the user inputs/outputs parameters needed to define the test (settings and user inputs of the considered test)
- Select the inputs/outputs parameters for performing studies with HyperStudy®
- Define the export information
Test selection
In the current version of Altair FluxMotor, 10 tests can be selected:
- Characterization / Open circuit / Motor & generator / Cogging
- Characterization / Open circuit / Motor & generator / Back emf
- Characterization / Thermal / Motor & generator / Steady state
- Working point / Sine wave / Motor / I-Ψ-N
- Working point / Sine wave / Motor / T-N
- Working point / Sine wave / Motor / I-U
- Working point / Sine wave / Generator / T-N
- Working point / Sine wave / Generator / I-U
- Working point / Square wave / Motor / Forced I
- Performance mapping / Sine wave / Motor / Efficiency mapping
- Performance mapping / Sine wave / Generator / Efficiency mapping
- Mechanics / NVH / Working point /I-Ψ-N
When a test is selected, the corresponding overview is displayed at the center of the screen, showing the main inputs to be considered.
 |
|
| Motor Factory – EXPORT AREA – Export connector for HyperStudy ® | |
| 1 | Selection of a test to be performed by HyperStudy® |
| 2 | Display of general information (overview) dealing with the selected test |
Test configuration
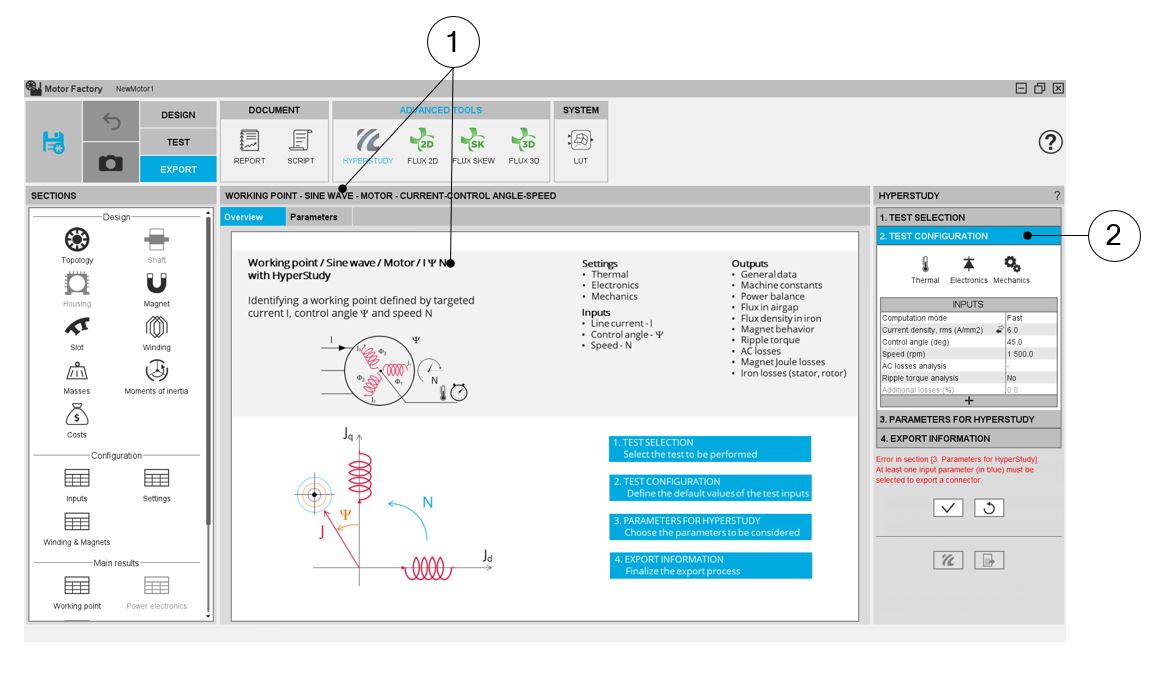
After selecting a test, the corresponding test inputs (settings and user inputs) must be defined. This allows to define the initial conditions for testing.
 |
|
| Motor Factory – EXPORT AREA – Export connector for HyperStudy® | |
| 1 | Overview of the selected test is displayed |
| 2 | User inputs can be defined in the test area |
Parameters for HyperStudy®
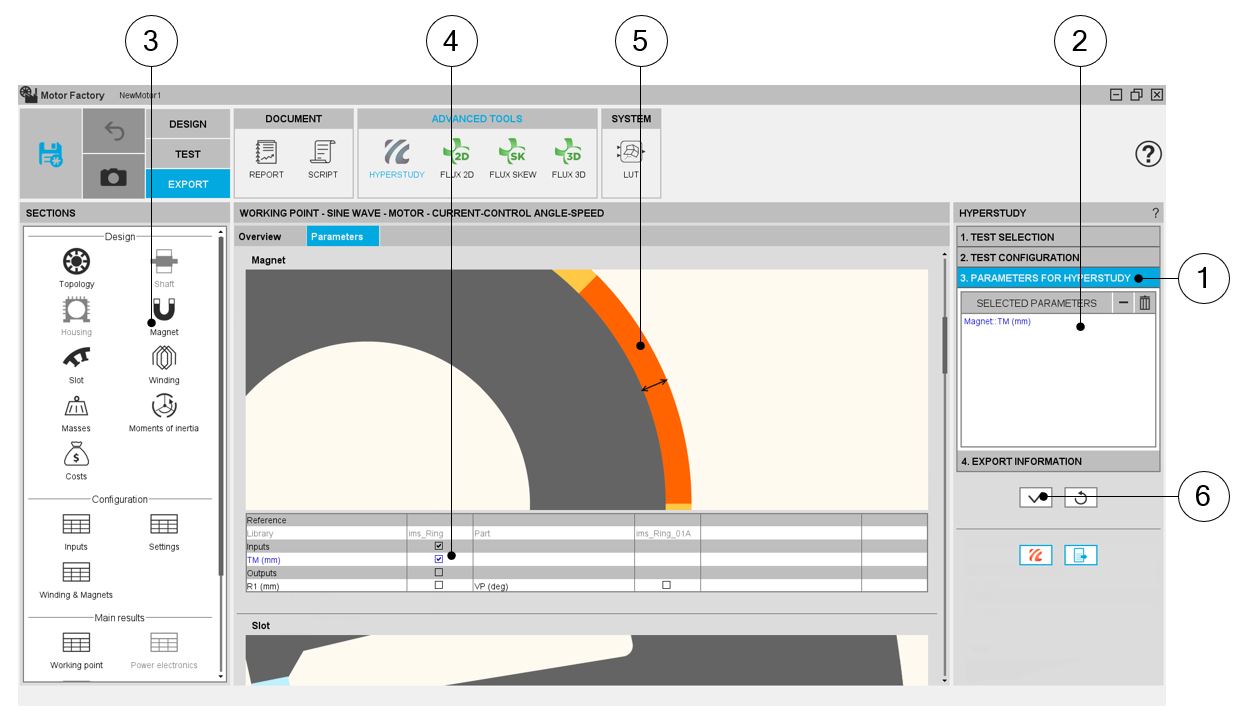
This section allows to select the parameters which must be available for the optimization in HyperStudy®.
These can be design parameters, parameters to define the test conditions (inputs and/or settings) or test results.
Selection of design parameters
 |
|
| Motor Factory – EXPORT AREA – Export connector for HyperStudy® Design parameters selection | |
| 1 | Tab to be expanded to choose input/output parameters for HyperStudy® |
| 2 | Area in which input/output parameters are stored for HyperStudy® |
| 3 | Shortcuts to select the part of the design to be considered for the selection of parameters |
| 4 | All available design inputs are displayed. The corresponding dimension is highlighted when selected - arrow (5).When a parameter is chosen, the associated box is ticked (4), and the parameter name is stored in the selected parameters area (2). |
| 5 | Arrow illustrating the selected design input parameter |
| 6 | Button to validate the previous choices |
Selection of test data
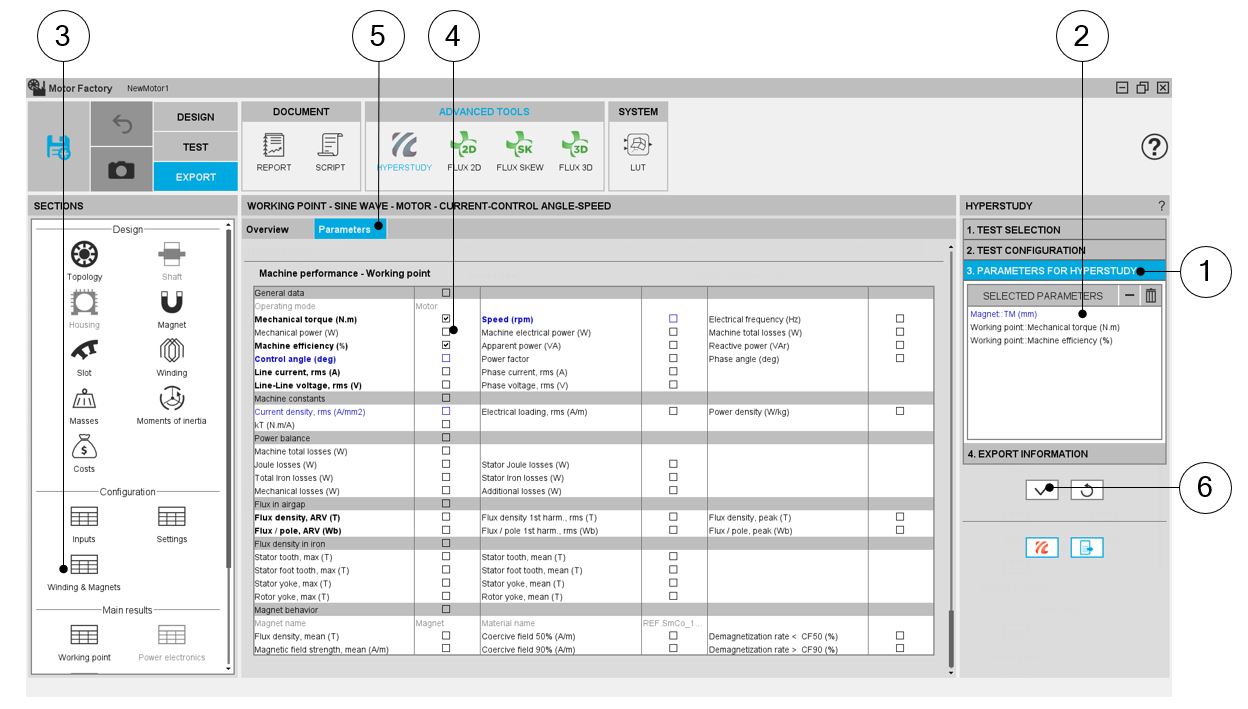
The test data groups test results as well as the user inputs and settings. All these data can be selected for optimization in HyperStudy.
 |
|
| Motor Factory – EXPORT AREA – Export connector for HyperStudy® – Test data selection | |
| 1 | Tab to be expanded to choose input/output parameters for HyperStudy® |
| 2 | Area in which input/output parameters are stored for HyperStudy® |
| 3 | Shortcuts to select the part of the test condition and test results to be considered for the selection of parameters |
| 4 | All available test data (test results as well as user inputs) are displayed. When a data is chosen, the associated box is ticked (4), and the parameter name is stored in the selected parameters area (2). |
| 5 | Display of data which can be selected for HyperStudy® studies |
| 6 | Button to validate the previous choices |
Export information
The last step for building the connector for HyperStudy® is to define the export information.
There are three data to be defined:
- The name of the connector
- The folder in which the connector must be stored
- The last answer, “Save iteration (Yes/No)“ indicates if the results of the HyperStudy must be stored in a dedicated catalog of Motor Catalog application. When yes is answered all the resulting motors can be visualized in Motor Catalog, and then these can be edited in the Motor Factory very quickly.
 |
|
| Motor Factory – EXPORT AREA – Export connector for HyperStudy® – Export information | |
| 1 | Tab to be expanded to define the export information for HyperStudy® |
| 2 | Area in which the export parameters to be defined are listed |
| 3 | Button to validate the previous choices |
| 4 | Button to finalize the export of the connector. |
| 4a | To finalize this operation from FluxMotor, a first button allows to directly and automatically launches HyperStudy, builds and load the connector to perform the optimization. |
| 4b | Button to finalize the export of the connector. When one clicks on this button opened the folder where the connector is stored. |
When one clicks on this button (4a), HyperStudy is automatically opened, with the connector built by FluxMotor uploaded.
The studies can be initialized and run immediately in HyperStudy. The input variables as well as the Output responses that have been selected in FluxMotor are automatically identified and uploaded.
 |
|
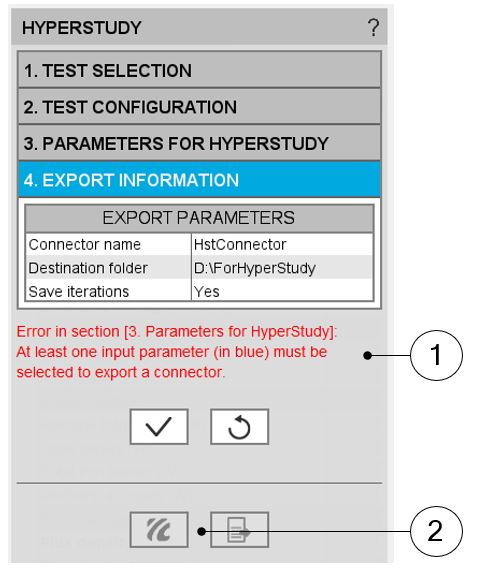
| Motor Factory – EXPORT AREA – Export connector for HyperStudy® – Error message | |
| 1 | Error message written in red font |
| 2 | The two buttons to export the connector and run launch HyperStudy are not active if the needed data is missing |
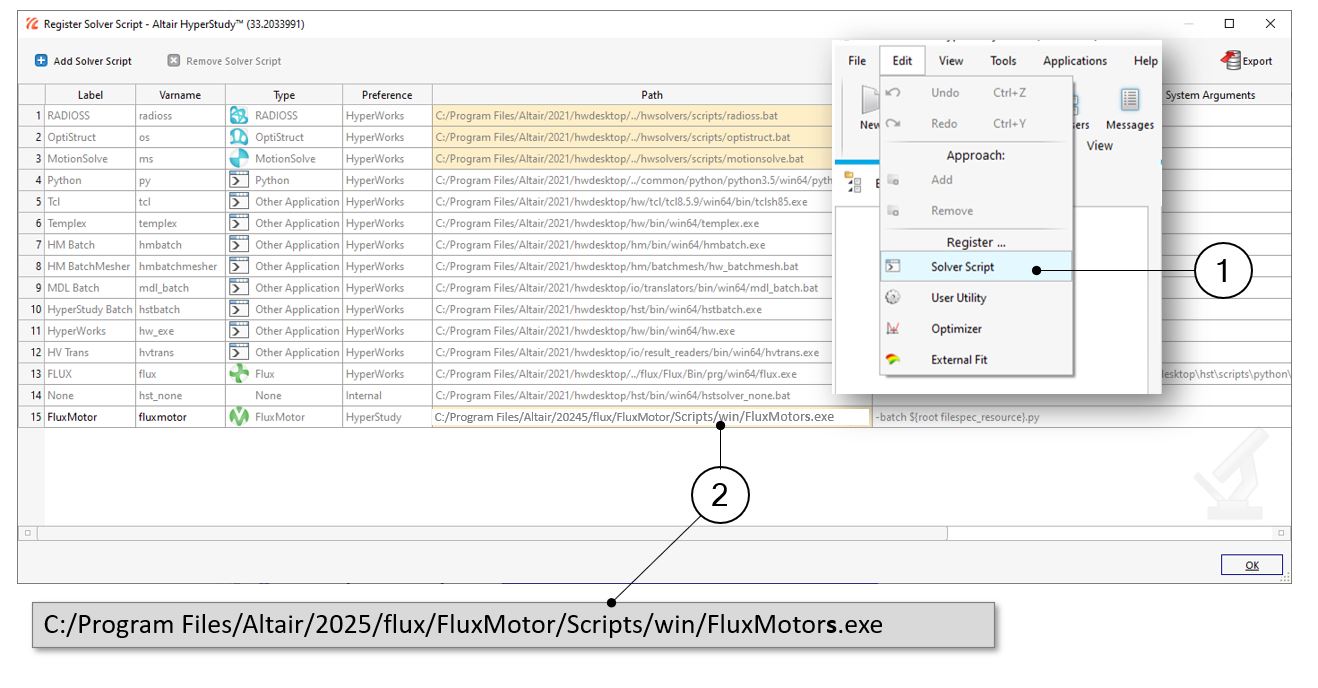
Connection between FluxMotor and HyperStudy®
Before starting new studies in HyperStudy® by using connectors exported from FluxMotor® , FluxMotor® must be registered as a new solver script in HyperStudy®.
This must be defined only when using the coupling for the first time.
 |
|
| Connection between FluxMotor® and HyperStudy® | |
| 1 | Open the area in HyperStudy to register FluxMotor 2026 script |
| 2 | Path where FluxMotor s .exe must be selected to
be registered as a new solver in HyperStudy. Note: :
FluxMotor s .exe with a “s” at the end of
FluxMotor s. This must be defined only when using
the coupling for the first time. Note:
Since the version 2022.1 of HyperStudy, the FluxMotor solver script is
automatically registered, when the default path installation is selected
while installing Flux and FluxMotor. |
The connectors used in HyperStudy must be synchronized with the FluxMotor solver version.
An error message (inside the log files) is generated while performing HyperStudy studies with a connector provided with a former version of FluxMotor solver.
A connector provided with FluxMotor version N-1 (or older) cannot be used in HyperStudy where the FluxMotor Solver Version N (or newest) is selected.
Since the FluxMotor 2022.3 version, each time a connector is generated, a ConnectorUpdater.py file is provided and located in the same folder as the connector
Thanks to this script, the user can update an older HyperStudy connector generated with a former version of FluxMotor.
Please refer to the document MotorFactory_2026_Introduction.pdf for additional information in the section dedicated to HyperStudy.
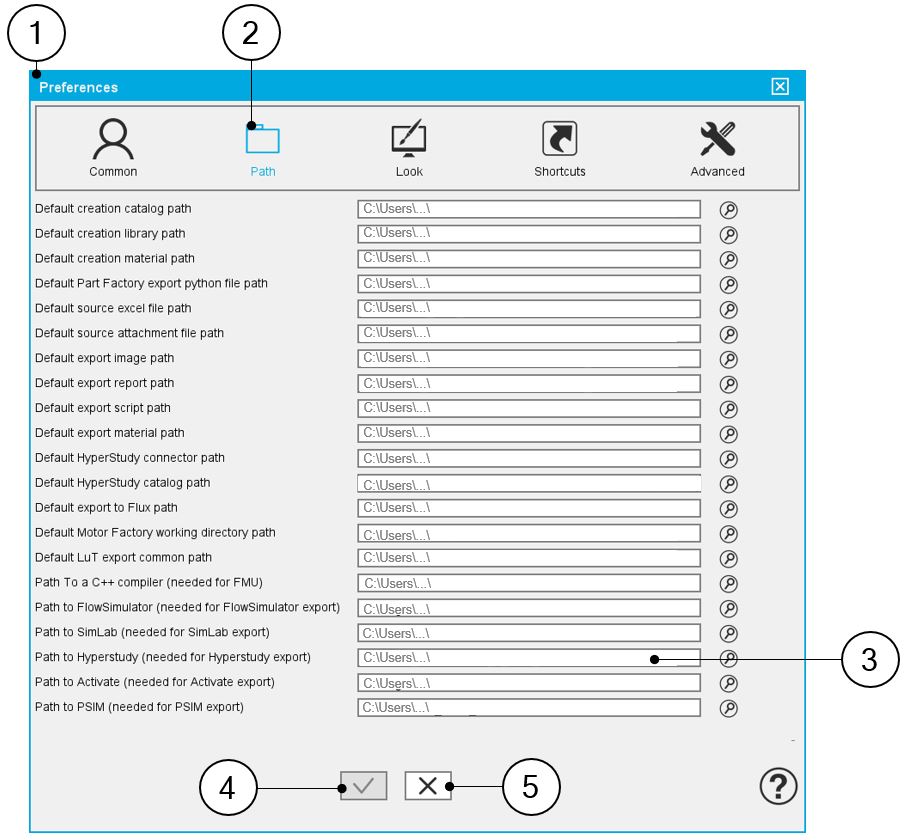 |
| Path to HyperStudy – Needed for HyperStudy export – It must be defined in the user preferences (Supervisor of FluxMotor) |