Place Pin

Open the Place Pin menu.

  1. In the Package Lead Editor, select and right-click a pin.
  2. Check All: Check all pins to place.
  3. Uncheck All: Uncheck all pins.
  4. Invert Check: Invert the checked status.
  5. Change X/Y Location: Change the X/Y coordinate of the selected pins.
    1. Apply to: Select object to be moved. Check Selected for the selected pins or check All for all pins.
    2. Move to Pin Location: Check to move to the original pin location.
    3. Setting: Enter the coordinate to move pins. If “Incremental” is checked, move pins to the location that is added by the specified value.
  6. Change Rotation: Change the X coordinate of the selected pins.
    1. Apply to: Select object to be rotated. Check Selected for the selected pins or check All for all pins.
    2. Move to Pin Location: Check to set to the original pin angle.
    3. Setting: Enter the rotation angle to rotate pins. If “Incremental” is checked, rotate pins to the angle that is added by the specified value.
  7. Change Undefined Type: Change the selected pins to undefined.
  8. Set Flag Pin: Define the flag pin.
    The flag pin means the first pin of the package part.
    1. Define Flag Pin for selected Pin: Set the selected pin as the flag pin.
    2. Find Flag Pin Automatically: Find and set the flag pin automatically. Normally PollEx UPE find the first pin named “1” or “A1” and set it as a flag pin.
  9. Align to Pad: Align the pin with the pin pad.
    You can select pin alignment. For each option, pins are moved like below. In case of align to top and bottom the X coordinate is not changed, and in case of align to left and bottom the Y coordinate is not changed.
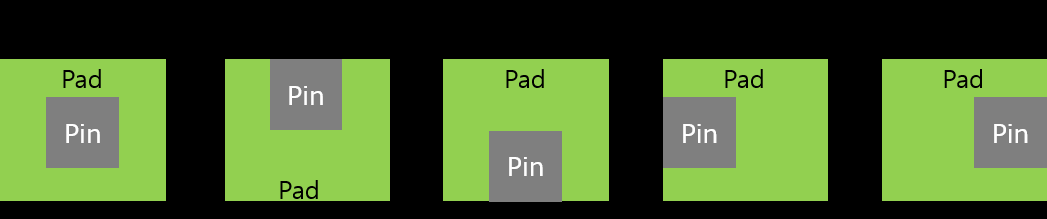

    Figure 1.
  10. Align to Package body: Align the pin with the package body. The aligning method is same with Align to Pad.
  11. Auto Generation by Pad Shape: Generate a pin automatically referring the pad shape.
    1. Thickness: Define pin thickness.
    2. Shrink: Define the gap from pad.
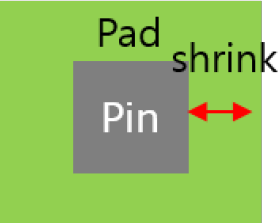

    Figure 2.