Run a Tryout Analysis
Run the forming operations for a tryout analysis.
-
From the Tryout ribbon, Run tools, click Run
Analysis.

-
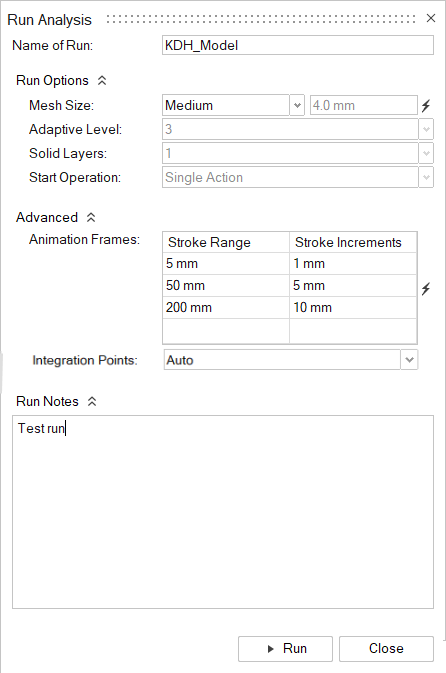
In the Run Analysis dialog, enter a name for the
analysis.
-
Determine the Mesh Size. Choose from the following
options: Coarse, Medium,
Fine, Custom, or
Adaptive. For Custom and
Adaptive, enter a value for the element size. If you
select Adaptive, enter a value in Adaptive
Level for the number of iterations, halving the element size, to
arrive at the final element size specified in Mesh Size.
Use the lightning bolt
 to restore the mesh size to default parameters set
in Preferences. Select Coarse Mesh
Gravity to use a coarse mesh for the Gravity stage to speed up
the analysis without sacrificing accuracy.
Note: Set a custom level for Coarse Mesh Gravity in Preferences. The default is 3.
 - In Solid Layers, select the number of layers from 1-5 for the thickness of the solid.
-
In Start Operation, select an operation to start the
analysis from.
Note: You must have previously analyzed the run with Inspire Form 2020 or later in order to have this option enabled.Note: If you make changes to a stage, make sure to select that stage or a previous one to include the changes in the analysis.
-
In the Animation Frames table, you can adjust the
frequency of the animation slices, depending on the stroke range as the tool is
traveling to deform the sheet.
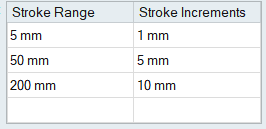
- Stroke Range
- Upper limit for the stroke measured from the closed position
- Stroke Incremements
- Amount of tool travel between animation frames
- Integration Points are points that run along the thickness direction of the model, and they are used to furthur calculate stress and strain for the selected element. Use the dropdown menu to choose the number of Integration Points you would like to use in the analysis.
- Optional:
Enter any Run Notes to distinguish the run.
Note: Hover over the name of a run in the Analysis Explorer dialog to view the notes for that run.
-
Click Run.
Note: By default, the run is saved with the model name in the run history directory specified in the Preferences.Important: If the model setup has errors, an error message is issued with an option to Cancel or Continue the run.
Run Options: Local vs. Remote
Choose whether to run jobs locally or on a remote job server.
Click the Run group label to define how jobs are run.
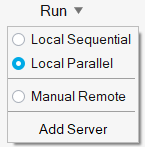
The options to Add a Server and Manual Remote are only available for Tryout analysis, not Feasibility analysis.
- Local Sequential
- Queue run requests on your local computer and run one after the other.
- Local Parallel
- Immediately execute all runs simultaneously on your local computer.
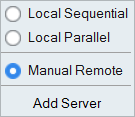
- Manual Remote
- Manually run a job on a remote server. Select this option if using a remote server that is not an Altair PBS server.
- Custom Server
- If you have added a remote server, the name of the server will appear in the menu. Select it to run jobs remotely on that server.
- Add Server
- Add and configure a remote job server.
Run a Job Manually
Manually copy a prepared model file and queue it on a remote jobs server.
-
Click the Run group label to display run options.

-
Select the Manual Remote option.
-
Select the File menu and click the
Preferences button to open the Preferences.
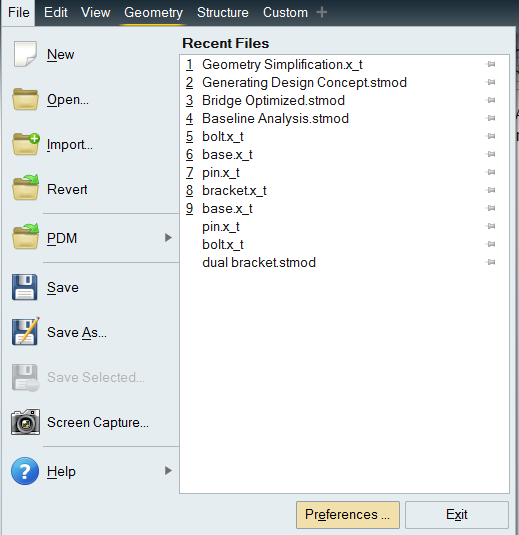
- Under Category, select Inspire: Run Options and enable Run in model directory, then click OK.
-
Set up and run an analysis.
The status icon in the Run Status window indicates that Inspire Form is waiting for the run file to be manually copied to the remote server.

-
Right-click on the run name and select Open Run
Folder.
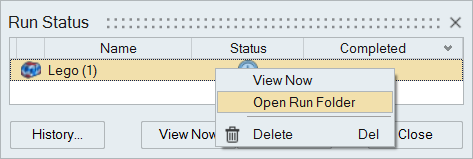
- Copy the run file and manually submit it to your remote job server queue.
- Create an empty folder in the run directory and copy the .zip file created for the remote job in the run directory specified in Preferences.
-
Specify the parameters for the job as follows using the batch file
InspireForm_Solver.bat found in <installation_directory>\InspireForm2024:
"InspireFormSolverWithPath" "zipfileForModelName"
                        optionalNumberofCores
run from the newly created folder.
Example:"C:\Program Files\Altair\2024\InspireForm2024\InspireForm_Solver.bat" "TestModel" 4 - When the job has finished running on the remote server, copy the set of result files back to the Inspire Form run history folder on your local computer.
-
Click the
 satellite on the Analyze icon to open the
Run Status window.
-
Right-click on the name of the run and select View
Results.
After copying the run files, the status will change to a green check mark indicating that results are ready to view.
- You can start a manual remote run and close your local version of Inspire Form. After copying the results back, you can load your results from the Run History.
- For more information about how to install and configure a remote job server, refer to the Inspire Form Remote Job Submission Guide, available on Altair Community's Documentation page. Just filter for Inspire Form and version 2024.
Add a Remote Job Server
Add and configure an Altair PBS server to run jobs remotely.
This option is only available for Tryout analysis, not Feasibility analysis.
-
Click the Run group label to display run options.

- Select the Add Server option from the menu.
-
Enter the Name, Host, and
Port.
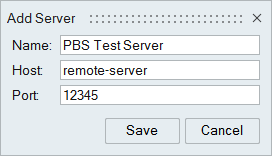
-
Click Save.
A cloud icon appears next to the Run menu when the connection to the server has been established.

- Click the Run group label and verify that the server has been added.
- Set up and run an analysis using the Run Analysis window.
If Inspire Form is integrated with Altair PBS Works, you can connect to an:
- HPC Cluster running PBS Professional Workload Manager
- HPC Cluster running LSF Workload Manager
Run Status
View the status of the current run, as well runs for the current model that have not yet been viewed. To see all past runs, you need to view the run history.
-
Hover over the Analyze icon, then select the
Run Status tool.

The run status window is displayed.
-
When the run is complete, review its status.
Status Description Note 
The run completed successfully. This is also indicated by a green flag above the Analyze icon. You can click the green flag to display the results. 
The run was incomplete. If running an analysis, the run was incomplete. Some but not all of the result types may be available. You should run a new analysis to generate complete results.

The run failed and no meaningful results are available. This is also indicated by a red flag above the Analyze icon. -
View one or more runs.
- To view a run, double-click the row.
- To view multiple runs, hold down Ctrl or
Shift while clicking the rows, and then click
the View Now button.Note: If several runs are associated with the same part, the result from the most recently completed run for that part will be activated in the modeling window.
- To open the directory where a run is stored, right-click the run name and select Open Run Folder.
- To view deleted or previously viewed runs, click the History button.
- To delete a run, select the run and press Delete. You can also delete runs using the right-click context menu in the Analysis Explorer and the Model Browser.
Run History
View, sort, open, and delete past runs for the current and previous models.
-
Hover over the Analyze or Analyze
Fluids icon, then select the Run
Status tool.

The run history is displayed.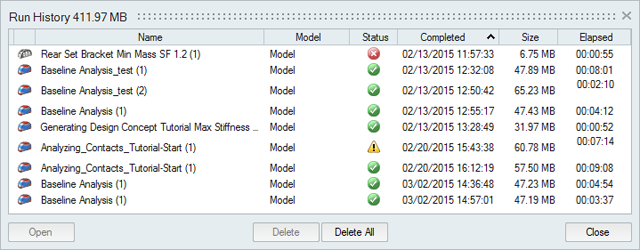
-
Review the status of the run.
Status Description Note 
The run completed successfully. 
The run was incomplete. If running an analysis, the run was incomplete. Some but not all of the result types may be available. You should run a new analysis to generate complete results.

The run failed and no meaningful results are available. - To view a run, double-click the row.
- To open the directory where a run is stored, right-click the run name and select Open Run Folder. The default directory where the run history is stored can be changed in the Preferences under Run Options.
- By default, you will receive a notification when the run history exceeds a certain size. You can change the size limit or turn off the notification in the Preferences under Run Options.
- To delete a run, select the run and press Delete.