
Compose-5000: Connect to an MQTT Broker using Compose
Tutorial Level: Advanced Publish and subscribe from a client to an IoT platform (external broker) using MQTT (Message Queuing Telemetry Transport) protocol.
Prerequesites for This Tutorial
The following software and accounts are required for this tutorial:
- Altair Compose
- Free account on Altair IoT Studio platform: https://studio.swx.altairone.com/
Overview
One of Compose's communication protocol options is MQTT, a well-known communication protocol used in IoT (Internet of Things). It is possible to both publish and subscribe to any MQTT broker, local or external, very quickly and lightly.
When publishing messages to a topic, Compose sends data from the software to the broker. When subscribed to a topic, Compose receives data from the broker to the software.
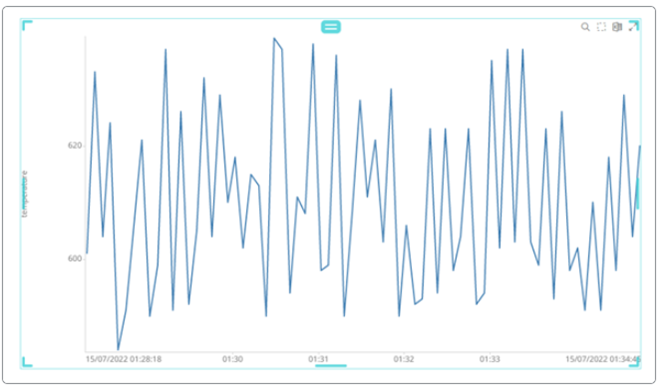
In this tutorial, the external MQTT broker is on Altair IoT Studio. That is the end-to-end Altair IoT platform that covers all necessary technology for Smart and connected products development. In IoT Studio, it is possible to create Things, which represent the entities in your world. They store information about real-world objects like assets, rooms, or buildings, as well as information about concepts like Tasks or processes. These Things receive data if Compose is publishing, and sends data if Compose is subscribed to the MQTT topic. With the data on the IoT platform, you can create dashboards using that data: https://help.altair.com/altair-iot-studio/topics/mqtt_dashboard.htm?hl=mqtt.
General Setup on IoT Studio-IoT Platform
-
In IoT Studio, .
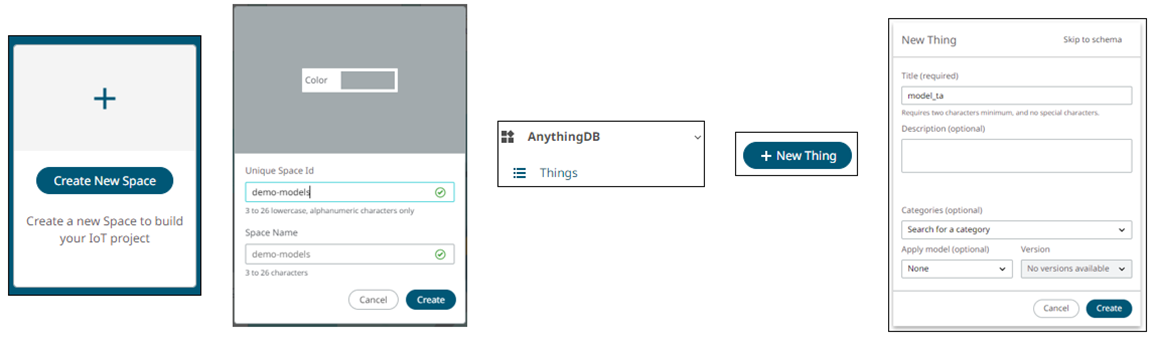
After the Thing is created, a property is created to receive data from Compose and be stored on IoT Studio.
-
Select .


-
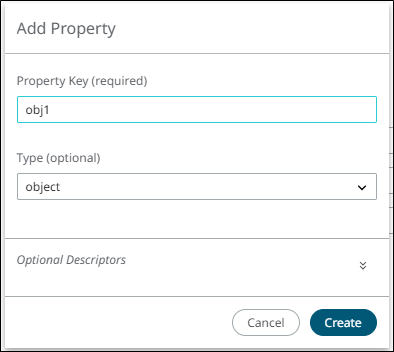
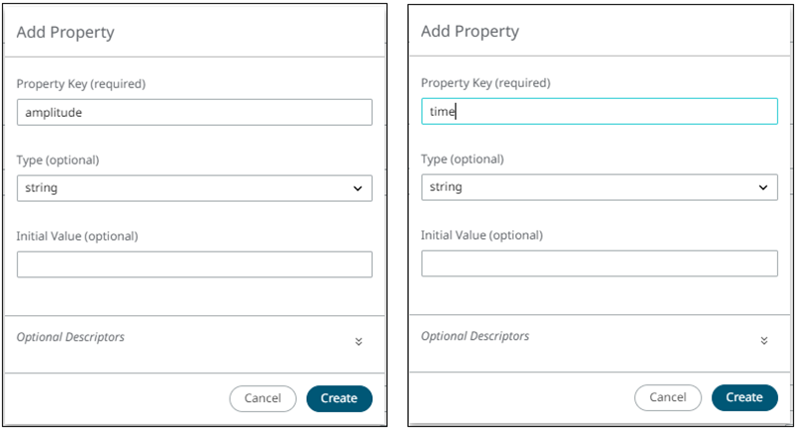
Create Properties to be attributed to this object:
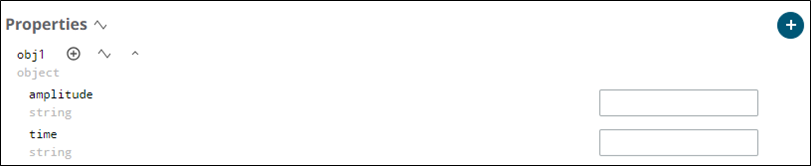
-
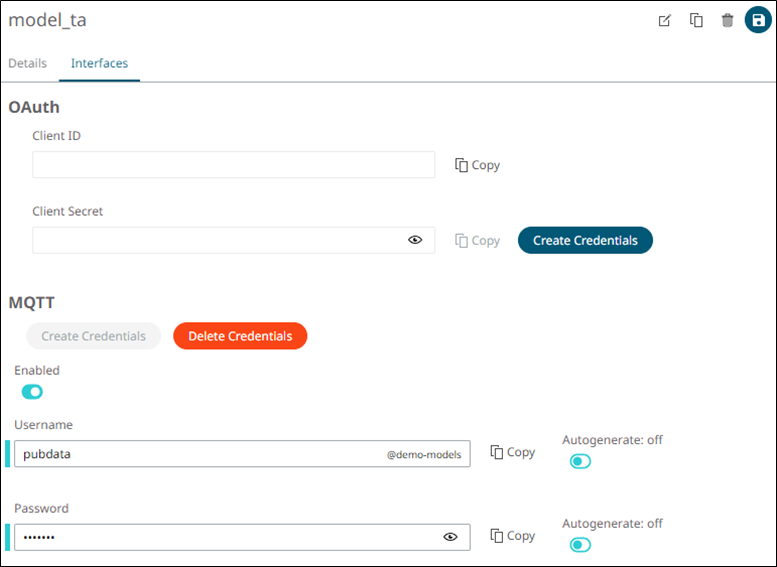
To set the MQTT credentials on IoT Studio, select .
Publishing to an MQTT Topic on IoT Studio
-
Clear existing clients that are connected to the session:
cld_all = mqttclientinfo('clientids'); if ~isempty(fieldnames(cld_all)) cellfun(@mqttdestroy,{cld_all(:).clientids}, 'uniformoutput', 0); end -
Compose has a useful capability to return a response when
the client receives a CONNACK (connect and response messages)
from the server. For this, you must write the callback function:
function connect_mqtt_callback(clientid, rc, Mqttmessageinfo) if rc == 0; printf('CONNACK return message for clientid %s: %s\n', clientid, Mqttmessageinfo); else printf('Failed to connect broker with clientid %s: %s\n', clientid, Mqttmessageinfo); end end -
Declare all the necessary arguments to be used on the MQTT functions, such as
host, port, credentials, and topic attributes:
host = 'mqtt.swx.altairone.com'; port = 1883; space = 'demo-models'; thing_id = '01HE682NDWSZ0F61JSFE0ZB6TE'; property = 'obj1'; topic = ['spaces/' space '/things/' thing_id '/properties']; user = 'cmodel@demo-models'; password = 'cmodel'; -
Set a client to get the ID and send the message using that ID. This is the
first step to set an MQTT connection. For this tutorial, the code below is used
to set a client, using the callback function to advise if the connection was
established:
clientid = mqttclient(host, 'port', port, 'username', user, 'password', password ...
			, 'keepaliveduration', 5, 'on_connect', 'connect_mqtt_callback');
In this case, a simple sinusoidal wave signal is generated to be sent to the client.Note: Cells are used to be better manipulated further in the publishing section:t = [0:0.1:10]; time = num2cell(t); amplitude = num2cell(sin(t)); -
Create a loop to send the sinusoidal data individually. IoT Studio requires JavaScript Object Notation (JSON)
format on the data. For that, a function is used to manipulate the data
individually, accessing each cell member of the sinusoidal wave. Finally, a plot
is created, having 0.5 seconds as a pause condition, to see what is the data
that is sent:
for i = 1:length(t)
	msg = jsonencode(struct(property, struct('amplitude', num2str(time{i}), 'time', num2str(amplitude{i}))));
	[mid, rc, msginfo] = mqttpublish(clientid, topic, msg, 2, true);
	pause(0.5);
	if rc == 0
		printf('Publishing to MQTT broker %s\n', host)
		printf('Send message %s with ID:%s, to topic: %s\n',num2str(amplitude{i}),num2str(mid), topic)
	end
	stem(t(i),amplitude{i});
	hold on;
end
It is possible to see that the data sent from Compose is being received on IoT Studio using the MQTT protocol.


Subscribing to an MQTT Topic on IoT Studio
-
Clear existing clients that are connected to the session:
cld_all = mqttclientinfo('clientids'); if ~isempty(fieldnames(cld_all)) cellfun(@mqttdestroy,{cld_all(:).clientids}, 'uniformoutput', 0); end -
Compose has a useful capability to return a response when
the client receives a CONNACK (connect and response messages)
from the server. For this, you must write the callback function:
function connect_callback(clientid, rc, Mqttmessageinfo)
	if rc == 0;
		printf('CONNACK return message for clientid %s: %s\n', clientid, Mqttmessageinfo);
	else
		printf('Failed to connect broker with clientid %s: %s\n', clientid, Mqttmessageinfo);
	end
end
It is possible to have a callback function to receive a message when the client subscribes to the broker:function subscribe_callback(clientid, mid, grand_qos) printf('message id: %s\n', num2str(mid)); end -
Get the message from the broker, in this case from IoT Studio. This is the last callback function in this
model:
function msg_callback(clientid, topic, msg)
	data = jsondecode(msg);
	printf('amplitude: %s\ntime: %s', data.obj1.amplitude, data.obj1.time);
end
Note: A JSON function is used to decode the data, as the message from IoT Studio has that format. -
Declare all the necessary arguments to be used on the MQTT functions, such as
host, port, credentials, and topic attributes:
host = 'mqtt.swx.altairone.com'; port = 1883; space = 'demo-models'; thing_id = '01HE682NDWSZ0F61JSFE0ZB6TE'; property = 'obj1'; topic = ['spaces/' space '/things/' thing_id '/properties/' property] -
Set a client to get the ID and send the message using that ID. This is the
first step to set an MQTT connection. For this tutorial, the code below is used
to set a client, using the callback function to advise if the connection was
established:
clientid = mqttclient(host, 'port', port, 'username', user ... ,'password', password, 'keepaliveduration',5 ... ,'on_connect','connect_callback' ... ,'on_subscribe','subscribe_callback' ... ,'on_message','msg_callback'); -
With all the setup done, subscribe to the broker and receive all the messages
that are sent to the IoT platfom:
[mid1, rc1, msginfo1] = mqttsubscribe(clientid, topic, 0);Considering that Compose is subscribed to the topic, if any message is sent from one device to that topic, Compose receives it:
It is possible to see that the data sent from IoT Studio is being received on Compose using the MQTT protocol.