
Use Panopticon to Run an FMU Exported from Twin Activate
Tutorial Level: Advanced Export an FMU from Twin Activate and execute it only using Panopticon.
Prerequesites for This Tutorial
The following software is required for this tutorial:
- Altair Twin Activate
- Altair Panopticon
Files for This Tutorial
Watertank prepared.scm, FMU.fmu, FMUinPano.exz, PythonScript.py
Overview
One of Twin Activate's capabilities is to export Functional Mock-Up Units (FMU), which are a container and an interface to exchange dynamic simulation models between different tools.
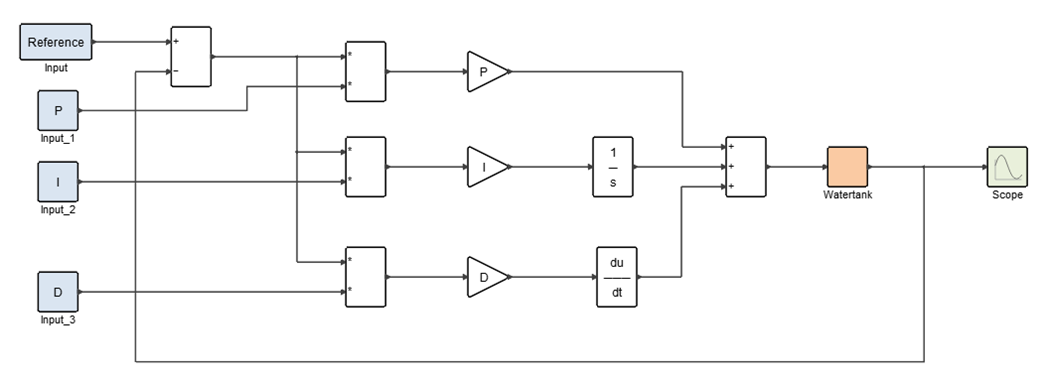
In this case, a dynamic model of a controlled water tank, where a reference level signal is set, uses a PID controller to make the plant reach the right water level:
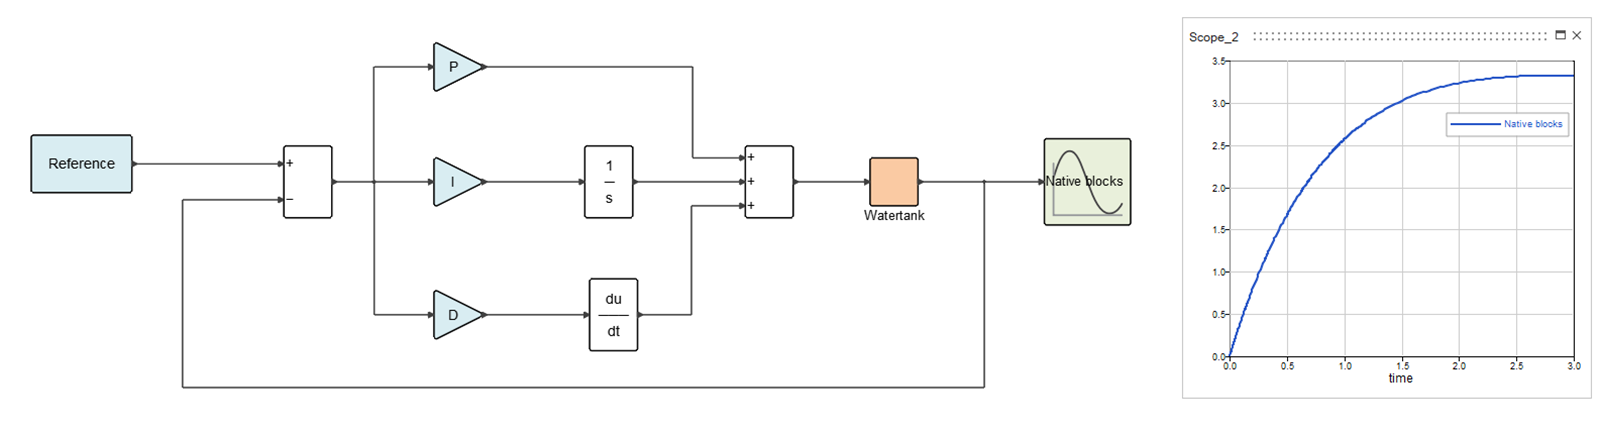
This entire model is exported as an FMU with input and output ports. In Panopticon, a dashboard is created to parametrize the FMU parameters P, I, and D and to run the dynamical model and get the outputs.
Among others, Panopticon supports Python codes. With Pyro, you can access local files through these codes, in this case the FMU, and utilize the fmpy library to run the FMU without Twin Activate.
Also, Panopticon provides a broad range of high-density information visualizations designed to foster intuitive comprehension of complex data. For more information, refer to https://altair.com/panopticon.
Export the FMU File from Twin Activate
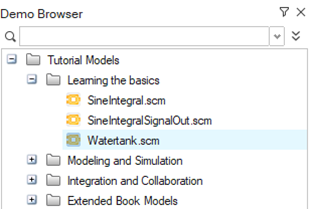
In this tutorial, a standard Twin Activate demo is used from the Demo Browser, but the process should be the same across any other diagram.
-
In Twin Activate, select .
-
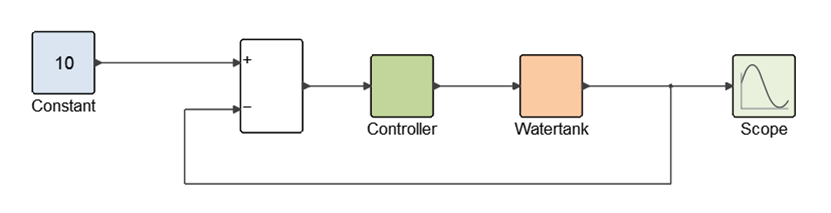
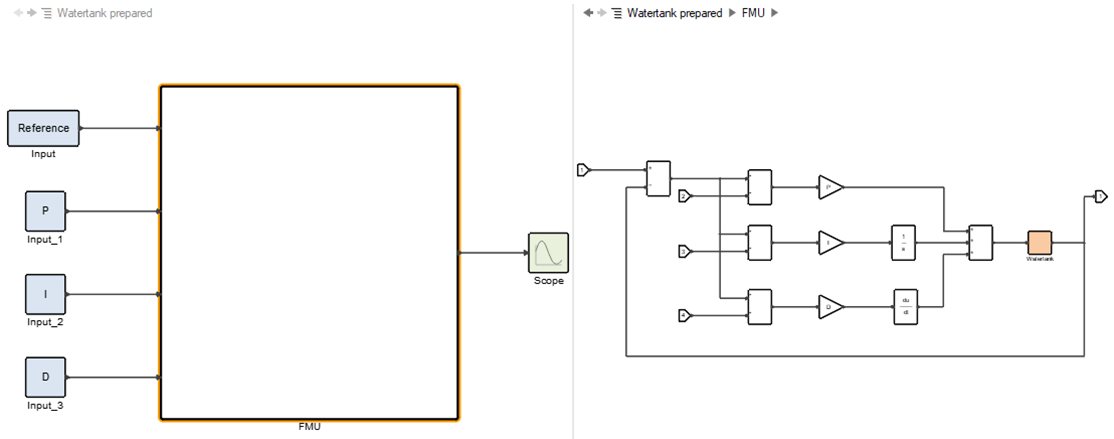
Rearrange the system to have four inputs and one output to be exported as FMU
further.
- Remove mask from Controller.
- Expand Controller super block.
- Add, e.g., Constant blocks as inputs.
- Reference water level (Input)
- P (Input_1)
- I (Input_2)
- D (Input_3)
-
Create a super block.
-
Select from the menu ribbon.
You can also right-click on the super block and select Code Generation and Export.
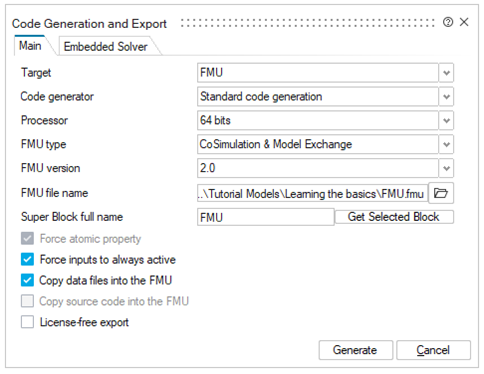
-
Select FMU for Target, select an
FMU file name, and click
Generate.
-
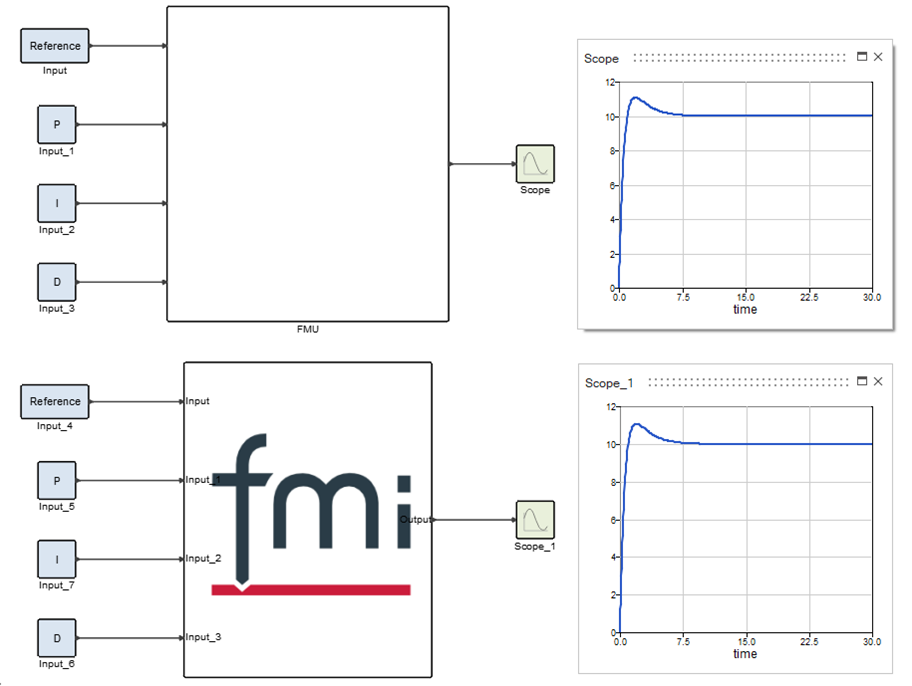
To validate the new FMU, insert an FMU block from the
Palette Browser under and check the results.
Panopticon Setup
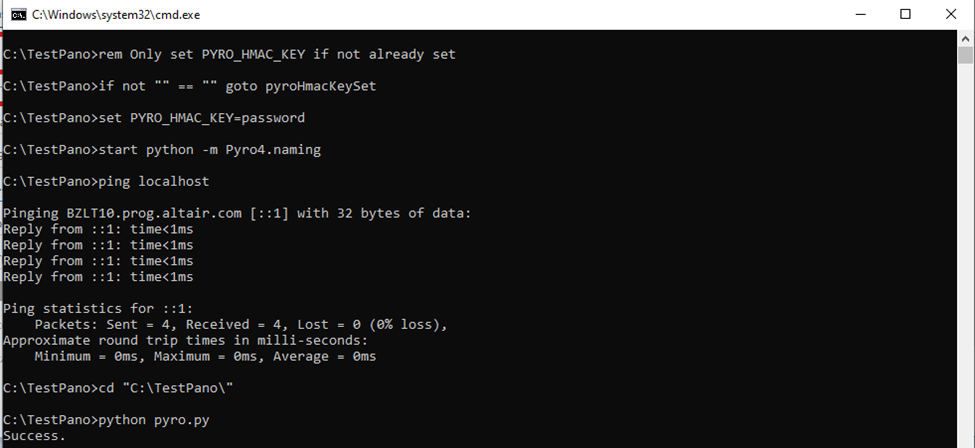
After this, the environment is ready to receive commands in Panopticon and access local files.
Panopticon Workbook
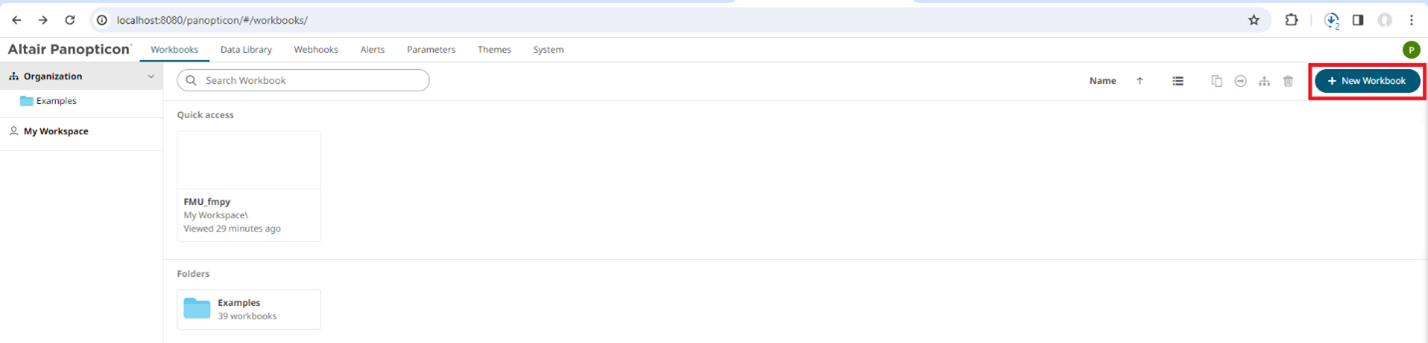
A new workbook must be created to set the environment to run the FMU without the need of Twin Activate.
-
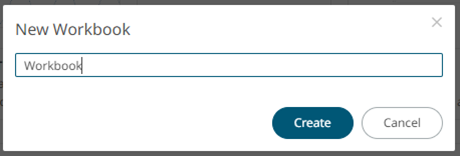
In the Panopticon main page, click New
Workbook, enter a name, and click Create.
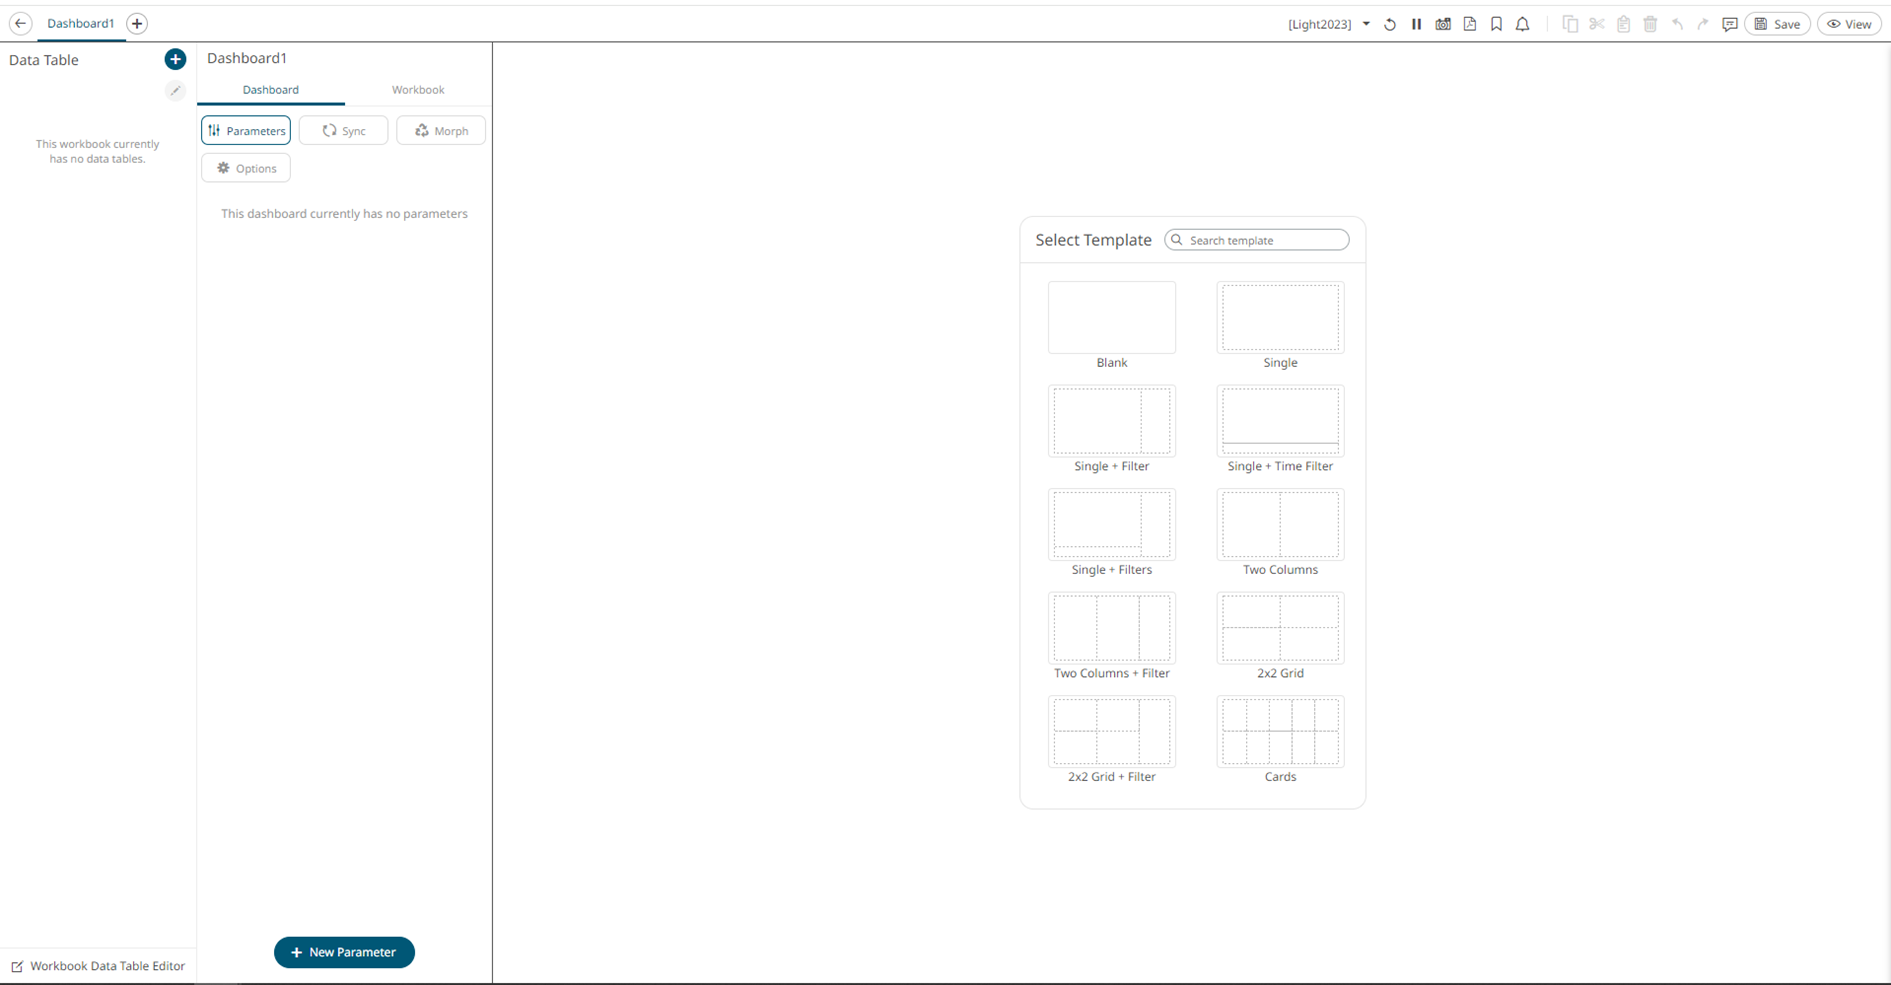
-
After creating the workbook, select a Template.
-
Open the Workbook Data Table Editor.
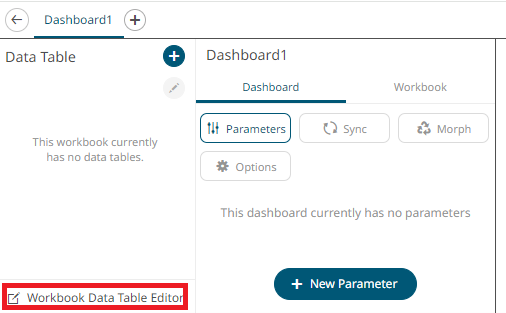
-
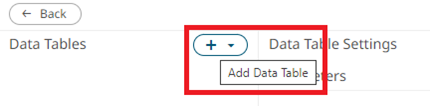
Click the + icon to add a new data table.
-
Click + Parameter to add five numeric parameters.
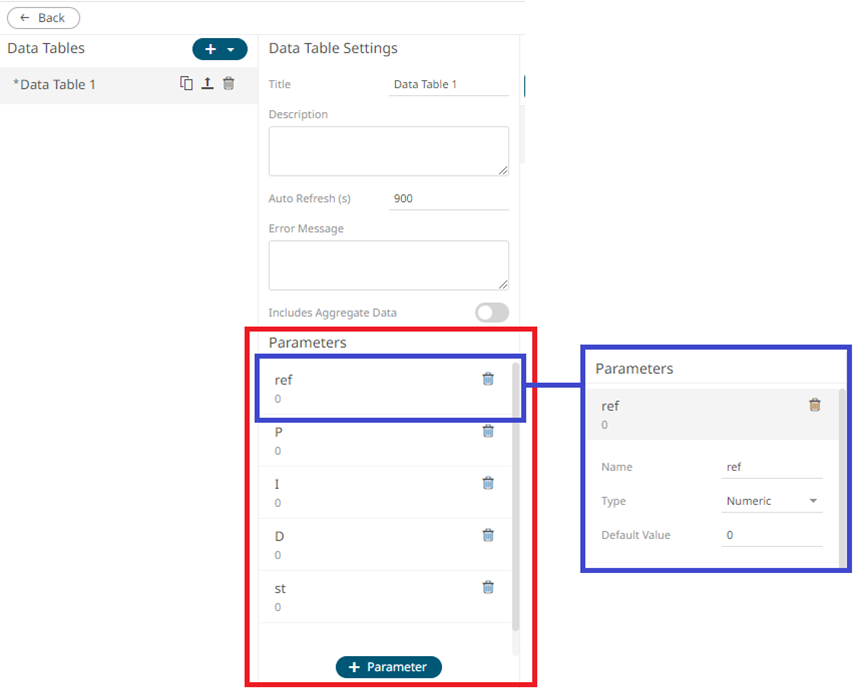
Besides the four parametrized variables mentioned before (Reference water level, P, I, and D), there will be one more, the final simulation time st. The variables are set as Numeric, and they can be freely named.
-
Select .
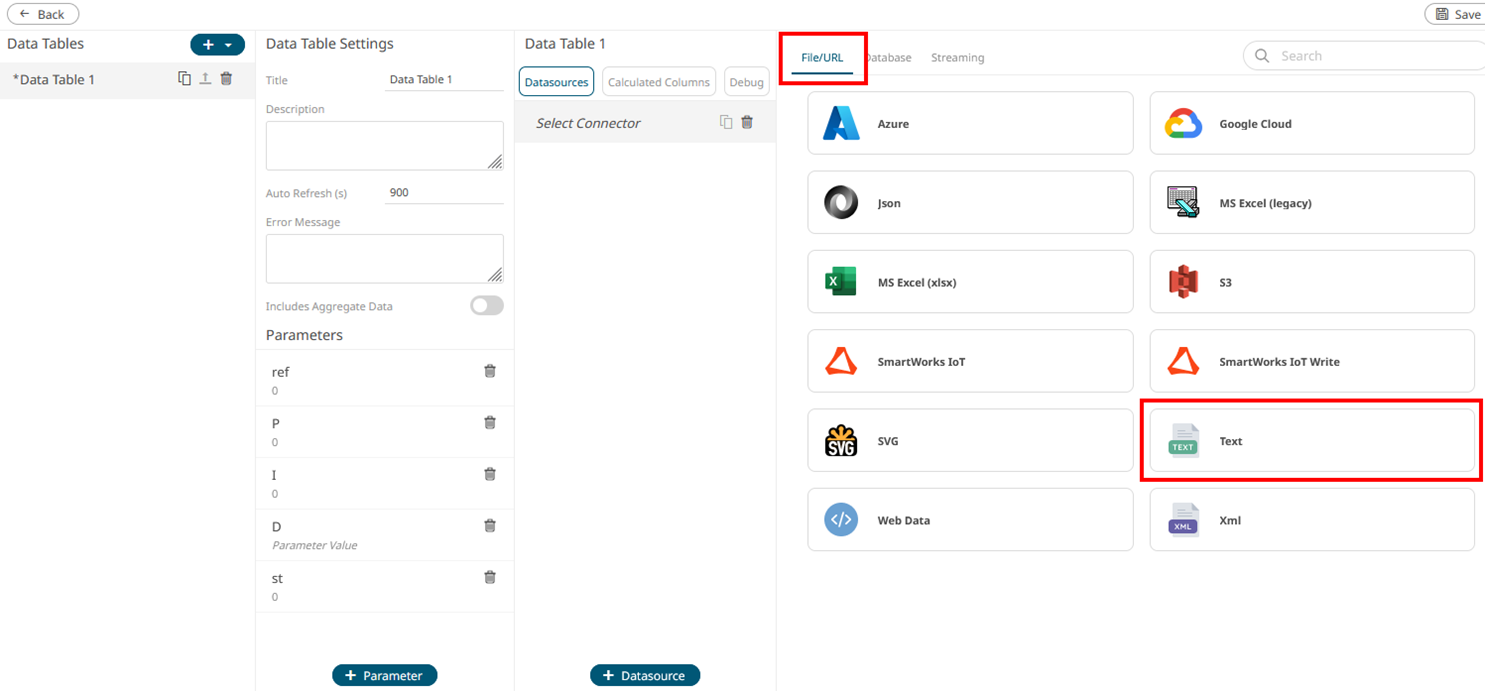
-
Change the Text File Source to
Text.
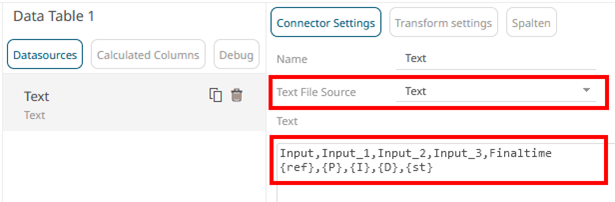 The following text is used to create a table using the parameters created in the data table:
Input,Input_1,Input_2,Input_3,Finaltime {ref},{P},{I},{D},{st} -
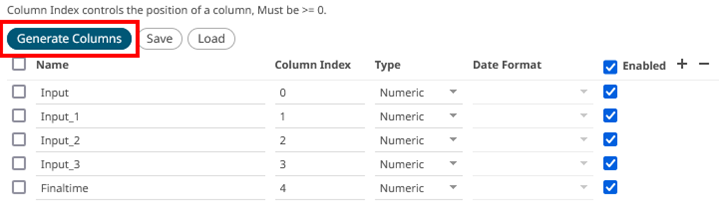
After you insert the text, click Generate Columns to
populate with the parameters.
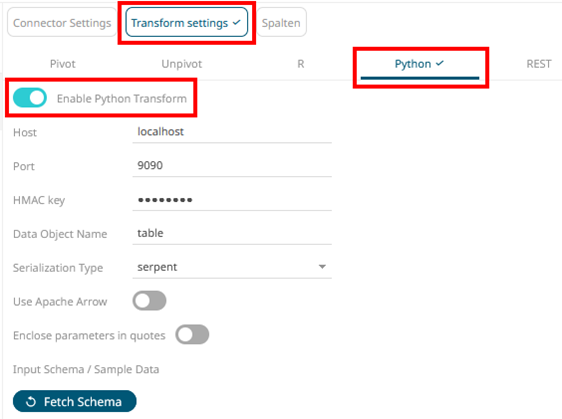
-
In , select Enable Python Transform and enter
the HMAC key from the Pyro.
The standard key is password.
-
In Python Script, insert the code below. The code is also available in
PythonScript.py.
from fmpy import read_model_description, extract, dump
from fmpy.fmi2 import FMU2Slave
from fmpy.util import plot_result, download_test_file
import numpy as np
import pandas as pd
import shutil

def simulate_custom_input(Input, Input_1, Input_2, Input_3, Finaltime):

    # define the model name and simulation parameters
    fmu_filename = '<FMU_location>\\FMU.fmu'
    start_time = 0.0
    stop_time = Finaltime
    step_size = 1e-3

    # read the model description
    model_description = read_model_description(fmu_filename)
    dump(fmu_filename)
	# collect the value references
    vrs = {}
    for variable in model_description.modelVariables:
        vrs[variable.name] = variable.valueReference
        print(variable.name,'=',variable.valueReference)
    vr_input   = vrs['Input']
    vr_input_1 = vrs['Input_1']
    vr_input_2 = vrs['Input_2']
    vr_input_3 = vrs['Input_3']
    vr_outputs = vrs['Output']
    print(vr_outputs)
    # extract the FMU
    unzipdir = extract(fmu_filename)

    fmu = FMU2Slave(guid=model_description.guid,
    unzipDirectory=unzipdir,
    modelIdentifier=model_description.coSimulation.modelIdentifier,
    instanceName='instance1')
    # initialize
    fmu.instantiate()
    fmu.setupExperiment(startTime=start_time)
    fmu.enterInitializationMode()
    fmu.exitInitializationMode()

    time = start_time

    rows = []  # list to record the results

    # simulation loop
    while time < stop_time:

        # NOTE: the FMU.get*() and FMU.set*() functions take lists of
        # value references as arguments and return lists of values

        # set the input
        fmu.setReal([vr_input], [Input])
        fmu.setReal([vr_input_1],[Input_1])
        fmu.setReal([vr_input_2],[Input_2])
        fmu.setReal([vr_input_3],[Input_3])
        # perform one step
        fmu.doStep(currentCommunicationPoint=time, communicationStepSize=step_size)

        # get the values for 'inputs' and 'outputs'
        inputs,outputs= fmu.getReal([vr_input,vr_outputs])
        inputs_1,outputs=fmu.getReal([vr_input_1,vr_outputs])
        inputs_2,outputs=fmu.getReal([vr_input_2,vr_outputs])
        inputs_3,outputs=fmu.getReal([vr_input_3,vr_outputs])

        # # use the threshold to terminate the simulation
        # if outputs > threshold:
        #     print("Threshold reached at t = %g s" % time)
        #     break
        # append the results
        rows.append((time, inputs,inputs_1,inputs_2,inputs_3,outputs))
        print(time,inputs,inputs_1,inputs_2,inputs_3,outputs)
        # advance the time
        time += step_size
    fmu.terminate()
    fmu.freeInstance()

    # clean up
    shutil.rmtree(unzipdir, ignore_errors=True)

    #convert the results to a structured NumPy array
    ptime = [rows[0] for rows in rows]
    poutput = [rows[5] for rows in rows]
    result_df= pd.DataFrame({'time': ptime, 'output': poutput})

    return result_df

t = pd.DataFrame(table)
get_df = simulate_custom_input(*t.iloc[0])
return get_df
The function simulate_custom_input has five inputs that are the parameters discussed previously. These parameters are referenced in the code.
The fmu_filename variable points to the FMU file with its location. It is good practice to use double backslashes between each of the folders.
The variables are now ready to be referenced on the dashboard and the FMU is ready to be executed.
Run the FMU inside Panopticon
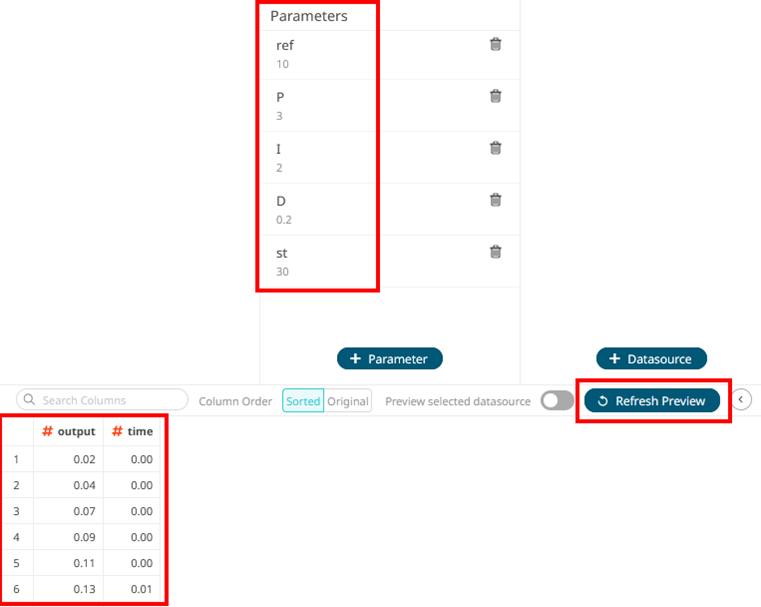
-
Assign some values to the parameters in the Data Table editor and click
Refresh Preview to see if the FMU works.
- Click Save in the upper-right to store all changes.
Design a Dashboard
- Return to the dashboard.
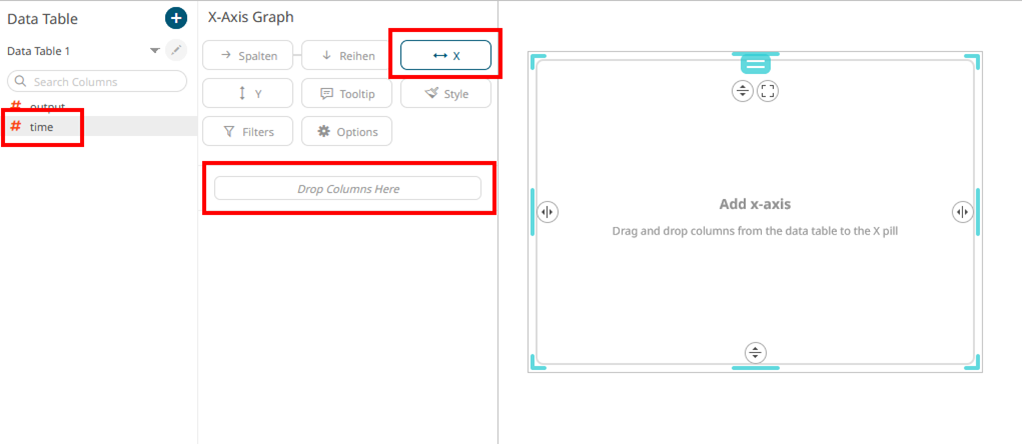
-
To add an x-axis graph, click and drag a rectangle on the dashboard and select .
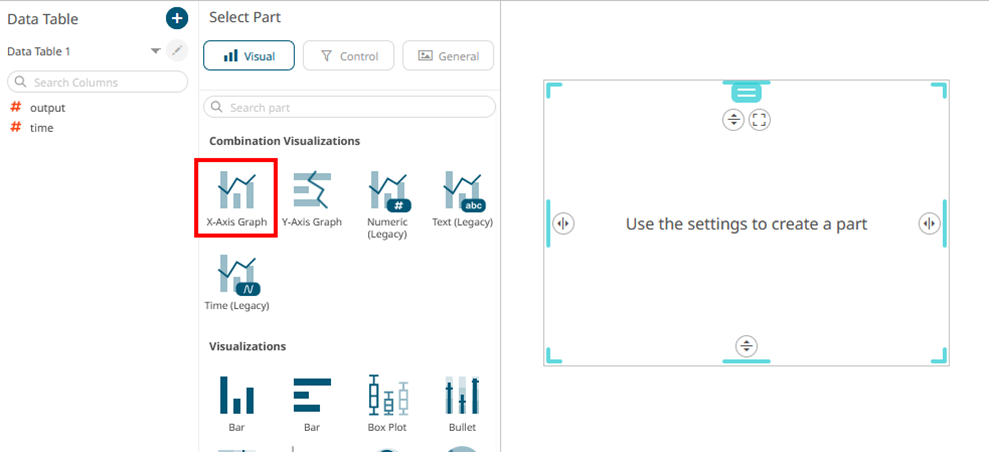
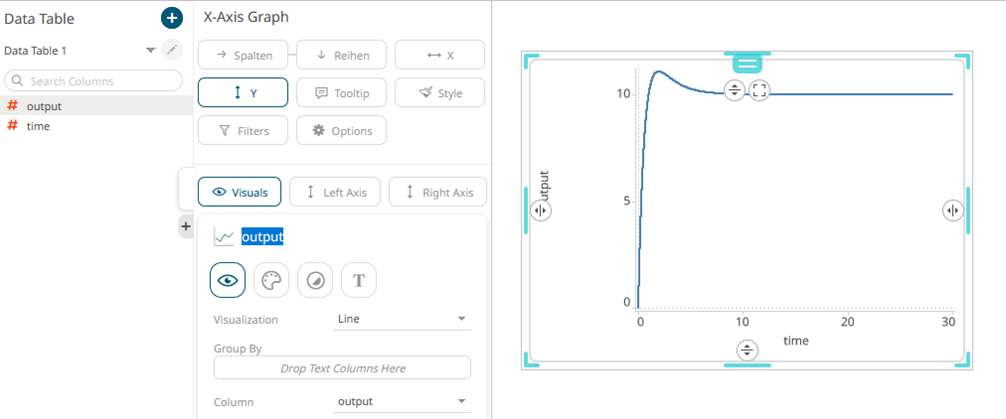
-
Assign time to X and output to Y by dragging and dropping.
-
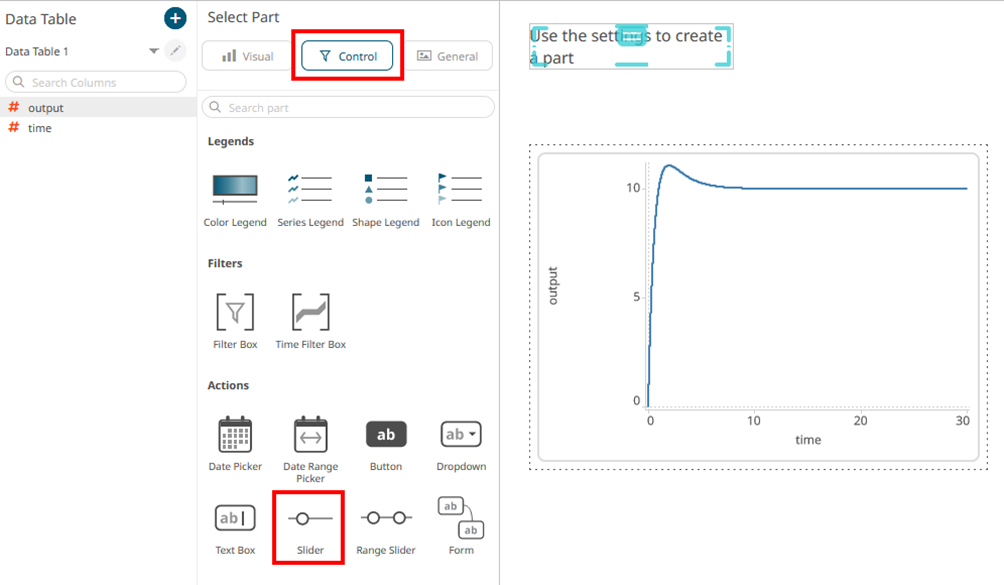
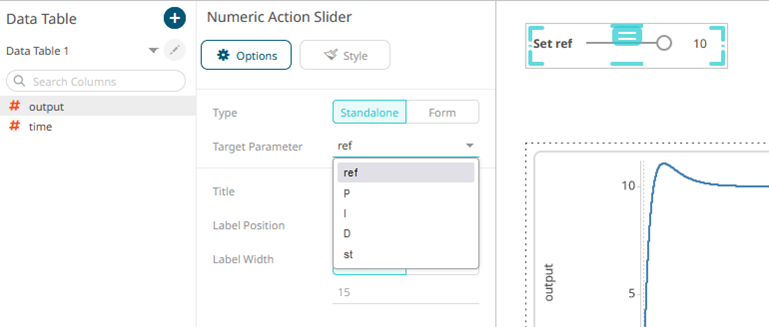
Click to add sliders for each parameter and assign the
parameters.
-
Save the changes and click View to leave the edit mode.
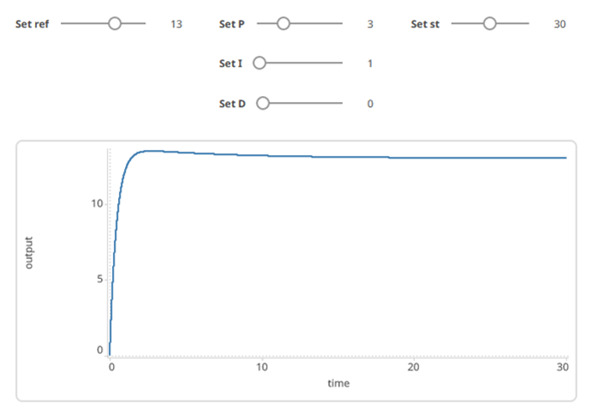
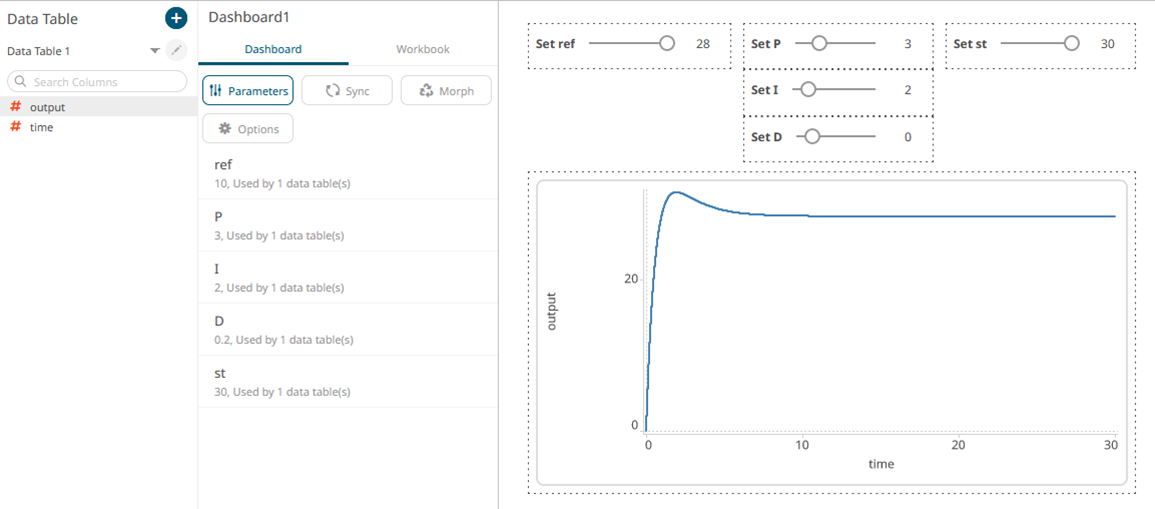
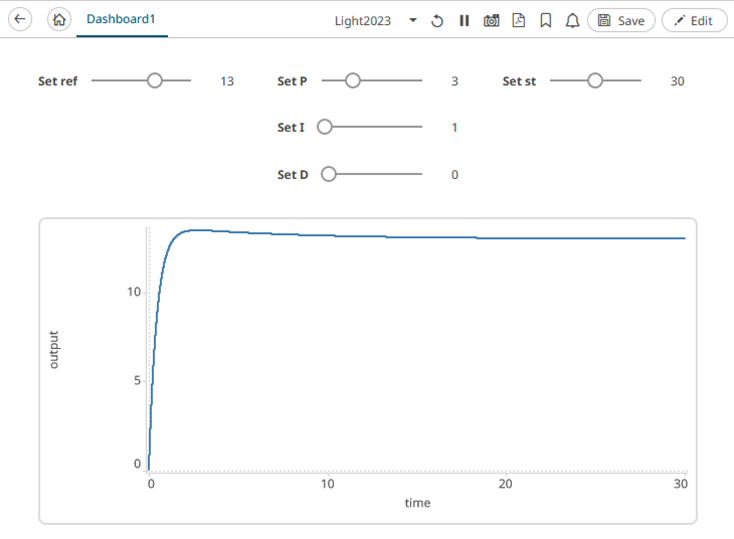
Change the parameters to run the FMU and see results in the graph. Each time a
parameter is changed, the FMU is executed and the graph is updated.
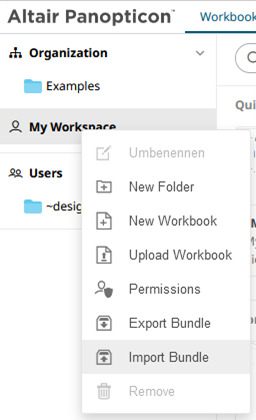
The final version of the Panopticon dashboard is available with the FMUinPano.exz bundle. To import it, right-click on My Workspace and select Import Bundle.
Panopticon is a tool with several available options to create customized dashboards, and there are focused tutorials for that. This is an example showing how to start using both tools together.