Apply a mask to hide the underlying blocks of a super block.
Masking is the main action from the Mask tool group. Masking hides the interior
blocks of a super block and changes the super block to appear and act like a regular
block. Additional tools let you edit, remove and restore a mask.
From a diagram, select a super block:
On the ribbon, from the Mask tool group , click the Auto Mask tool:
.
The super block is masked and behaves like a regular block. For example,
double-clicking a block or a masked super block opens a block dialog for
modifying parameters, whereas double-clicking an unmasked super block opens the
diagram associated with the super block.
Double-click the masked super block.
For the masked super block named, Controller, which contains a diagram
of a PID controller, the following block dialog appears with the parameters I, D
and P:The values for these parameters are the input entries, I, D, and P, which
are the context variables defined in the context of the root diagram of the
Controller super block.
Navigating in Masked Super Blocks
You can navigate inside of a masked super block from the Project Browser or the context menu.
From the Project Browser,
double-click a super block.
The model display clears, and the main diagram of the super block
appears.
Note: Navigation from the Project Browser is
the same for masked and unmasked super blocks.
From the modeling window, in a diagram, right-click a
masked super block, and from the context menu, select Enter Masked
Super Block.
The model display clears, and the main diagram of the super block
appears.
To clear the display of the super-block, in the blank space around the super
block, double-click.
The super block closes and the model display returns.
Editing Masked Super Blocks
The Edit Mask tool lets you modify the parameters associated with a super block.
Select the masked super block you want to edit.
On the ribbon, from the Mask tool group, click the
Edit tool: .
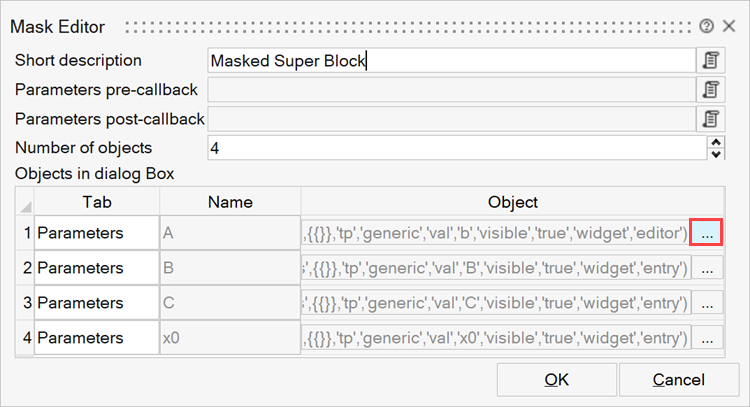
The Mask Editor dialog opens. It contains the following fields:
Short description: Enter a text description.
Parameters pre-callback: Enter an OML script to
update UI content or the block depending on parameters.
Parameters post-callback: Enter an OML script to
update UI content or the block depending on parameters.
Number of objects: Enter a number of objects that
will be shown in the dialog when you open the Parameters of the masked
super block. The objects are shown in a table below this field. These
objects can be parameters, which are defined in the Parameter Creator
detailed below.
Parameters Creator
Define parameters in a masked super block.
When you edit a masked super block to add objects, you can define those objects as text,
buttons, or parameters.
To open the Parameters Creator, after you enter a value in the Number of
objects field in the Mask Editor dialog, click the
... button to the right of an object in the table.
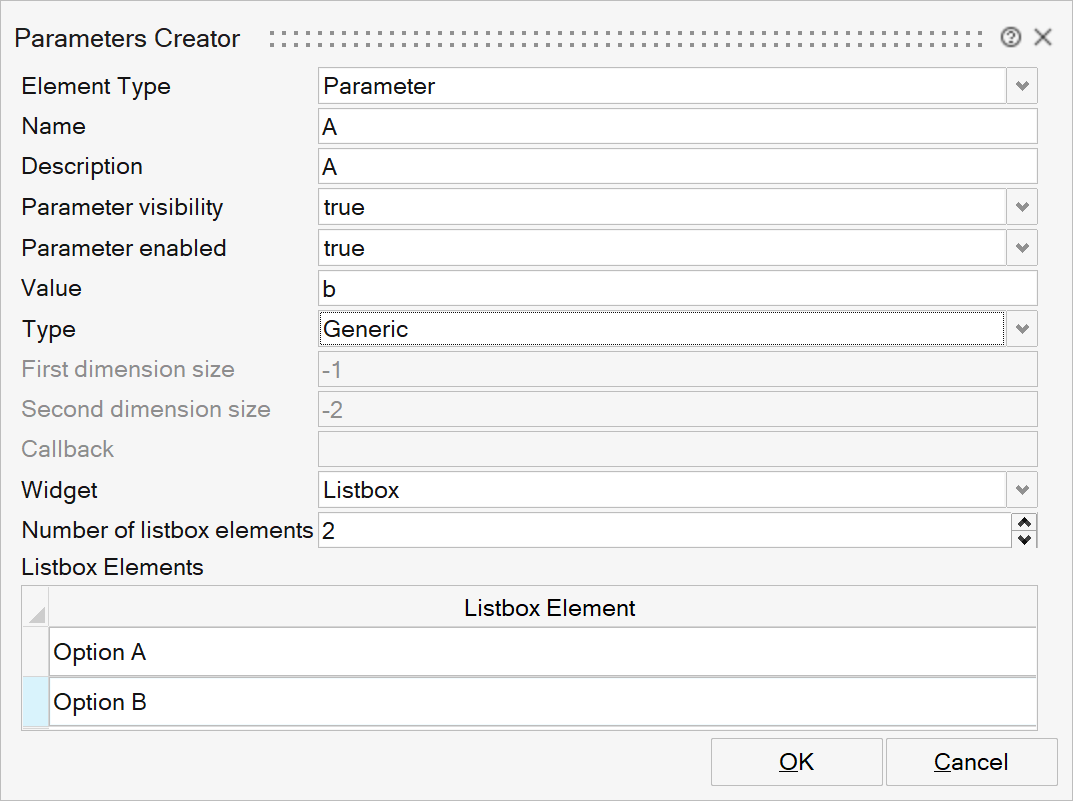
The Parameters Creator dialog contains the following fields:
Note: There are many options in the Parameters Creator, and not all fields are enabled
depending on which options you select. The following list does not necessarily cover
every possible combination of options.
Element Type: Options are Parameter,
Text, or Button. The Text option enables
only the Name and Value fields. The Button option enables the Name, Description,
Value, and Callback fields.
Name
Description
Parameter visibility: Toggle whether the parameter is
visible.
Parameter enabled: Toggle whether the parameter can
used.
Value: The default value of the parameter.
Type: Options are Scalar,
Vector, Matrix, String,
Number, and Generic. Depending on which
type you select, other fields are enabled or disabled.
First dimension size: Defines the size of a vector or
matrix if you select those types.
Second dimension size: Defines the size of a matrix if
you select that type.
Callback: For widgets Editor and Disabled Editor (see
below), define the function called by the additional editor button.
Widget: Select the type of UI element associated with the
parameter. Options include:
Entry: Simple entry field.
Checkbox: Select or deselect the parameter.
Listbox: Select entries in a list. To define the
listbox options, enter a value in Number of listbox
elements and enter the option names in the table.
Combobox: Select entries in a combobox. To define the
combobox options, enter a value in Number of
subparameters and enter Names and Descriptions in the
table.
Radio button: Select radio button options. To define
the radio button options, enter a value in Number of
subparameters and enter Names and Descriptions in the
table.
Table: Table of subparameters. Define the number of
rows in Table row dimension. Define the
Number of table subparameters. Table
subparameters are effectively another layer of parameters. Click the
... button to open the Table Parameters
Creator, which contains a subset of the same fields as the Parameters
Creator dialog.
Editor: Adds a button to the right of the parameter
that opens a script editor.
Disabled Editor: Disables the parameter field and adds
a button to the right of the parameter that opens a script editor.
Removing and Restoring Masks from Super Blocks
The Remove tool lets you remove a mask from a super block so that you can access the
hidden contents of the super block. The Restore tool reapplies the mask.
From a diagram, select a masked super block.
The tools in the Mask tool group are
activated.
On the ribbon, from the Mask tool group, select the
Remove tool: .
The mask is removed from the super block and the diagrams and other
information about the super block is accessible.
Select the super block.
From the ribbon, select the Restore tool: .
A mask is reapplied to the super block and once again the super block
behaves as a regular block.
Masking Examples
Learn about masking, auto-masking, and the creation of new blocks through
masking.
Super Block Masking
A mask placed on a Super Block breaks the semi-global hierarchical scoping mechanism.
A mask defines a set of parameters (mask parameters) and provides values for them,
possibly as a function of parameters outside the Super Block. By analogy, an
unmasked Super Block can be compared to an OML script and a masked Super Block, to
an OML function.
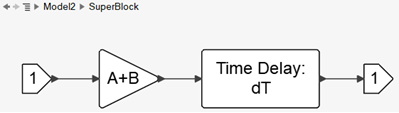
Super Block Diagram
Consider the following diagram, inside a Super Block named SuperBlock:
If the Super Block Context is empty, the parameters of this diagram are A,
B and dT. If the Super Block is masked, then the mask should
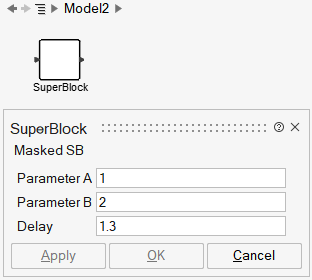
define these three parameters. Such a mask may look as follows:
The mask parameter names are not directly visible on the mask GUI; they can be made
visible by placing the cursor on top of the parameter description. In this case the
mask parameters are named A, B and dT. The parameter values are
defined by numerical values 1, 2 and 1.3. At this point the Super Block resembles a
library block; the mask parameters are essentially local, private variables of the
block, transparent to the user.
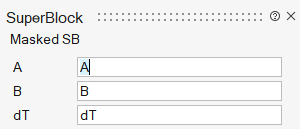
Auto-Masking
The mask for a Super Block may be created using the mask editor, or it can be
generated automatically. The auto-masking facility identifies the set of parameters
required to make the diagram inside the Super Block self-contained and use them both
as mask parameter names and values. Auto-masking, applied to the previous example,
creates the following mask:
This mask defines parameters named A, B and dT inside the Super
Block from model parameters with the same names outside the Super Block. This mask
can then be edited, in particular for providing descriptions for the parameters
(auto-masking places by default the name of the parameter in the description
field).
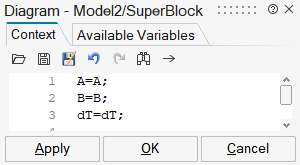
It should be emphasized that this model contains now two parameters named A,
having the same value. The same is true for B and dT. Semantically,
the presence of this mask is equivalent to placing the following instructions in the
Context of the Super Block:
Creating New Blocks through Masking
Once a Super Block is masked, it can be used like a library block, and even placed in
a block library. The values of the parameters should simply be replaced by default
numerical values. Several Twin Activate base library blocks are masked Super Blocks.
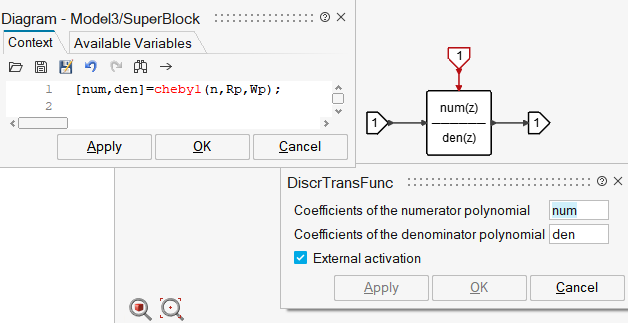
Creating a New Block with a Digital Chebyshev Filter
Consider the creation of a new block that implements a digital Chebyshev filter of
type I, based on the OML function cheby1. This function computes the
numerator and the denominator of the discrete transfer function of the filter based
on the order of the filter, its attenuation factor, and its cut-off frequency. The
Chebyshev block does not exist in Twin Activate but the discrete transfer function does.
So, a Chebyshev block can be constructed as a masked Super Block as follows:
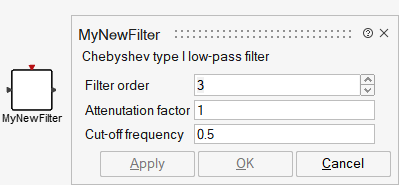
The new block can now be created by auto-masking this Super Block, and editing the
mask to provide a description for the block, and, descriptions and default values
for the parameters:
This block can now be used as such in the model or be placed in a library for wider
usage.


 , click the Auto Mask tool:
 .
The super block is masked and behaves like a regular block. For example, double-clicking a block or a masked super block opens a block dialog for modifying parameters, whereas double-clicking an unmasked super block opens the diagram associated with the super block.
.
The super block is masked and behaves like a regular block. For example, double-clicking a block or a masked super block opens a block dialog for modifying parameters, whereas double-clicking an unmasked super block opens the diagram associated with the super block.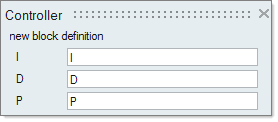
 .
The Mask Editor dialog opens. It contains the following fields:
.
The Mask Editor dialog opens. It contains the following fields: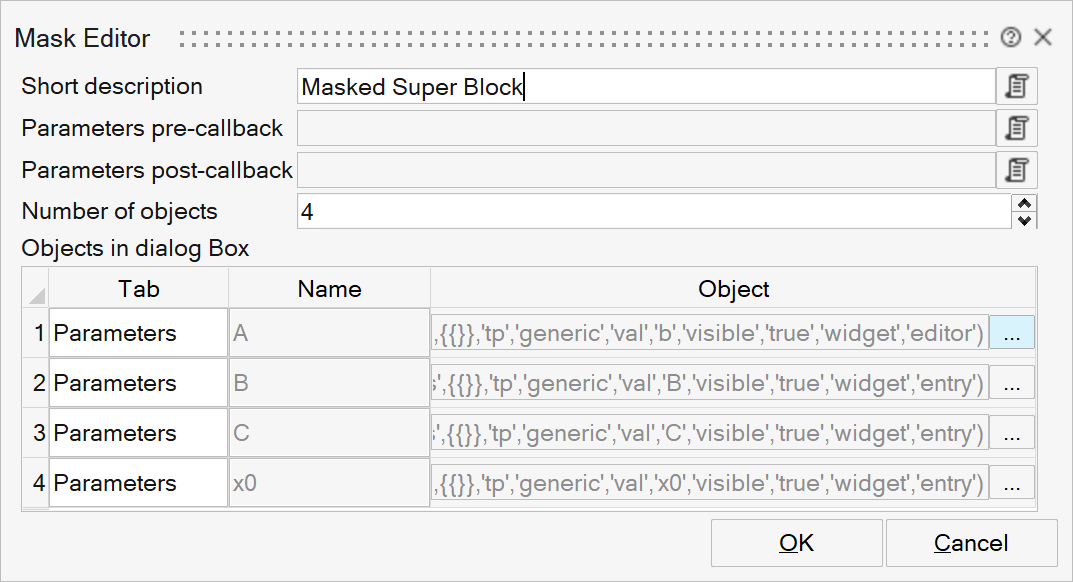
 .
The mask is removed from the super block and the diagrams and other information about the super block is accessible.
.
The mask is removed from the super block and the diagrams and other information about the super block is accessible. .
A mask is reapplied to the super block and once again the super block behaves as a regular block.
.
A mask is reapplied to the super block and once again the super block behaves as a regular block.