In this section, you will be taking the place of an Author who must fulfill a demand
from the CAE department.
You receive a message from the CAE department. Orchestrators want to expand the
module library due to request from an analyst that wants to test various geometry
configurations of the hull. You are required to develop a module that accomplishes
this task.
Click on the Application Template button to create a new
module.
Figure 1.
The three main components of an application template are:
its application.
the script.
inputs and outputs.
Name the task as desired.
Set the Application to Inspire
2022.
Figure 2.
To create the necessary inputs and outputs to communicate with the application,
navigate to the Input-Output tab.
Click to create an input.
Figure 3.
Change the following parameters of the geometry file that are to be
modified by the application.
Display name is the name the user will
see when asked for input.
Variable name is the name that must be
used in the script to refer to the input.
Type is the input type, which can be
Scalar, File or Directory. In this case it is File.
In the GUI Description you can define how
the user will be prompted for the input.
In this case the Widget will be a File path open.
Figure 4.
Click to create an input that will control how the
geometry of the hull will be modified.
Change the following parameters.
When the input type is Scalar, you can
select between different Value types,
String,
Boolean,
Double or
Integer. In this case we will use
String.
Note that in the GUI Description, the Widget is now defined as
Combobox. The available Widget will depend on the input Type and
Value Type of the input. Combobox allows the user to select
between predefined values through a drop-down menu. The
permitted values will be defined through the
Allowables entry. One can also define
a Default value.
Figure 5.
Click and select Output to create
an output that contains the modified geometry file.
Change the following parameters.
Define Type as
File
If Scalar was chosen earlier,
Value(s).
The output can only get its value through the script using Pulse
APIs.
Figure 6.
Go to the Task tab and select
Script. Here we are going to define the script that
will perform the modifications to the geometry.
Inspire has a python automation layer, so chose
Python as Script language.
For Script name select the InspireHullMod.py that can
be found in the ThreeProfiles Tutorial > Author folder.
Figure 7.
Pulse executes applications based on the definition on the Application tab. For
example, when Inspire 2022 is select as application on an application template,
it will be executed with no arguments. Therefore, to execute the python script
in Inspire 2022, we need to define the necessary arguments. As a best practice,
define the arguments inside the application template.
Figure 8.
Navigate to the Task tab and select
General. Under the General section go to
Arguments and type -f $SCRIPTNAME.
-f is an Inspire parameter and
$SCRIPTNAME will input the value into Script
name.
Close the application template dialog.
Figure 9.
The script must be modified to properly define the communication between Pulse
and Inspire.
Right-click on the application template and select Edit
Script…
Figure 10.
The Pulse Script Editor opens and displays the existing script.
Figure 11.
Lines 1 to 6 import python and Inspire needed libraries.
Lines 8 to 11 import Pulse API.
Line 15 defines Inspire units.
Lines 18 and 19 import the geometry to Inspire.
Lines 21 to 23 performs a selection of the geometrical
features.
Lines 26 to 31 perform the modification of the geometry.
Lines 35 and 36 set the value of the output variable
out_file.
Line 40 saves the model.
You can see how in lines 26 and 40 Pulse API
getVariableValue command is being used to retrieve
the value input by the user. Line 35 uses the
getWorkingDir command to get the current Pulse
working directory and line 36 uses the setVariableValue
command to set the value of the output out_file. To learn
more, review the API Commands Pulse help
section.
Edit line 18 so that it reads InputModel=
pulse.getVariableValue("input_file")and save the file.
The python InputModel variable now gets its value
from input_file Pulse input.
Figure 12.
9. Execute the application template by clicking the Run button.
Select the Hull.x_t geometry file in the ThreeProfiles Tutorial > Author folder location.
Chose any rib configuration from the drop-down menu.
Figure 13.
Click Proceed.
Inspire opens to the model with the rib configuration selected.
Figure 14.
Review the model and close Inspire.
Hover over the input and output ports of the realized task.
The values of input or output will be displayed.
Figure 15.
Figure 16.
Click the Stop button.
Right-click the task.
Click to select Export to Library.
Figure 17.
The Save File dialog opens.
Navigate to the ThreeProfiles Tutorial > Author > Library folder.
Double-click to open the User Modules
folder.
Create a new folder named Hull_Modification.
Inside this folder, save the module as
Hull_Modification.
Figure 18.
Create a new Pulse project by clicking the following icon.
Figure 19.
Navigate to the Library tab.
If ThreeProfiles Tutorial > Author > Library is not defined as the Library, click
Preferences and define the Library.
Right-click on the blank space of the Library tab.
Click to select Refresh.
Figure 20.
Click to expand the User Modules, then
Hull_Modification folders.
The newly exported task will be visible.
Figure 21.
Optionally, open the Pulse project created in the Orchestrator tutorial section
and link the Hull_Modification task to the
beginning.
 Figure 1. The three main components of an application template are:
 Figure 2.
  to create an input.
 Figure 3.
  Figure 4.
  Figure 5.
  Figure 6.
  Figure 7.
  Figure 8.
  Figure 9.
 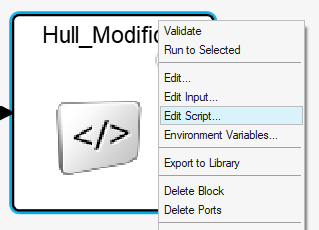 Figure 10.
  Figure 11.
  Figure 12.
  Figure 13.
  Figure 14.
 Figure 16.
  Figure 17. The Save File dialog opens.
 Figure 18.
 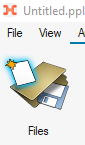 Figure 19.
  Figure 20.
 Figure 22.