Edit Soldering Pallet
Use this function to modify the Soldering Pallet Data generated through the Soldering Pallet Generator.
When the Soldering Pallet Generator is executed, the data required to create the Soldering Pallet are as follows.
Data required to produce Soldering Pallet are distributed and generated in Pallet Area, Hole_Variant_Barrier, Pallet Bottom, Pallet Frame, Reflow_Process, Pallet Boundary Layer.
 Figure 1. |
 Figure 2. |
In the Edit function, functions such as adding, modifying, and removing data on the screen are performed.
From the menu bar, click . The Edit Menu dialog opens.
Open, Save As, Export DXF, Generate Layer
- Open: Open the PollEx Soldering Pallet Edit files (*.PSPE).
- Save As: Save as PollEx Soldering Pallet Edit file (*.PSPE).
- Export DXF: Outputs data related to Soldering Pallet to DXF file.
- Generate Layer: Additional layers related to Soldering Pallet are generated.
Add Pallet Area
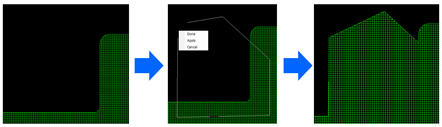
Figure 3.
If you click on any coordinates and click Done or Apply, a polygon area is added.
Add Lines
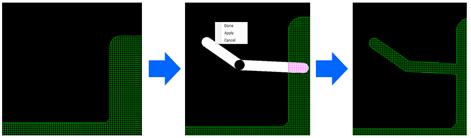
Figure 4.
Auto Routing
If there are few bridges that are automatically created in the Soldering Pallet Area, select the area to be connected and click Done or Apply to find and connect the shortest distance among the parts that can be connected between the two areas.
Straighten Lines

Figure 5.
If the Start Point and End Point are entered near the data that has already been created, the area can be straightened using the mouse.
Arrange Lines
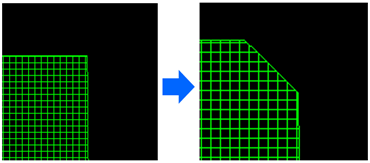
Figure 6.
This is a function to organize the outer lines.
It changes the 90-degree corner of the generated soldering pallet data to 45 degrees, or performs the function to automatically clean up unnecessary data.
Add Text

Figure 7.
- Text characters are displayed at the clicked position with the mouse
- Back Space: erase Hangeul characters from behind
- Left, Right, Bottom, Top arrows: Move text position
- Shift + Bottom, Shift + Top: Change font size
Delete Pallet Area
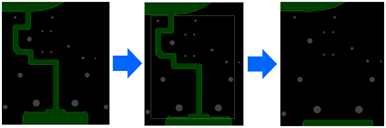
Figure 8.
Select a rectangular area with the mouse, the selected area is removed.
Select Pallet Area and Move
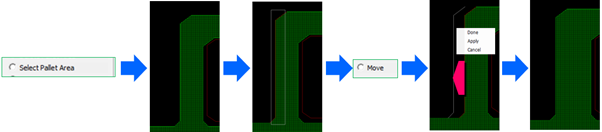
Figure 9.
- Select Pallet Area: Select an object using the mouse on the screen. Data included in the selected area is displayed in red.
- Select Move: Move the selected data with the mouse. When applied as Done or Apply, the selected area is moved.