Install Grid Engine Execd on the VM
Install the Grid Engine Execd on the virtual machine and configure the VM per your site's environment.
A startup script is provided during the creation of the cloud environment. This script (cloud-init script) is executed after a cloud node is deployed and is used to set up the system environment so that nodes deployed in the cloud can communicate with the workload manager. A service specifically designed for cloud instance initialization is cloud-init and is utilized by NavOps when booting cloud nodes, therefore it must be installed on the VM. For more information about installing cloud-init, refer to the Cloudinit Documentation.
The PBS Professional installer package will need to be copied to the virtual machine. Use SCP to copy the tarball file to the virtual machine. For more information, see Move files to and from a Linux VM using SCP.
- SSH into the virtual machine using the public IP address of the
VM:
ssh IPV4PublicIP
where IPV4PublicIP is the public IP address of the virtual machine.Figure 1. Bursting Virtual Machine 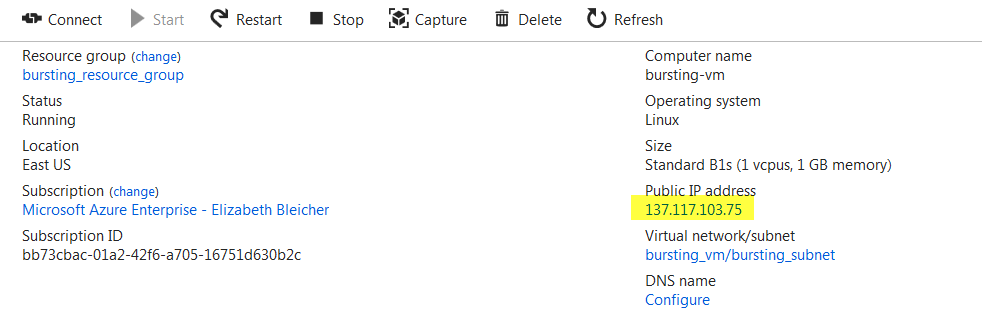
-
Enter the command:
sudo -i
- Upload your installers to the VM.
- Update the Operating system (For example, yum update).
- Ensure SELinux is in permissive or disabled mode. Edit /etc/selinux/config, to set without reboot setenforce 0
-
Install firewalld and open it on internal network:
yum -y install firewalld
systemctl enable firewalld
systemctl start firewalld
firewall-cmd --zone=trusted --permanent --add-source=10.0.0.0/16
firewall-cmd --reload
Note: Adjust the subnet per your network configuration, our subnet has 10.0.0.0/16 available -
Create key users with the same IDs as user on headnode. This must match as
default AGE project will be NFS mounted. Add AGE Admin user to instance, we
chose agedata as this user on our AGE Master:
groupadd agedata -g 1002
useradd agedata -u 900 -g 1002 -m
-
Add users to the system or connect to auth:
groupadd centos -g 1001
useradd centos -u 1001 -g 1001 -m
-
Mount AGE (${SGE_ROOT}/${SGE_CELL}) on to compute instance.
In this case we also mounted /home for ease of SSH key
management, this is only scaleable to approx 50 to 400 nodes depending on NFS
tuning.
create ${SGE_ROOT}/${SGE_CELL} chown -R agedata:agedata ${SGE_ROOT} -
Update /etc/fstab:
ip-10-0-0-70:/home /home nfs defaults 0 0
ip-10-0-0-70:/age/default /age/default nfs defaults 0 0
For example,<AGE-Master>:/${SGE_ROOT}/${SGE_CELL} /${SGE_ROOT}/${SGE_CELL} nfs defaults 0 0 - Mount with:mount -a
-
Validate with: df
root@ip-10-0-0-197 age]# df

Filesystem 1K-blocks Used Available Use% Mounted on
…
ip-10-0-0-70:/home 209702912 31398912 178304000 15% /home
ip-10-0-0-70:/age/default 209702912 31398912 178304000 15% /age/default
Note: On Server export these as:/home *(rw,no_root_squash,sync,no_subtree_check) /age/default *(rw,no_root_squash,sync,no_subtree_check) e.g. /${SGE_ROOT}/${SGE_CELL} *(rw,no_root_squash,sync,no_subtree_check) - Copy common and platform specific Grid Enginer installers to /${SGE_ROOT} which, in this instance, is: cd /age
- Using the Grid Engine Installation Guide, install and configure the system. The scaling process uses a lot of data from the server, this make it easier to run the cloud-init and create the environment.
- Configure the VM for your site's environment such as mounting file systems, connecting it to the authentication service, installing any applications, etc.
-
Check if cloud-init is installed. For example:
yum list installed | grep cloud
-
If cloud-init is not present, install it. For example:
yum install cloud-init
- Submit a job and test to ensure it is working as expected.
-
Test scaling with a cloud-init using SGE_ROOT/SGE_CELL.
Here's an example cloud-init.
#!/bin/bash
NAVOPS_HOST="<NavOps-Host-IP" <<DYNAMIC_VALUE>>
SGE_ROOT="/age" <<DYNAMIC_VALUE>>
SGE_CELL="default" <<DYNAMIC_VALUE>>
curl --insecure https://${NAVOPS_HOST}/resources/agent/navops-agent.age-exec.linux_amd64.tgz | sudo tar xzf - -C /opt
/opt/navops/bin/agent-setup.sh --non-interactive
systemctl enable /opt/navops/etc/systemd/navops-agent.service
/usr/bin/sed -i "s#sge_root:.*#sge_root: ${SGE_ROOT}#" /opt/navops/etc/meta.yaml
/usr/bin/sed -i "s#^spool_dir:.*#spool_dir: ${SGE_ROOT}/${SGE_CELL}/spool/$(hostname | awk -F. '{print $1}')/active_jobs#" /opt/navops/etc/meta.yaml
systemctl start navops-agent