
Create a Material
Create, modify, apply, save, and organize materials.
- Select one or more objects.
-
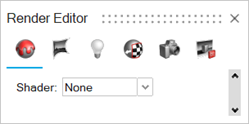
On the Rendering tab, select the
Editors tool.
Tip: To find and open a tool, press Ctrl+F. For more information, see Find and Search for Tools.The Render Editor appears.
-
Select the Material tab.
-
From the Shader dropdown menu, select a material
type.
- None
- Plastic
- Carbon Fiber
- Metal
- Leather
- Wood
- Simple Glass
- Glass/Gems
- Fabric
- Paint
- Construction
- Emitter
The material is applied.
- Define the parameters.
Plastic Material Parameters
Define the color, reflectivity, roughness, transparency, and more.
- Color
- To define the color, choose from the following
options:
- Select a color.
- Select a texture. The texture overrides the color.
- To blend the color with the texture, click the plus symbol (+). You can tell if the blend option is turned on by looking at the image preview.
To define the shade, enter a value of 0-100, where 100 is the true color and 0 is black.
- Reflectivity
- Define the strength of the reflections.
Enter a value of 0-100, where 100 produces perfect mirror reflections and 0 produces the weakest reflections.
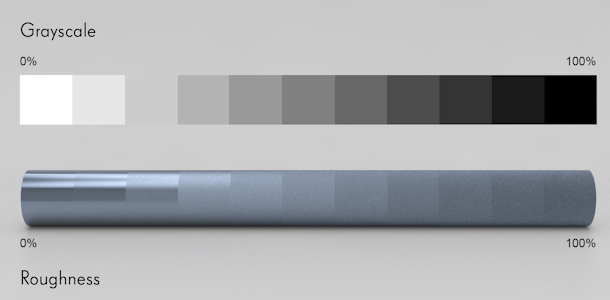
- Roughness
- Roughness adds texture to the material at a microscopic level. When you
modify the roughness, the surface texture still looks the same; however,
tiny changes invisible to the naked eye have occurred, affecting
reflectivity.
0 can produce a perfect mirror reflection.
Lower values produce crisper and brighter reflections.
Higher values produce blurrier, dimmer reflections. Increasing the roughness spreads and distributes reflections over the surface and creates a more matte surface.
At values approaching 100, light becomes so scattered that reflections are barely visible, if at all.
- Transparency
- Define the level of the material transparency. 100 = completely transparent, 0 = fully opaque.
- Bump
- Bump adds texture to the material at a macroscopic level. Because it visibly
affects the surface texture, Bump is useful for simulating irregular
surfaces.A bump map gives the illusion of texture without physically distorting the geometry, minimizing rendering time. The grayscale map tells Inspire Form how to change the surface normals as if the surface had been displaced; the modified normals are used in lighting calculations. A bump map looks like the inverse of what you might expect: black represents the highest extreme and white represents the flattest extreme, while shades of gray represent grades in between.
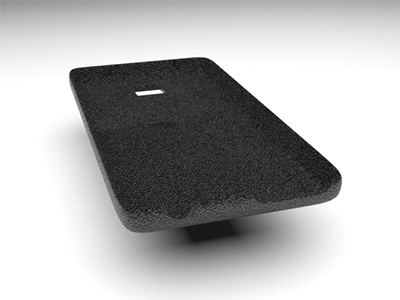
- Coating
- Create varnishes and paints on a layered material.
The coating will reflect some light, while the rest of the light will be absorbed by the layer of material underneath; the extent to which this happens affects how the final material looks.
Several coatings may be applied one after the other, simulating multiple varnishes and paints.
Figure 1. Plastic without a Coating 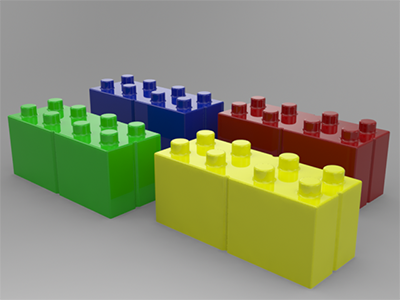
Figure 2. Plastic with a Coating 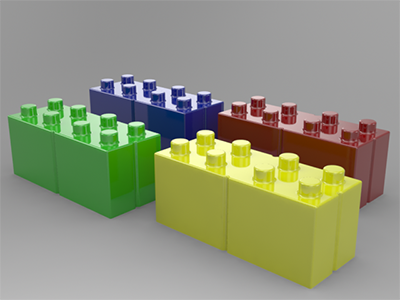
- Scratches
- Add scratches to a material.
- Wear
- Add wear to a material.
- Trimming
- Add cut-out patterns to a material.
Carbon Fiber Material Parameters
Define the color, reflectivity, roughness, transparency, and more.
- Reflectivity
- Define the strength of the reflections.
Enter a value of 0-100, where 100 produces perfect mirror reflections and 0 produces the weakest reflections.
- Roughness
- Roughness adds texture to the material at a microscopic level. When you
modify the roughness, the surface texture still looks the same; however,
tiny changes invisible to the naked eye have occurred, affecting
reflectivity.
0 can produce a perfect mirror reflection.
Lower values produce crisper and brighter reflections.
Higher values produce blurrier, dimmer reflections. Increasing the roughness spreads and distributes reflections over the surface and creates a more matte surface.
At values approaching 100, light becomes so scattered that reflections are barely visible, if at all.
- Transparency
- Define the level of the material transparency. 100 = completely transparent, 0 = fully opaque.
- Texture
- Select or upload a texture to apply to the object. To learn how to adjust the texture, see Edit and Position the Material's Texture.
- Color
- To define the color, choose from the following
options:
- Select a color.
- Select a texture. The texture overrides the color.
- To blend the color with the texture, click the plus symbol (+). You can tell if the blend option is turned on by looking at the image preview.
To define the shade, enter a value of 0-100, where 100 is the true color and 0 is black.
- Bump
- Bump adds texture to the material at a macroscopic level. Because it visibly
affects the surface texture, Bump is useful for simulating irregular
surfaces.A bump map gives the illusion of texture without physically distorting the geometry, minimizing rendering time. The grayscale map tells Inspire Form how to change the surface normals as if the surface had been displaced; the modified normals are used in lighting calculations. A bump map looks like the inverse of what you might expect: black represents the highest extreme and white represents the flattest extreme, while shades of gray represent grades in between.
- Anisotropy
- Stretch and blur highlights. Anisotropic reflections are like regular reflections, except they are stretched and blurred against the grain of the material. They are often used to simulate finely brushed metals.
- Coating
- Create varnishes and paints on a layered material.
The coating will reflect some light, while the rest of the light will be absorbed by the layer of material underneath; the extent to which this happens affects how the final material looks.
Several coatings may be applied one after the other, simulating multiple varnishes and paints.
Figure 3. Plastic without a Coating
Figure 4. Plastic with a Coating
- Scratches
- Add scratches to a material.
- Wear
- Add wear to a material.
- Trimming
- Add cut-out patterns to a material.
Metal Material Parameters
Define the color, reflectivity, roughness, transparency, and more.
- Presets
- The Preset is automatically set to
Custom.Choose one of the following options:
- Aluminum
- Brass
- Chassis
- Chromium
- Copper
- Galvanized
- Gold
- Silver
- Stainless
- Titanium
- Color
- To define the color, choose from the following
options:
- Select a color.
- Select a texture. The texture overrides the color.
- To blend the color with the texture, click the plus symbol (+). You can tell if the blend option is turned on by looking at the image preview.
To define the shade, enter a value of 0-100, where 100 is the true color and 0 is black.
- Reflectivity
- Define the strength of the reflections.
Enter a value of 0-100, where 100 produces perfect mirror reflections and 0 produces the weakest reflections.
- Roughness
- Roughness adds texture to the material at a microscopic level. When you
modify the roughness, the surface texture still looks the same; however,
tiny changes invisible to the naked eye have occurred, affecting
reflectivity.
0 can produce a perfect mirror reflection.
Lower values produce crisper and brighter reflections.
Higher values produce blurrier, dimmer reflections. Increasing the roughness spreads and distributes reflections over the surface and creates a more matte surface.
At values approaching 100, light becomes so scattered that reflections are barely visible, if at all.
- Transparency
- Define the level of the material transparency. 100 = completely transparent, 0 = fully opaque.
- Bump
- Bump adds texture to the material at a macroscopic level. Because it visibly
affects the surface texture, Bump is useful for simulating irregular
surfaces.A bump map gives the illusion of texture without physically distorting the geometry, minimizing rendering time. The grayscale map tells Inspire Form how to change the surface normals as if the surface had been displaced; the modified normals are used in lighting calculations. A bump map looks like the inverse of what you might expect: black represents the highest extreme and white represents the flattest extreme, while shades of gray represent grades in between.
- Coating
- Create varnishes and paints on a layered material.
The coating will reflect some light, while the rest of the light will be absorbed by the layer of material underneath; the extent to which this happens affects how the final material looks.
Several coatings may be applied one after the other, simulating multiple varnishes and paints.
Figure 5. Plastic without a Coating
Figure 6. Plastic with a Coating
- Brushed
- Add a brushed finish to a material.
- Scratches
- Add scratches to a material.
- Wear
- Add wear to a material.
- Trimming
- Add cut-out patterns to a material.
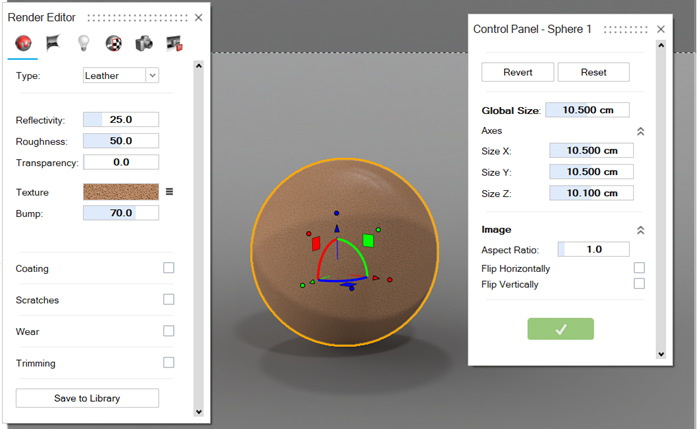
Leather Material Parameters
Define the color, reflectivity, roughness, transparency, and more.
- Reflectivity
- Define the strength of the reflections.
Enter a value of 0-100, where 100 produces perfect mirror reflections and 0 produces the weakest reflections.
- Roughness
- Roughness adds texture to the material at a microscopic level. When you
modify the roughness, the surface texture still looks the same; however,
tiny changes invisible to the naked eye have occurred, affecting
reflectivity.
0 can produce a perfect mirror reflection.
Lower values produce crisper and brighter reflections.
Higher values produce blurrier, dimmer reflections. Increasing the roughness spreads and distributes reflections over the surface and creates a more matte surface.
At values approaching 100, light becomes so scattered that reflections are barely visible, if at all.
- Transparency
- Define the level of the material transparency. 100 = completely transparent, 0 = fully opaque.
- Texture
- Select or upload a texture to apply to the object. To learn how to adjust the texture, see Edit and Position the Material's Texture.
- Bump
- Bump adds texture to the material at a macroscopic level. Because it visibly
affects the surface texture, Bump is useful for simulating irregular
surfaces.A bump map gives the illusion of texture without physically distorting the geometry, minimizing rendering time. The grayscale map tells Inspire Form how to change the surface normals as if the surface had been displaced; the modified normals are used in lighting calculations. A bump map looks like the inverse of what you might expect: black represents the highest extreme and white represents the flattest extreme, while shades of gray represent grades in between.
- Coating
- Create varnishes and paints on a layered material.
The coating will reflect some light, while the rest of the light will be absorbed by the layer of material underneath; the extent to which this happens affects how the final material looks.
Several coatings may be applied one after the other, simulating multiple varnishes and paints.
Figure 7. Plastic without a Coating
Figure 8. Plastic with a Coating
- Scratches
- Add scratches to a material.
- Wear
- Add wear to a material.
- Trimming
- Add cut-out patterns to a material.
Wood Material Parameters
Define the color, reflectivity, roughness, transparency, and more.
- Reflectivity
- Define the strength of the reflections.
Enter a value of 0-100, where 100 produces perfect mirror reflections and 0 produces the weakest reflections.
- Roughness
- Roughness adds texture to the material at a microscopic level. When you
modify the roughness, the surface texture still looks the same; however,
tiny changes invisible to the naked eye have occurred, affecting
reflectivity.
0 can produce a perfect mirror reflection.
Lower values produce crisper and brighter reflections.
Higher values produce blurrier, dimmer reflections. Increasing the roughness spreads and distributes reflections over the surface and creates a more matte surface.
At values approaching 100, light becomes so scattered that reflections are barely visible, if at all.
- Transparency
- Define the level of the material transparency. 100 = completely transparent, 0 = fully opaque.
- Texture
- Select or upload a texture to apply to the object. To learn how to adjust the texture, see Edit and Position the Material's Texture.
- Bump
- Bump adds texture to the material at a macroscopic level. Because it visibly
affects the surface texture, Bump is useful for simulating irregular
surfaces.A bump map gives the illusion of texture without physically distorting the geometry, minimizing rendering time. The grayscale map tells Inspire Form how to change the surface normals as if the surface had been displaced; the modified normals are used in lighting calculations. A bump map looks like the inverse of what you might expect: black represents the highest extreme and white represents the flattest extreme, while shades of gray represent grades in between.
- Coating
- Create varnishes and paints on a layered material.
The coating will reflect some light, while the rest of the light will be absorbed by the layer of material underneath; the extent to which this happens affects how the final material looks.
Several coatings may be applied one after the other, simulating multiple varnishes and paints.
Figure 9. Plastic without a Coating
Figure 10. Plastic with a Coating
- Scratches
- Add scratches to a material.
- Wear
- Add wear to a material.
- Trimming
- Add cut-out patterns to a material.
Simple Glass Parameters
Define the color, reflectivity, roughness, transparency, and more.
- Color
- To define the color, choose from the following
options:
- Select a color.
- Select a texture. The texture overrides the color.
- To blend the color with the texture, click the plus symbol (+). You can tell if the blend option is turned on by looking at the image preview.
To define the shade, enter a value of 0-100, where 100 is the true color and 0 is black.
- Reflectivity
- Define the strength of the reflections.
Enter a value of 0-100, where 100 produces perfect mirror reflections and 0 produces the weakest reflections.
- Roughness
- Roughness adds texture to the material at a microscopic level. When you
modify the roughness, the surface texture still looks the same; however,
tiny changes invisible to the naked eye have occurred, affecting
reflectivity.
0 can produce a perfect mirror reflection.
Lower values produce crisper and brighter reflections.
Higher values produce blurrier, dimmer reflections. Increasing the roughness spreads and distributes reflections over the surface and creates a more matte surface.
At values approaching 100, light becomes so scattered that reflections are barely visible, if at all.
- Transparency
- Define the level of the material transparency. 100 = completely transparent, 0 = fully opaque.
- Texture
- Select or upload a texture to apply to the object. To learn how to adjust the texture, see Edit and Position the Material's Texture.
- Bump
- Bump adds texture to the material at a macroscopic level. Because it visibly
affects the surface texture, Bump is useful for simulating irregular
surfaces.A bump map gives the illusion of texture without physically distorting the geometry, minimizing rendering time. The grayscale map tells Inspire Form how to change the surface normals as if the surface had been displaced; the modified normals are used in lighting calculations. A bump map looks like the inverse of what you might expect: black represents the highest extreme and white represents the flattest extreme, while shades of gray represent grades in between.
- Coating
- Create varnishes and paints on a layered material.
The coating will reflect some light, while the rest of the light will be absorbed by the layer of material underneath; the extent to which this happens affects how the final material looks.
Several coatings may be applied one after the other, simulating multiple varnishes and paints.
Figure 11. Plastic without a Coating
Figure 12. Plastic with a Coating
- Scratches
- Add scratches to a material.
- Wear
- Add wear to a material.
- Trimming
- Add cut-out patterns to a material.
Glass/Gems Parameters
Create solid glass objects, glass vessels containing liquid, and gemstones.
- Roughness
- Roughness adds texture to the material at a microscopic level. When you
modify the roughness, the surface texture still looks the same; however,
tiny changes invisible to the naked eye have occurred, affecting
reflectivity.
To add a roughness map, upload an image.
0 can produce a perfect mirror reflection.
Lower values produce crisper and brighter reflections.
Higher values produce blurrier, dimmer reflections. Increasing the roughness spreads and distributes reflections over the surface and creates a more matte surface.
At values approaching 100, light becomes so scattered that reflections are barely visible, if at all.
- Presets
-
Choose one of the following options:
- Amethyst
- Aquamarine
- Diamond
- Emerald
- Fluorite
- Glass
- Plastic
- Polycarbonate
- Quartz
- Ruby
- Sapphire
- Topaz
- Water
- Zircon
- Custom
Figure 18. Example of Glass 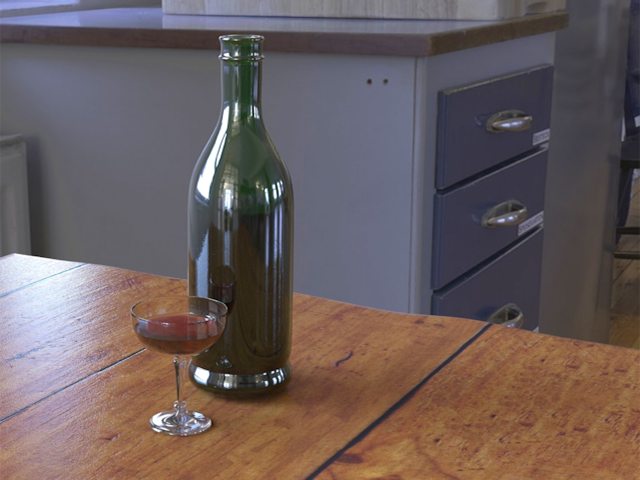
- Absorption Color
- Define which colors of the spectrum are absorbed (thus not visible) by uploading an image or picking a plain color. The remaining colors of the spectrum are reflected (thus visible).
- Absorption Distance
- Lower values are more transparent. Higher values are more opaque. Values range from 0 to 0.05 m.
- Index of Refraction (N)
- Define the reflectivity of the surface. Higher values correspond to more
intense reflections.
If you selected a preset, this value is predefined. If you selected a custom preset, look up the index of refraction online.
- Use Abbe Number
- Abbe Number: Lower values correspond to a stronger rainbow effect. Increase the value to make the effect more subtle. The default value is 10.
Fabric Material Parameters
Define the color, reflectivity, roughness, transparency, and more.
- Reflectivity
- Define the strength of the reflections.
Enter a value of 0-100, where 100 produces perfect mirror reflections and 0 produces the weakest reflections.
- Roughness
- Roughness adds texture to the material at a microscopic level. When you
modify the roughness, the surface texture still looks the same; however,
tiny changes invisible to the naked eye have occurred, affecting
reflectivity.
0 can produce a perfect mirror reflection.
Lower values produce crisper and brighter reflections.
Higher values produce blurrier, dimmer reflections. Increasing the roughness spreads and distributes reflections over the surface and creates a more matte surface.
At values approaching 100, light becomes so scattered that reflections are barely visible, if at all.
- Transparency
- Define the level of the material transparency. 100 = completely transparent, 0 = fully opaque.
- Texture
- Select or upload a texture to apply to the object. To learn how to adjust the texture, see Edit and Position the Material's Texture.
- Bump
- Bump adds texture to the material at a macroscopic level. Because it visibly
affects the surface texture, Bump is useful for simulating irregular
surfaces.A bump map gives the illusion of texture without physically distorting the geometry, minimizing rendering time. The grayscale map tells Inspire Form how to change the surface normals as if the surface had been displaced; the modified normals are used in lighting calculations. A bump map looks like the inverse of what you might expect: black represents the highest extreme and white represents the flattest extreme, while shades of gray represent grades in between.
- Coating
- Create varnishes and paints on a layered material.
The coating will reflect some light, while the rest of the light will be absorbed by the layer of material underneath; the extent to which this happens affects how the final material looks.
Several coatings may be applied one after the other, simulating multiple varnishes and paints.
Figure 29. Plastic without a Coating
Figure 30. Plastic with a Coating
- Scratches
- Add scratches to a material.
- Wear
- Add wear to a material.
- Trimming
- Add cut-out patterns to a material.
Paint Material Parameters
Define the color, reflectivity, roughness, transparency, and more.
- Color
- To define the color, choose from the following
options:
- Select a color.
- Select a texture. The texture overrides the color.
- To blend the color with the texture, click the plus symbol (+). You can tell if the blend option is turned on by looking at the image preview.
To define the shade, enter a value of 0-100, where 100 is the true color and 0 is black.
- Glow Color
- Define the color of the glow.
- Glow Intensity
- Define how intensely the metallic flakes glow. Increase this value for a brighter glow; decrease it for a softer glow. We suggest keeping this value under 30-35%, as increasing this number too much can obliterate the base color.
- Roughness
- Roughness adds texture to the material at a microscopic level. When you
modify the roughness, the surface texture still looks the same; however,
tiny changes invisible to the naked eye have occurred, affecting
reflectivity.
0 can produce a perfect mirror reflection.
Lower values produce crisper and brighter reflections.
Higher values produce blurrier, dimmer reflections. Increasing the roughness spreads and distributes reflections over the surface and creates a more matte surface.
At values approaching 100, light becomes so scattered that reflections are barely visible, if at all.
- Transparency
- Define the level of the material transparency. 100 = completely transparent, 0 = fully opaque.
- Coating
- Create varnishes and paints on a layered material.
The coating will reflect some light, while the rest of the light will be absorbed by the layer of material underneath; the extent to which this happens affects how the final material looks.
Several coatings may be applied one after the other, simulating multiple varnishes and paints.
Figure 31. Plastic without a Coating
Figure 32. Plastic with a Coating
- Scratches
- Add scratches to a material.
- Wear
- Add wear to a material.
- Trimming
- Add cut-out patterns to a material.
Construction Material Parameters
Define the color, reflectivity, roughness, transparency, and more.
- Reflectivity
- Define the strength of the reflections.
Enter a value of 0-100, where 100 produces perfect mirror reflections and 0 produces the weakest reflections.
- Roughness
- Roughness adds texture to the material at a microscopic level. When you
modify the roughness, the surface texture still looks the same; however,
tiny changes invisible to the naked eye have occurred, affecting
reflectivity.
0 can produce a perfect mirror reflection.
Lower values produce crisper and brighter reflections.
Higher values produce blurrier, dimmer reflections. Increasing the roughness spreads and distributes reflections over the surface and creates a more matte surface.
At values approaching 100, light becomes so scattered that reflections are barely visible, if at all.
- Transparency
- Define the level of the material transparency. 100 = completely transparent, 0 = fully opaque.
- Texture
- Select or upload a texture to apply to the object. To learn how to adjust the texture, see Edit and Position the Material's Texture.
- Bump
- Bump adds texture to the material at a macroscopic level. Because it visibly
affects the surface texture, Bump is useful for simulating irregular
surfaces.A bump map gives the illusion of texture without physically distorting the geometry, minimizing rendering time. The grayscale map tells Inspire Form how to change the surface normals as if the surface had been displaced; the modified normals are used in lighting calculations. A bump map looks like the inverse of what you might expect: black represents the highest extreme and white represents the flattest extreme, while shades of gray represent grades in between.
- Coating
- Create varnishes and paints on a layered material.
The coating will reflect some light, while the rest of the light will be absorbed by the layer of material underneath; the extent to which this happens affects how the final material looks.
Several coatings may be applied one after the other, simulating multiple varnishes and paints.
Figure 33. Plastic without a Coating
Figure 34. Plastic with a Coating
- Scratches
- Add scratches to a material.
- Wear
- Add wear to a material.
- Trimming
- Add cut-out patterns to a material.
Emitter Parameters
Define the color, power unit, and side.
- Color
- Define the color of the light by choosing a plain color from the color palette. It is recommended to use subtle, light colors for better results.
- Power Unit
- The default is Watts. Switch to Lumens to automatically convert the Power value.
- Power
- Enter a value between 0 and 150 Watts or between 0 and 22500 Lumens.
- Side
- Select which side of the object to emit from. The default option is Both.
Edit and Position the Material's Texture
After you apply a material with a texture to one or more objects, you can edit, scale, and position the texture.
-
Next to Texture, select the texture preview image.
The Textures dialog box is displayed.
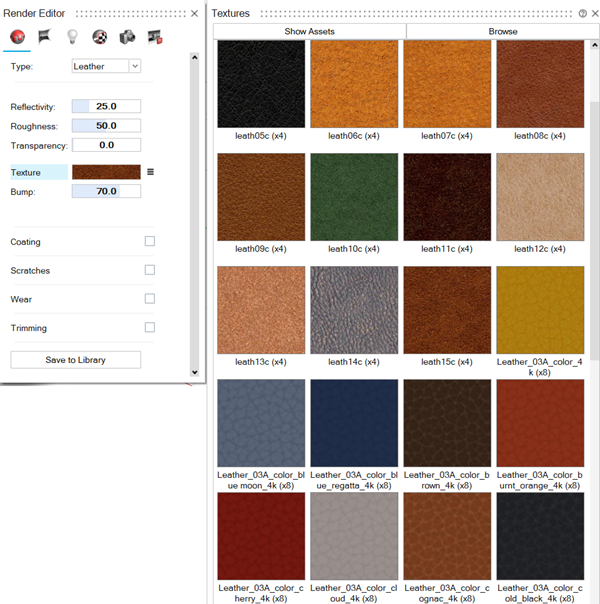
- Select the texture you would like to apply to the material.
-
Edit, reposition, or scale the texture.
To Do this Colorize the texture - Next to the texture preview image, select
 .
. - From the context menu, select Colorize
Texture.
The Color dialog box is displayed.
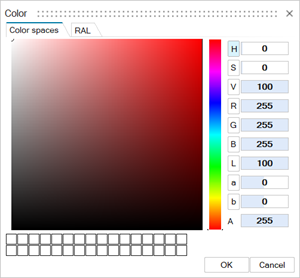
- Choose the color you would like to apply to the material, then click OK.
Adjust the texture's parameters - Next to the texture preview image, select .
- From the context menu, select Edit
Image.
A dialog box is displayed, with texture parameters.
-
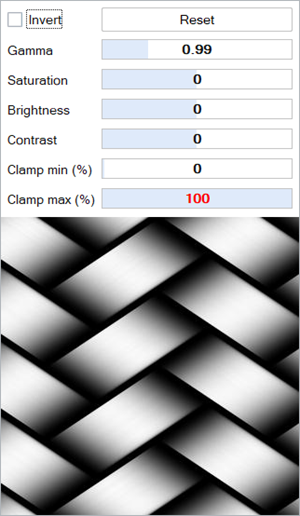
Adjust the following parameters:
- Invert: Invert all the colors of the texture to their complementary colors.
-
- Gamma
- Default value: 2.2. Lower values will make the image darker while higher values will give a washed-out look.
- Saturation: Use a value from -100% to 100%.
-
- Brightness
- Use a value from ‐100% to 100% to control the tone of the texture. A brightness of ‐100% makes the image completely black.
-
- Contrast
- Higher values will give higher contrast.
- Clamp min (%) and Clamp max (%): Specify the minimum and maximum clamp of the selected texture. RGB colors normally range from 0 to 255. By setting, for example, the minimum clamp to 20%, the colors with RGB values less than around 51 will be “cut” and get this value. By increasing minimum clamp percentage, the image turns whiter, while decreasing the maximum clamp percentage results in darker image colors. By decreasing the maximum percentage and increasing the minimum at the same time, textures tend to appear grayer, as gray colors has RGV values around the middle of the 256 colors (128, 128, 128).
Remove the current texture - Next to the texture preview image, select .
- From the context menu, select Remove.
Open the texture library - Next to the texture preview image, select .
- From the context menu, select Library.
Scale the texture - Next to the texture preview image, select .
- From the context menu, select Position
Texture.
The Control Panel is displayed.
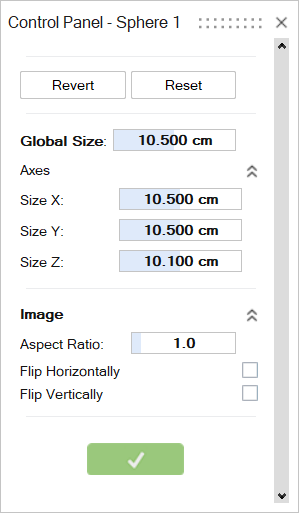
- Enter values for the following:
- Global Size
- Size X
- Size Y
- Size Z
Define the aspect ratio - Next to the texture preview image, select .
- From the context menu, select Position
Texture.
The Control Panel is displayed.
- Enter the Aspect Ratio.
Position the texture - Next to the texture preview image, select .
- From the context menu, select Position
Texture.
The Control Panel is displayed.
- Turn on Flip Horizontally or
Flip Vertically.
You can also position the texture using the manipulator that appears in the modeling window when you open the texture positioning settings.
- Drag the handles of the manipulator to move the texture to the optimal position. Any settings you adjust using the manipulator are reflected in the corresponding Control Panel values.
- Click the green check mark in the Control Panel to apply your edits.
Revert the texture to undo the last edit - Next to the texture preview image, select .
- From the context menu, select Position Texture.
- The Control Panel is displayed.
- Click the Revert button.
Reset the texture to the default settings - Next to the texture preview image, select .
- From the context menu, select Position Texture.
- The Control Panel is displayed.
- Click the Reset button.
- Next to the texture preview image, select
- Right-click and mouse through the check mark to exit, or double-right-click.