Export area
Home page view
The area “EXPORT” of the Motor Factory groups two main families of functions: “Document” and advanced tools.
In the “Document” area the function “Report” allows building reports automatically to describe all the work achieved in the design as well as for the tests. Then, the function “Script” allows to build and export a python script of a current motor in the application Script Factory or in a targeted folder.
On the other hand, links are available to make connections with other solutions - Part of Altair’s global solution for eMotors supported by Altair Unit System (Aus) - to go further by performing advanced studies.
- Export projects to Flux® environment for performing advanced studies either with magneto static or transient applications.
- Export thermal scheme to Flow SimulatorTM
- A powerful coupling with Altair® HyperStudy®… For optimizing motors
- Export Lookup tables…For exporting data from FluxMotor to Siemens Simcenter Amsim, PSIM, Altair® Activate® for analyzing motors in their electric power electronic system.
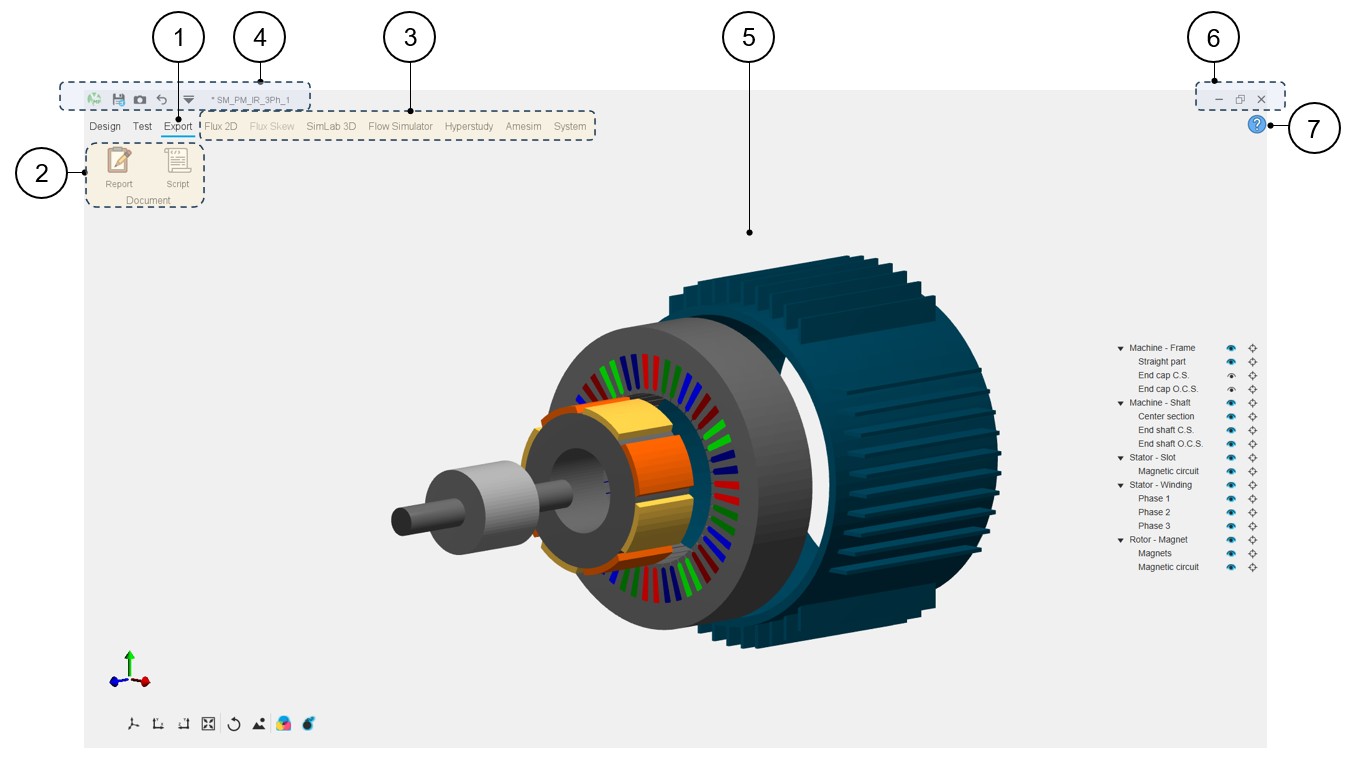
An overview of the Motor Factory – Test area is presented in the picture below.
 |
|
|---|---|
| 1 | In Motor Factory, selection of the test environment. |
| 2 | Document area where two icons – Report and Script allow respectively, to build reports automatically describing all the work achieved in the design as well as for the tests and to provide a python script able to build the current motor in the application Script Factory. |
| 3 | Icons are available to make connections with other solutions like
Flux®, Flow SimulatorTM, HyperStudy®, Siemens Simcenter Amsim, PSIM,
Altair® Activate®. Note: This list of
applications appears only when “Export” is
selected. |
| 4-6 | Access to general functions and tools for managing the project and the GUI. Refer to the section dedicated to the System functions. |
| 5 | Motor Factory – Test home page. A 3D view illustrates the considered machine. |
| 7 | Access to the online user help guide dedicated to the usage of
the Motor Factory – Export area. Note: Each
type of export has its own dedicated online user help
guide. |
Export to Flux2D
- Home page viewThe process to export projects from FluxMotor to Flux 2D is like what is done in the Motor Factory – Test area.Important:
All the corresponding environments have almost the same principles. We are going to illustrate it with one example: the export to Flux 2D environment.
An overview of the Motor Factory – Export to Flux2D area is presented in the picture below.
Table 2. Motor Factory – Export to Flux2D area home view – Example of the synchronous machine – Permanent magnets and Inner Rotor. 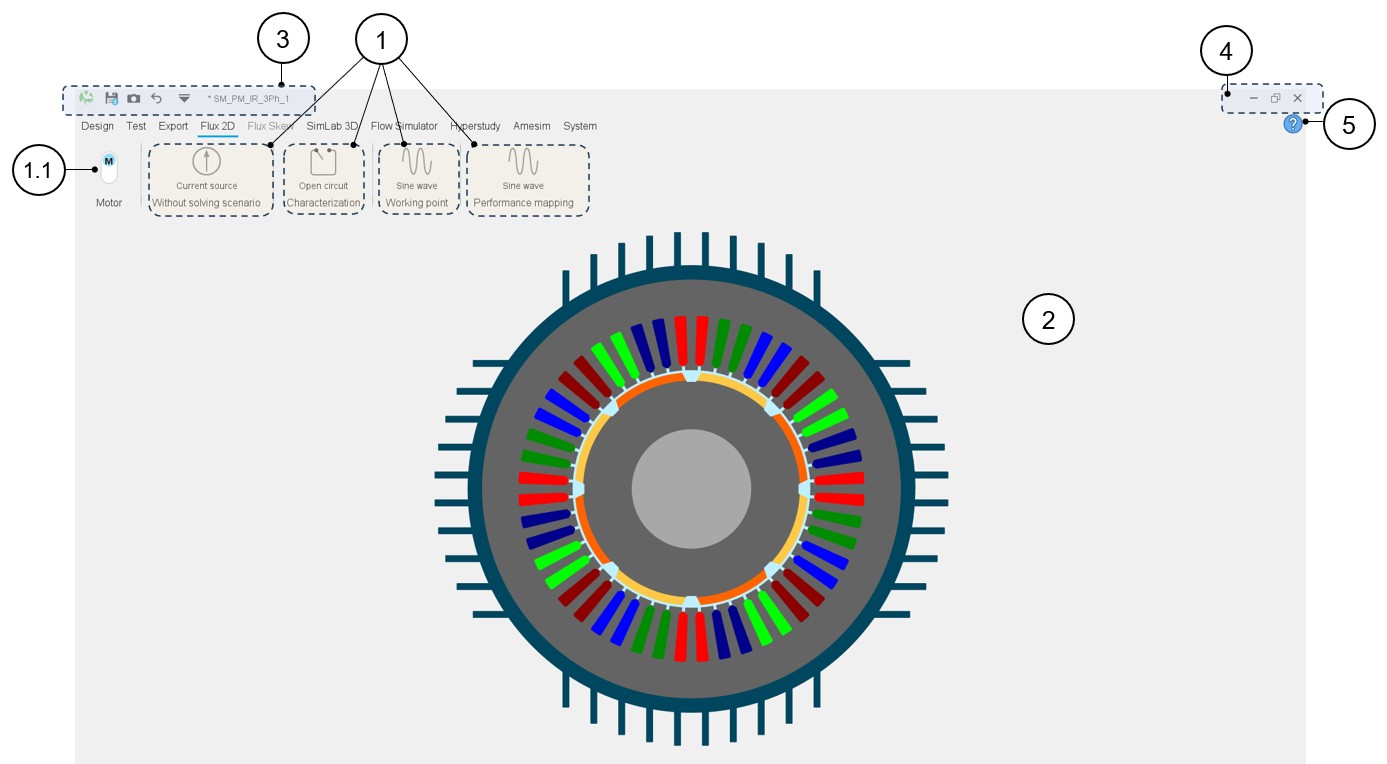
1 Visualization and access to the different Export to Flux 2D packages classified into test families. In this example 4 varieties (families) of export packages are available:- Without solving scenario
- Characterization
- Working point
- Performance Mapping
Then one clicks on a package’s icon, opens it and gives access to the list of exports stored in it.
1.1 Selection of the operating mode and/or associated convention of the machine. 2 Motor Factory – Test home page. A 3D view illustrates the considered machine. 3 Access to general functions and tools for managing the project and the GUI. Refer to the section dedicated to the System functions. 4 Access to general functions and tools for managing the project and the GUI. Refer to the section dedicated to the System functions. 5 Access to the online user help guide dedicated to the usage of Motor Factory – Test area. Note: Each type of machine has its own dedicated online user help guide. - Description of the test export pageIn the Motor Factory Export environment, to select and export a test, first one must click on a test package belonging to a test family. In the example below, one selects the test package "Sine wave" of the working point test family. Among the list of available tests, one selects the computation of a working point defined by the current (I), the control angle () and the speed (N). See the various elements of a test export page below.
Table 3. Motor Factory – Export area – Example - Area dedicated to the computation of a working point defined by the current (I), the control angle (Ψ) and the speed (N) – Overview 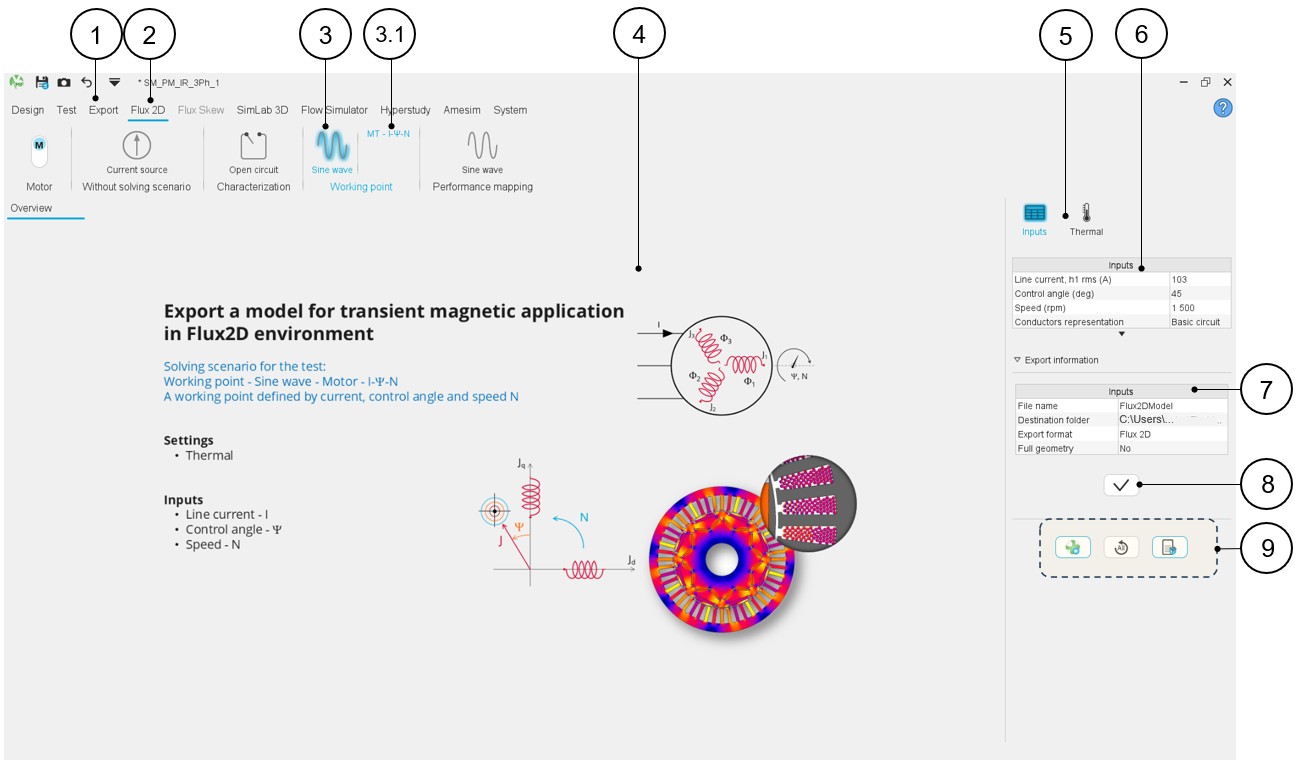
1 Select the Export area of Motor Factory. 2 In the Motor Factory / Export area, select the export to Flux 2D environment. 3 Icon to select one export package belonging to a test family (The test export package "Sine wave" of the “Working point” test family in this example). Note: A blue halo surrounds the selected icon.3.1 Among the list of available tests, one selects the computation of a working point defined by the current (I), the control angle (Ψ) and the speed (N). In this example only one export is available. 4 Motor Factory – Export – Flux 2D home page displaying the picture that illustrates the overview of the test. 5 Scrolling selection bar where several sections can be selected to define the settings of the test export. In this example four sections are available: Inputs, Thermal, Electronics and Mechanics when relevant. Once one setting section is selected, the user can define the corresponding inputs. 6 Inputs are always displayed on the right part of the screen. 7 Definition of the export information: File name, destination folder. 8 Button to validate the user inputs. 9 Buttons to manage the exported project. Open Flux2D with the exported project, or to Export the project file or to restore default parameter values (Inputs as well as the settings like Thermal, Electronics and Mechanics parameters).